8
BEFORE LIGHTING
Choose a Proper Location to Grill
• Only use this grill outdoors in a well-ventilated
area. Do not use in a garage, building,
breezeway, or any other enclosed area.
• Keep the grill on a secure, level surface at all
times.
• Do not use grill within five feet (1.5 m) of any
combustible material. Combustible materials
include, but are not limited to, wood or treated
wood decks, patios, and porches.
Choose How Much Charcoal to Use
Choosing charcoal quantity depends on what you
are grilling and the size of your grill. If you are
grilling small, tender pieces of food that take less
than 20 minutes, refer to the Measuring & Adding
Charcoal for Direct Heat chart. If you are grilling
larger joints of meat that require 20 minutes or
more of grilling time, or delicate foods, refer
to the Measuring & Adding Charcoal for Indirect
Heat chart. Use the charcoal cup supplied with
your grill to measure the appropriate amount of
charcoal. For more details about the difference
between direct and indirect cooking, refer to the
GRILLING METHODS section.
The Very First Time You Grill
It is recommended that the grill be heated up and
the fuel kept red hot, with the lid on, for at least
30 minutes prior to cooking for the first time.
Preparing the Grill for Lighting
1. Remove the lid and position it on the side of
your grill using either the lid hook located
on the inside of the lid, or the Tuck-Away
™
lid
holder (depending on your model of grill).
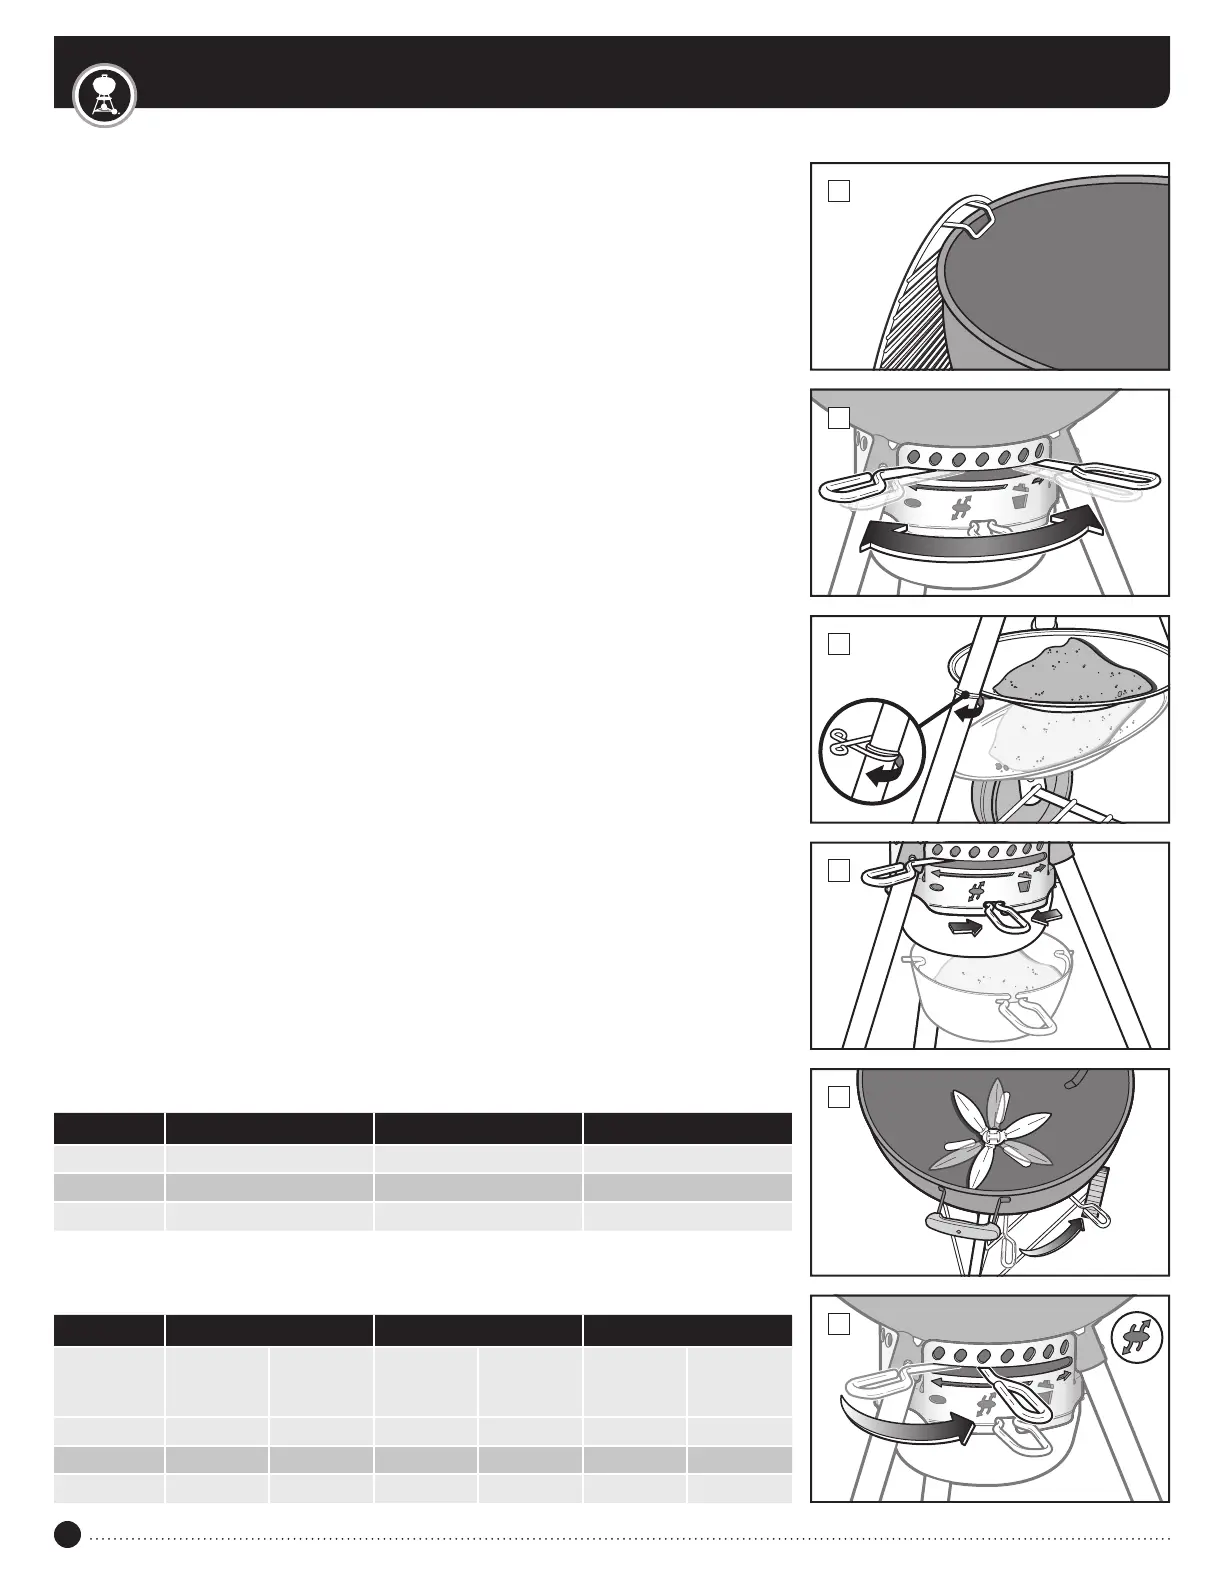
2. Remove the cooking (top) grate from your grill.
For convenience, hang the cooking grate on
the bowl, rear panel or frame of your grill by
its curved handle (a feature on some of our
grills) (A). If your grill comes with the Gourmet
BBQ System
™
cooking grate, first remove
the detachable centre area, and then the full
cooking grate from the grill.
3. Remove the charcoal (bottom) grate and clear
ashes or chunks of old charcoal from the
bottom of the bowl. Charcoal requires oxygen
to burn, so be sure that nothing clogs the
vents. Forgrills with a One-Touch
™
cleaning
system, move the handle back and forth to
move ash from the bottom of the grill into the
ash catcher (B).
4. If your grill has a standard ash catcher, release
the leg clip to remove the ash catcher (C) then
dispose of the ashes. If your grill has a high
capacity ash catcher, squeeze the ash catcher
handle to release it from the grill (D).
5. Open bowl vent by moving the handle all the
way to the right (E) or by moving the handle to
the open position (F) (depending on your model
of grill).
6. Replace charcoal (bottom) grate.
Note: Instructions for using lighter fluid were purposely
left out of this owner’s guide. Lighter fluid is messy and
can transmit a chemical taste to your food, while lighter
cubes (sold separately) do not. If you choose to use lighter
fluid, follow the manufacturer’s instructions and NEVER add
lighter fluid to a burning fire.
Measuring & Adding Charcoal for Indirect Heat
*When measuring lump charcoal, use the charcoal measuring cup provided with your grill.
Grill Diameter Charcoal Briquettes Beechwood Lump Charcoal* Mixed Wood Lump Charcoal*
Briquettes
for first hour
(per side)
Briquettes
to add for each
additional hour
(per side)
Charcoal
for first hour
(per side)
Charcoal
to add for each
additional hour
(per side)
Charcoal
for first hour
(per side)
Charcoal
to add for each
additional hour
(per side)
47 cm 15 briquettes 7 briquettes ½ cup (0.30 kg) 1 handful ½ cup 1 handful
57 cm 20 briquettes 7 briquettes ½ cup (0.30 kg) 1 handful ½ cup 1 handful
67 cm 30 briquettes 8 briquettes ¾ cup (0.42 kg) 1 handful ¾ cup 1 handful
Measuring & Adding Charcoal for Direct Heat
*When measuring lump charcoal, use the charcoal measuring cup provided with your grill.
Grill Diameter Charcoal Briquettes Beechwood Lump Charcoal* Mixed Wood Lump Charcoal*
47 cm 30 briquettes 1 cup (0.56 kg) ¾ cup
57 cm 40 briquettes 1¾ cups (0.98 kg) 1¼ cups
67 cm 60 briquettes 4 cups (2.24 kg) 2¾ cups
B
F
E
C
D
A