EasyManua.ls Logo

Weber GENESIS SP-E-335 - User Manual

Weber GENESIS SP-E-335
28 pages
Print Icon
To Next Page IconTo Next Page
Loading...
E335 • S335 • SES335 • SPE335
E435 • S435 • SLS435
Keep this Owners Manual for future reference, thoroughly read through it, and
if you have any questions please contact us today.
LP Owners Manual
52981
101021
enUS
REGISTER TODAY
Register your gas grill and receive special content
to make you the ultimate backyard hero.
Scan the QR Code or register online at weber.registria.com
Need help? Visit photoregister.com/help or text help to 71403

Other manuals for Weber GENESIS SP-E-335

Question and Answer IconNeed help?

Do you have a question about the Weber GENESIS SP-E-335 and is the answer not in the manual?

Summary

Important Safety Information

DANGER, WARNING, CAUTION Statements

Defines hazard level terms used throughout the manual to emphasize critical information.

Actions if Gas is Smelled

Immediate steps to take if a gas odor is detected: shut off gas, extinguish flame, open lid.

Flammable Liquids & LP Tanks

Prohibits storing flammable liquids or unconnected LP tanks near the grill.

Outdoor Use Requirement

Specifies that the grill must be used outdoors only in a well-ventilated area.

The Weber Promise

Voluntary Warranty Details

Explains the terms, limitations, and exclusions of the voluntary warranty.

Owners Responsibilities Under Warranty

Lists owner's duties for trouble-free warranty coverage, including registration.

Warranty Handling and Exclusions

Details the process for claims and lists common causes for warranty exclusion.

Product Warranty Periods

Specifies the duration of warranty coverage for various grill components.

California Proposition 65 Warnings

Provides chemical exposure warnings mandated for California residents.

Genesis Features

High Performance Grilling System

Overview of the grilling system, emphasizing its design and user experience.

Key Ignition and Burner Features

Details on the INFINITY Ignition and tapered burner design for heat distribution.

Flavorizer Bars Functionality

Explains how angled Flavorizer Bars catch drippings to create smoke and flavor.

Grease Management System Explained

Describes the system that funnels drippings away from burners into a disposable tray.

Getting Started: LP Gas & Connections

Understanding LP Gas

Explains Liquefied Petroleum gas (LP), its properties, and how it becomes gas.

Safe LP Tank Handling Tips

Crucial advice for safe management, transport, and storage of LP tanks.

LP Tank and Regulator Requirements

Specifies requirements for LP tanks and the necessary regulator for safe operation.

LP Tank Installation Procedures

Tank Installation Location and Inspection

Guides on correct tank placement and inspecting the tank valve for damage.

Steps for Installing the LP Tank

Step-by-step instructions for securely connecting the LP tank to the grill.

Critical Hose Securing Warning

Emphasizes securing the hose with the clip to prevent fire or explosion hazards.

Leak Checking Procedures

Purpose and Scope of Leak Checks

Explains the importance of leak checks and which fittings to test.

Performing a Gas Leak Check

Detailed instructions for using soap and water solution to check for gas leaks.

Critical Safety: No Open Flames for Leak Checks

Warning against using flames or sparks when checking for gas leaks.

Critical Safety: LP Tank Storage Near Grill

Warning against storing spare LP tanks under or near the grill.

LP Tank Refilling and Replacement

Checking LP Tank Fuel Level

How to use the tank scale and indicator to check the remaining fuel.

Step-by-Step LP Tank Removal

Instructions for safely closing the valve, unscrewing the regulator, and removing the tank.

Additional Leak Check Precautions

Further leak check advice for fittings after refilling and reinstalling the tank.

Operation: Initial Setup and Routine Maintenance

Initial Burn-Off Procedure

Procedure to heat the grill on high for 20 minutes before first use.

Meal-to-Meal Maintenance Steps

Routine checks and cleaning steps to perform before each grilling session.

Grease Management System Cleaning

How to clean the slide-out grease tray and catch pan to prevent fires.

Gas Hose Inspection

Checking the gas hose for signs of cracking, abrasions, or cuts.

Grill Preheating Importance and Process

Explains why preheating is critical and the steps to perform it.

Cooking Grate Cleaning After Preheating

Best practice for cleaning grates with a brush after preheating.

Critical Safety: Grease Tray Lining

Warning against lining the slide-out grease tray or cookbox with aluminum foil.

Grill Brush Safety and Maintenance

Advice on checking grill brushes for loose bristles and wear.

Operation: Igniting the Grill

Using the Electronic Ignition System

Instructions for igniting the grill's burners using the electronic ignition system.

Extinguishing Grill Burners

Procedure for turning off all grill burners and the gas supply.

Ignition Safety: Keep Lid Open

Safety warning to keep the grill lid open during ignition.

Ignition Safety: Delay If No Ignition

Procedure if ignition fails: turn off, wait five minutes, then retry.

Operation: Using the Sear Zone

Searing Technique Explained

How to use the high-heat sear zone for caramelizing food surfaces.

Igniting the Sear Burner

Steps to ignite the sear burner along with other grill burners.

Extinguishing Burners After Searing

Procedure to turn off all burners after completing searing.

Operation: Igniting the Side Burner

Electronic Ignition for Side Burner

Instructions for igniting the side burner using the electronic ignition.

Extinguishing the Side Burner

Procedure to turn off the side burner and the gas supply.

Side Burner Ignition Safety: Lid Open

Safety warning to keep the side burner lid open during ignition.

Tips and Hints: Heat Management

Direct vs. Indirect Heat Setup

Explains the differences between direct and indirect heat grilling methods.

Direct Heat Grilling Technique

How to use direct heat for searing and cooking smaller, tender food items.

Indirect Heat Grilling Technique

How to use indirect heat for larger cuts or delicate foods.

Tips and Hints: Grilling Best Practices

Importance of Grill Preheating

Emphasizes preheating for preventing sticking, searing, and flavor development.

Grilling on Clean Grates

Explains why grilling on clean grates is essential for food quality.

Being Present During Grilling

Advice on having all tools and ingredients ready before starting.

Grilling Space and Food Placement

Tips for arranging food on the grates to allow for easy movement and cooking.

The Try Not to Peek Grilling Rule

Highlights the importance of keeping the lid closed for faster, more flavorful cooking.

The Only Flip Once Grilling Rule

Guidance on flipping food only once for optimal searing and flavor.

Knowing When Food is Done

Recommends using an instant-read thermometer for accurate doneness testing.

Experimentation in Grilling

Encouragement to experiment with different recipes and techniques.

Tips and Hints: Real Smoke Flavor

Using the Smoker Box Effectively

Guide on how to use the smoker box with wood chips for smoke flavor.

Smoker Box Setup for Indirect Cooking

Method for positioning the smoker box for indirect heat cooking.

Smoker Box Setup for Direct Cooking

Method for positioning the smoker box for direct heat cooking.

Critical Safety: Flammable Fluids in Smoker Box

Warning against using flammable fluids to ignite wood chips in the smoker box.

Cleaning the Smoker Box

Instructions for cleaning ash from the smoker box before each use.

Tips and Hints: Extra Features

WEBER CRAFTED Grill Locker Storage

Details on the side storage area for accessories and grillware.

Grill Storage Hooks Utilization

How to use the hooks on the cabinet for storing grates and accessories.

Grilling at Night Features

Utilizing the Grill Lighting System

How to activate and use the built-in grill lighting system.

Product Care: Cleaning and Maintenance

General Inside Grill Cleaning

Comprehensive guide to cleaning the inside of the grill, recommended twice yearly.

Cleaning the Grill Lid

Instructions for removing carbonized grease deposits from the inside of the lid.

Cleaning Cooking Grates and Flavorizer Bars

Steps for cleaning cooking grates and scraping Flavorizer Bars.

Burner and Spider Screen Cleaning

How to clean burner ports and spider/insect screens for optimal performance.

Safety Warning: Turn Grill Off Before Cleaning

Crucial safety reminder to turn off and cool the grill before any cleaning.

Product Care: Component Cleaning

Cleaning Heat Deflectors and Cookbox

Steps for cleaning heat deflectors and scraping grease from the cookbox.

Grease Management System Cleaning

How to clean the angled slide-out grease tray and catch pan.

Exterior Grill Surface Cleaning

General methods for cleaning stainless steel, porcelain-enameled, and plastic surfaces.

Cleaning Stainless Steel Exterior

Specific advice for cleaning stainless steel surfaces with non-abrasive cleaners.

Cleaning Painted and Plastic Exterior

Methods for cleaning painted, porcelain-enameled, and plastic components.

Cleaning Grills in Unique Environments

Advice for cleaning grills in harsh environments prone to surface rusting.

Troubleshooting: Ignition Issues

Burner Ignition Failure Symptoms and Causes

Identifies common symptoms and causes for main or side burner ignition failure.

Lighting Grill with a Match

Alternative procedure for igniting burners using a match if electronic ignition fails.

Diagnosing Gas Flow Issues

Steps to check for gas flow problems affecting burner ignition.

Obtaining Replacement Parts

Information on how to contact retailers or visit weber.com for replacement parts.

Troubleshooting: Gas Flow and Smell

Gas Flow Problems and Solutions

Addresses issues like uneven heating, low flames, or erratic flame patterns.

Spider Screen Obstruction Issues

Explains how obstructed spider screens affect burner flame and how to clean them.

Gas Smell and Hissing Sound Issues

Identifies potential leaks from damaged tank seals or incomplete regulator connections.

Troubleshooting: Grill Appearance and Flare-Ups

Greasy Grill Lid Appearance

Addresses the cause of peeling paint-like flakes on the inside of the grill lid.

Grill Flare-Up Causes and Solutions

Explains how leftover food and internal grease cause flare-ups and how to prevent them.

Replacing Grill Lighting Batteries

Battery Replacement Procedure

Step-by-step instructions for replacing the size C batteries in the grill light.

Troubleshooting: Ignition System Components

Checking Electronic Ignition Battery

Guidance on verifying the battery's presence, installation, and charge.

Checking Ignition Wires and Connections

How to ensure ignition wires are securely connected to the button and module.

Checking the Ground Wire

Verification of the ground wire's secure connection to the manifold bracket.

Grilling Guide

Red Meat Grilling Times and Methods

Cooking times and techniques for various red meat cuts like steaks and tenderloin.

Pork Grilling Times and Methods

Cooking times and techniques for pork cuts like brats, ribs, and tenderloin.

Poultry Grilling Times and Methods

Cooking times and techniques for poultry like chicken and turkey.

Seafood Grilling Times and Methods

Cooking times and techniques for seafood like fish fillets and whole fish.

Vegetable Grilling Times and Methods

Cooking times and techniques for various vegetables like corn, onions, and potatoes.

Replacement Parts Diagrams (E;S Models)

Genesis E-335;S-335 Parts Identification

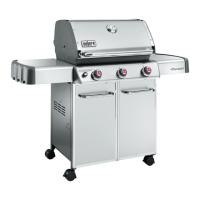
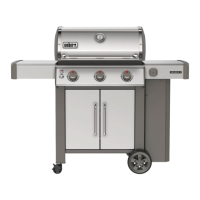
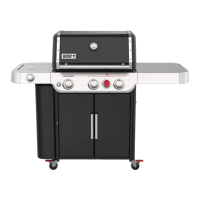
Diagram identifying all parts for the Genesis E-335 and S-335 models.

Genesis SE-S-335 Parts Identification

Diagram identifying all parts for the Genesis SE-S-335 model.

Replacement Parts Diagrams (E;S Models)

Genesis E-435;S-435 Parts Identification

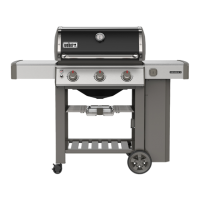
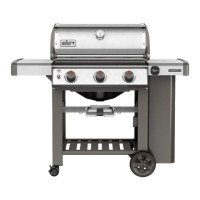
Diagram identifying all parts for the Genesis E-435 and S-435 models.

Replacement Parts Diagrams (SP;SL Models)

Genesis SP-E-335 Parts Identification

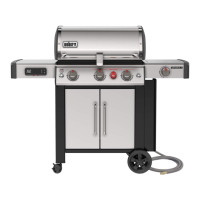
Diagram identifying all parts for the Genesis SP-E-335 model.

Genesis SL-S-435 Parts Identification

Diagram identifying all parts for the Genesis SL-S-435 model.

Overview

This document is the owner's manual for the Weber Genesis LP gas grill, covering models E-335, S-335, SE-S-335, SP-E-335, E-435, S-435, and SL-S-435. It provides comprehensive information on installation, operation, maintenance, and troubleshooting to ensure a safe and enjoyable grilling experience.

The Weber Genesis grill is designed for outdoor use only and features a high-performance grilling system. Key components include:

  • Infinity Ignition: Guarantees ignition for quick start-up.
  • Burners: Uniquely tapered to deliver consistent gas flow and ultimate heat distribution across the cooking grates, ensuring even cooking.
  • Flavorizer Bars: Angled stainless steel bars designed to catch drippings, which then smoke and sizzle, adding a smoky flavor to food and preventing flare-ups.
  • Grease Management System: Funnels drippings away from burners into a disposable drip tray within a removable catch pan, making cleanup easy and preventing grease fires.

Usage Features:

Getting Started:

  • LP Tank Installation: The manual provides detailed steps for safely installing the LP tank onto the tank scale inside the grill cabinet. It emphasizes checking the tank valve for proper mating with the regulator and inspecting for damage or debris. The hose retention clip must be secured to the tank scale to prevent damage.
  • Leak Checking: A crucial safety step, the manual outlines how to perform a leak check using a soap and water solution on all fittings (regulator to tank, gas hose to bulkhead, bulkhead to corrugated gas line). It describes how to identify a leak by observing bubbles and provides instructions on what to do if a leak is found, stressing that the grill should not be operated with a gas leak.
  • Refilling or Replacing an LP Tank: The grill features an easy-to-read fuel gauge to indicate the amount of fuel remaining. Instructions are provided for safely removing an empty tank and installing a refilled or new one, with additional leak check precautions for reinstalled tanks.

Operation:

  • Initial Burn-Off: Before first use, the grill should be preheated on the highest setting with the lid closed for at least 20 minutes to burn off any manufacturing residues.
  • Every Time You Grill (Meal-to-Meal Maintenance):
    • Check for Grease: Before each use, the slide-out grease tray and catch pan must be checked for grease build-up and cleaned to prevent fires.
    • Inspect the Hose: The fuel hose should be routinely inspected for cracks, abrasions, or cuts. A damaged hose must be replaced with a Weber-authorized part.
    • Preheat the Grill: Preheating is essential for preventing food from sticking and achieving proper searing. The grill should be preheated with all burners on the start/high position for 15 minutes with the lid closed.
    • Clean the Cooking Grate: After preheating, the cooking grates should be brushed with a stainless steel bristle grill brush to remove any food debris.
  • Igniting the Grill (Electronic Ignition System): Step-by-step instructions are provided for igniting the main burners, starting from the leftmost burner. The lid must be open during ignition, and the electronic ignition button should be pushed and held until the burner ignites. If a burner fails to ignite, the control knob should be turned off, and a five-minute wait period is required before reattempting.
  • Using the Sear Zone: The sear zone is designed for intense, direct heat to create sear marks. Instructions detail how to ignite the sear burner, preheat the grill, and use the sear zone in tandem with adjacent burners for optimal searing, followed by indirect cooking to finish the meal.
  • Igniting the Side Burner: Similar to the main burners, the side burner can be ignited using the electronic ignition system. The side burner lid must be open during ignition.
  • Extinguishing Burners: All burner control knobs should be turned to the off position, and the gas supply at the LP tank should be turned off.

Tips and Hints:

  • Direct or Indirect Heat: Explains how to set up the grill for direct heat (for small, tender foods) or indirect heat (for larger cuts of meat or delicate foods), emphasizing cooking with the lid closed for best results.
  • Weber Crafted Outdoor Kitchen Collection Ready: Select models are compatible with the Outdoor Kitchen Collection accessories, allowing for versatile cooking options. The manual explains how to use the included grates and frame, and the spacer for specific accessories.
  • Grilling Do's and Don'ts:
    • Preheat Every Time: Always preheat the grill to high for 15 minutes to prevent sticking and achieve proper searing.
    • Clean Grates: Grill on clean grates to avoid food sticking and unwanted flavors.
    • Be Present: Have all tools and ingredients ready before grilling.
    • Elbow Room: Avoid overcrowding the cooking grates for better flexibility and control.
    • Don't Peek: Keep the lid closed to maintain heat, smoke, and faster cooking times.
    • Flip Once: Turn food only once to achieve a good sear and caramelization.
    • Know When to Tame the Flame: Use an instant-read thermometer to ensure food is cooked to the desired doneness.
    • Experiment: Encourages users to explore different cooking techniques and recipes beyond traditional grilling.
  • Real Smoke Flavor (Smoker Box): Available on select models, the smoker box allows for adding continuous smoke flavor using dry wood chips. Instructions detail setting up the smoker box for both indirect and direct cooking, emphasizing placing the smoker box over a lit burner for ignition and adding water to the water pan for flavorful smoke.
  • Extra on the Side:
    • Weber Crafted Grill Locker: Provides enclosed storage for grilling tools and accessories, with an adjustable condiment basket.
    • Storage Hooks: Double-sided hooks on the cabinet sides for storing cooking grates and the Weber Crafted spacer grate.
    • Expandable Top Cooking Grate: Functions as a warming rack or a secondary cooking surface, with instructions on how to unfold and store it.
  • Grilling at Night (Grill Lighting): Select models feature integrated LED lights in the lid handle, activated by an "awake" button. The lights automatically turn on when the lid is opened and off when closed, with a deactivation timer.

Maintenance Features:

Cleaning and Maintenance:

  • Inside of the Grill: A thorough cleaning of the grill's interior is recommended at least twice a year, or quarterly with consistent use.
    • Cleaning the Lid: Carbonized grease and smoke deposits on the inside of the lid should be brushed off with a stainless steel bristle grill brush to prevent flaking onto food.
    • Cleaning the Cooking Grates: After preheating, brush the grates with a stainless steel bristle grill brush.
    • Cleaning the Flavorizer Bars: Scrape the Flavorizer Bars with a plastic scraper and brush with a stainless steel bristle grill brush to remove drippings and prevent flare-ups.
    • Cleaning the Burners: Essential for optimum performance, the burner ports (small raised openings) and spider/insect screens should be kept clean. Use a stainless steel bristle grill brush for ports and a soft bristle brush for screens, avoiding damage to the ignition electrode.
    • Cleaning the Heat Deflectors: Scrape and brush the heat deflectors to ensure even heat distribution.
    • Cleaning the Cookbox: Scrape debris from the sides and bottom of the cookbox into the grease tray opening.
    • Cleaning the Grease Management System: Regularly clean the angled slide-out grease tray and catch pan to prevent grease fires.
  • Outside of the Grill:
    • Stainless Steel Surfaces: Clean with a non-toxic, non-abrasive stainless steel cleaner or polish and a microfiber cloth, cleaning in the direction of the grain. Avoid abrasive pastes.
    • Painted, Porcelain-Enameled, and Plastic Components: Clean with warm soapy water, paper towels or cloth, then rinse and dry thoroughly.
    • Grills in Unique Environments: For grills in harsh environments (e.g., coastal areas, near pools), more frequent cleaning with warm soapy water, rinsing, and drying is recommended, along with weekly application of stainless steel cleaner to prevent rust.
  • Cleaning the Smoker Box: Empty ash before each use to ensure proper airflow. Note that smoke residue on the smoker box and inside the grill is normal and does not affect performance.

Troubleshooting:

  • Main Burner(s) or Side Burner Will Not Ignite: Provides solutions for gas flow issues (e.g., activated flow limiting device, low LP tank, kinked hose, dirty burner ports) and electronic ignition system problems (e.g., battery issues, loose wires). Includes instructions for match lighting to diagnose gas flow.
  • Greasy Grill (Peeling Paint & Flare-Ups): Addresses symptoms like peeling paint (carbonized cooking vapors) and flare-ups (leftover food), recommending thorough cleaning of the lid and inside of the grill.
  • Replacing Batteries for the Grill Lighting: Instructions for replacing the C batteries in the lid handle, emphasizing using alkaline batteries and proper installation.
  • Checking the Components of the Electronic Ignition System: Guides users to check the battery (plastic wrap removal, correct installation, age) and ignition wires (secure connections, color coding) if the ignition button does not produce a ticking sound.
  • Checking the Ground Wire (Models 425s and 435): Instructions to check that the ground wire is properly secured.
  • Gas Flow Issues: Provides solutions for symptoms like failure to reach desired temperature, uneven heating, burners failing to ignite, low flame, or erratic flame patterns, often related to the "flow limiting device" or dirty burner ports.
  • Spider Screens: Explains that obstructed spider screens can cause yellow, lazy flames and provides instructions for cleaning them.
  • Gas Leaks (Smell of Gas/Hissing Sound): Advises on what to do if a gas leak is detected, including extinguishing open flames, shutting off gas, and inspecting the rubber seal or connection.

The manual also includes a grilling guide with approximate total grill times for various types of meat and vegetables, emphasizing that these are guidelines and factors like altitude and wind can affect cooking times. It encourages users to register their grill for special content and support.

Weber GENESIS SP-E-335 Specifications

General IconGeneral
TypeGas Grill
Fuel TypeLiquid Propane
Number of Burners3
Total Cooking Area669 sq in
Warranty10 years
Grates MaterialStainless Steel
Flavorizer BarsStainless Steel
IgnitionElectronic
Main Burner BTUs39, 000 BTU
Side Burner BTUs12, 000 BTU

Related product manuals