Do you have a question about the Weber SUMMIT GC38 E and is the answer not in the manual?
Covers critical safety warnings and guidelines for installing and assembling the grill, emphasizing proper construction and gas type usage.
Details essential safety precautions for operating the grill, including placement, clearance, ventilation, and handling of flammable materials.
Outlines owner's duties for warranty coverage, including registration, proper use, and maintenance as per the owner's manual.
Explains how to claim warranty service, what is covered, and common exclusions like misuse, neglect, or environmental damage.
Lists the specific warranty duration for different grill components, such as cookbox, lid, burners, and electronics.
States limitations on warranties, liabilities, and remedies, emphasizing that the warranty is exclusive and does not cover misuse.
Provides essential information on natural gas properties and safe connection procedures, including hose requirements and pressure testing.
Details the grill's operating pressure and guidelines for installing quick-disconnect fittings to ensure proper function.
Specifies the need for a model-specific hose and how to obtain replacements if worn or damaged.
Instructs on safely testing the gas supply system at various pressures, requiring disconnection of the grill.
Step-by-step guide on how to safely connect the grill's hose to the gas supply via a quick-disconnect fitting.
Illustrates a standard natural gas grill pipe installation, noting local code requirements and disallowed fittings.
Details the process of performing a leak check using soap and water solution to ensure gas tightness after connection.
Step-by-step instructions for identifying gas leaks at various fittings using a soap and water solution.
Explains the safe method for disconnecting the gas hose, which automatically shuts off the gas supply.
Provides guidance on regularly inspecting the gas hose for damage like cracking or abrasions, and the importance of replacement.
Guides on using the one-handed ignition system to light individual main burners for preheating and grilling.
Details the importance of preheating the grill for 15 minutes on high for optimal cooking performance.
Instructions on how to safely turn off the main burners by pushing in the control knobs and turning them clockwise.
Explains the operation of the infrared broiler for searing, including adjusting cooking surfaces and heat settings.
Provides instructions on how to safely turn off the infrared broiler by pushing in and turning the control knob clockwise.
Comprehensive guide on preparing the grill, setting up the rotisserie, cooking tips, and use/care instructions.
Step-by-step instructions for igniting the side burner using the one-handed ignition system, including troubleshooting.
Instructions on how to safely turn off the side burner by pushing in the control knob and turning it clockwise.
Guidance on cleaning the interior grill components like the lid, cooking grates, flavorizer bars, and burners for optimal performance.
Instructions for cleaning cooking grates to prevent food sticking and maintain grill performance.
Steps for scraping and cleaning FLAVORIZER BARS to manage drippings and prevent flare-ups.
Instructions for cleaning burner ports and spider screens to ensure proper gas flow and safe operation.
Details on cleaning spider screens to prevent obstructions caused by insects, which can affect flame and gas flow.
Guidance on cleaning heat deflectors to ensure even heat distribution and enhance cooking performance.
Instructions for cleaning grease accumulation and debris from the cookbox to prevent fires.
Instructions for cleaning the grease tray and catch pan, crucial components for managing grease during grilling.
Methods for cleaning various exterior surfaces (stainless steel, porcelain-enameled, plastic) and handling unique environments.
Guidance on cleaning the interior cabinet, emphasizing care around electronic components.
Instructions for replacing the D-cell batteries in the battery pack, including precautions and storage advice.
Explains how to adjust cabinet doors using hinge screws for proper alignment and closing.
Provides instructions for safely removing and reattaching grill doors using the hinge release lever.
Addresses issues where burners fail to ignite, guiding users to check gas flow and electronic ignition systems.
Provides a method to light the grill with a match to diagnose gas flow issues and test the ignition system.
Instructions for using a match to test gas flow to the side burner or infrared broiler, aiding in troubleshooting ignition failures.
Identifies symptoms of poor gas flow like uneven heating or failure to ignite, and their causes (kinked hose, dirty ports).
Describes the correct flame pattern for burners and how to identify issues like yellow or lazy flames.
Explains how spider screens can get obstructed, causing gas flow issues, yellow flames, and potential hazards.
Details how to activate and use the grill's integrated lighting system for nighttime grilling.
Instructions on how to turn on and off the illuminated control knobs for better visibility during use.
Guidance on how to replace the C-cell batteries for the NIGHTVISION lighting system.
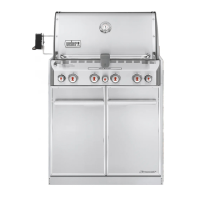
This document describes the Weber Summit Grill Center, a natural gas grill designed for outdoor use. It emphasizes safe operation, proper assembly, and routine maintenance to ensure optimal performance and longevity.
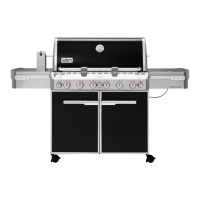
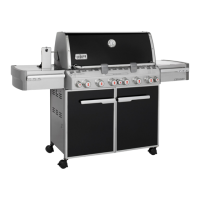
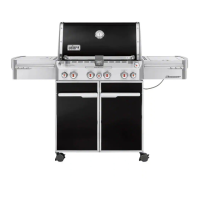
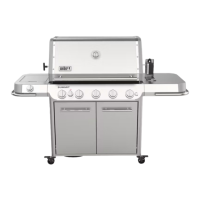
The Weber Summit Grill Center is a natural gas grill designed for outdoor cooking. It features multiple main burners, a side burner, and an infrared broiler, allowing for a variety of cooking methods from direct grilling to rotisserie cooking. The grill is equipped with an electronic ignition system for easy startup and lighted control knobs for nighttime use. A key feature is its grease management system, which includes an angled slide-out grease tray and a catch pan, designed for easy removal and cleaning to prevent grease fires. The grill is intended for use with natural gas only and is not designed for conversion to liquid propane. It is built to operate at a specific water column pressure, ensuring efficient gas flow and consistent heat. The grill's design prioritizes safety, with warnings against indoor use, use in vehicles, and proximity to combustible materials.
The grill offers a user-friendly experience with several features to enhance cooking and convenience. The main burners are ignited using a one-handed electronic ignition system, where users push in and turn the control knobs. For the side burner, the lid must be open before ignition. The infrared broiler also uses an electronic ignition, requiring the knob to be held in for a period to ensure a continuous gas flow and full ignition of the ceramic surface.
For nighttime grilling, the grill includes NIGHTVISION lighting, which activates when the lid is opened and deactivates when closed, or after 30 minutes of inactivity. The control knobs are also lighted, activated by a power button on the control panel.
Rotisserie cooking is a prominent feature, requiring the removal of the warming rack and cooking grates. A fresh foil pan is recommended under the food to catch drippings. The rotisserie motor is integrated into a retractable panel, and the spit forks are adjustable to secure food. Proper food centering and uniform shape are crucial for effective rotation. After use, the rotisserie motor, spit, and forks can be stored within the grill cabinet, with the power cord neatly tucked away.
The grill is designed for outdoor use in well-ventilated areas, with specific guidelines for partial enclosures to ensure adequate airflow. It is crucial to keep the cooking area clear of flammable vapors, liquids, and combustible materials.
Routine maintenance is essential for the grill's safety and performance. A thorough leak check is recommended after assembly and annually, using a soap and water solution to detect gas leaks at various fittings. If leaks are found, the gas supply must be turned off, and the grill should not be operated until the issue is resolved. The gas supply hose should also be inspected regularly for cracks, abrasions, or cuts, and replaced if damaged.
Cleaning the grill is divided into several components:
The manual also provides troubleshooting steps for ignition issues and gas flow problems, including instructions for match lighting if the electronic ignition fails. It emphasizes contacting customer service for any repairs to gas-carrying, gas-burning, or ignition components.
| Fuel Type | Liquid Propane |
|---|---|
| Grates Material | Stainless Steel |
| Lid and Bowl Material | Stainless Steel |
| Type | Gas |
| Side Burner BTU | 12, 000 BTU |
| Warranty | 10 years |