OPERATION
OFFSETTING YOUR TAILSTOCK
WARNING! The tailstock comes from the factory properly aligned with the headstock.
The tailstock can also be used in an offset position to help turn tapers on a work piece. Adjusting the tailstock into
an offset position requires removing the tailstock from the bed and adjusting the offset screw on the bottom of the
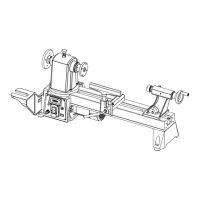
tailstock. To properly offset the tailstock follow these steps (Fig. 8):
1. Use a 17mm wrench or socket to loosen the lock nut that holds the tailstock in place. Remove the stop screw on
the rear of the end of the bed (p. 8, item 18) using a 4mm hex wrench. Then slide the tailstock off the bed.
2. Loosen the offset set screw (Fig. 7 - 2) on the back of the tailstock, below the handle.
3. Loosen the offset cap screw (Fig. 7 - 3) on the bottom of the tailstock. Only loosen it enough so the tailstock can
slide.
4. Slide the tailstock back onto the bed and adjust it to the desired offset.
5. Tighten the offset setscrew to hold the tailstock at the proper offset position.
6. Slowly and carefully slide the tailstock off the bed and tighten the offset cap screw on the bottom.
7. Slide the tailstock back onto the bed, lock it in to the desired position and check your tolerances to makes sure it
is in the desired offset.
8. Repeat the previous steps in order to adjust the offset to the exact position necessary for your workpiece. Rein-
stall the stop screw on the end of the bed when finished.
TOOL POST
The tool post is used to hold your cutting tools and run the cutting edge along the workpiece you are turning. The
tool post can hold four tools at a time and has 4 preset stops at 90 degree intervals. It can also be set at any angle
in between these four presets. To install a cutting tool into the tool post follow these steps:
1. Determine which cutting tool will create the desired cut profile.
2. Loosen the screws in the top of the tool post on the edge you will place the cutting tool. Make sure the tool will
be secured by a minimum of two of these screws.
3. Place the tool under the screws and loosely tighten them, making sure it is perpendicular (or at the proper angle)
to the axis of the workpiece.
4. Align the tip of the tool with the centerline of the workpiece. If the workpiece centerline is higher, place shims
under the tool to raise its height. This machine uses 5/16” (8mm) tools. To determine if the tool tip is even with the
centerline, check the tool tip against the tip of the center in the tailstock. If the two tips are even or the tool tip is
below the center tip, the tool is the proper height. If the two tips are even or the tool tip is below the center team, the
tool is the proper size for the lathe. If the tool tip is below the center tip, it will need to be shimmed up to the height
of the center tip, otherwise you will see a small “button” on the workpiece when parting off. If the tool tip is higher
than the center tip, the tool is the wrong size for this lathe.
NOTE: You may also install an aftermarket quick-change tool post, size 0XA, if desired. The mounting bolt size is
M10x65mm.
14