EasyManua.ls Logo

Whirlpool WFC 3C26 User Manual

Whirlpool WFC 3C26
34 pages
To Next Page IconTo Next Page
Page #1 background imageLoading...
Page #1 background image
Question and Answer IconNeed help?

Do you have a question about the Whirlpool WFC 3C26 and is the answer not in the manual?

Whirlpool WFC 3C26 Specifications

General IconGeneral
Appliance placementFreestanding
ColourWhite
Built-in displayYes
Door hingeLeft
Spinning speed1200 RPM
Spin-drying classB
Delayed start timerYes
Loading typeFront-load
Delayed start24 hours
Width60 cm
Height850 mm
ProgramsCotton, Synthetic, Delicate, Wool, Eco
Washing programsMix, Cotton, Eco, Synthetics, Wool, Delicate/silk, Cold, Jeans/denim, Rapid

Summary

Whirlpool Dishwasher Overview

Energy and Consumption Data

Details on kWh/annum, L/annum, and noise level.

Key Dishwasher Features

Capacity and Washing Options

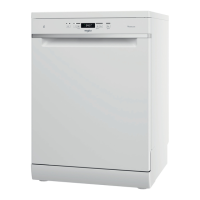
14-place settings, single rack, and flexible washing.

Detailed Feature Explanations - Part 1

Single Rack Washing & Start Delay

Efficient washing for small loads and setting cycle start times.

Detailed Feature Explanations - Part 2

Silent Operation & 6th Sense

Low noise output and advanced soil sensing technology.

Dishwasher Accessories

Basket Components

Images showing the lower and upper baskets.

Technical Specifications - General

Electrical and Physical Data

EN Code, wattage, voltage, frequency, dimensions, weight.

Technical Specifications - Programs & Indicators

Program and Indicator Features

Automatic programs, max temp, start delay, indicator lights.

Model and Serial Number Identification

Location of Identification Label

Serial number and model found on the right side of the door.

Pre-Installation Requirements

Power Outlet and First Use Advice

Required power outlet and initial setup tips.

Component Identification Guide

Internal Components Overview

Labels for racks, spray arms, and filter assembly.

Control Panel Functions

Button Operations and Indicators

Functions of buttons and meanings of indicator lights.

Operational Requirements - Salt Reservoir

Filling the Salt Reservoir

Instructions on how to fill the salt reservoir and its importance.

Operational Requirements - Water Hardness

Setting Water Hardness Level

Procedure to adjust water softener based on local water.

Operational Requirements - Rinse Aid Dispenser

Filling the Rinse Aid Dispenser

How to fill the rinse aid dispenser and its capacity.

Rinse Aid Dosage Adjustment

Adjusting Rinse Aid Quantity

Steps to modify rinse aid output for improved drying results.

Operational Requirements - Detergent Dispenser

Filling the Detergent Dispenser

Instructions for using the detergent dispenser compartments.

Wash Program Comparison Table

Program Details and Consumption Data

Summary of programs, duration, water, and energy use.

Wash Cycle Descriptions

Standard Wash Programs

ECO, 6th Sense, Intensive, Daily, Silent program details.

Loading the Racks - Cutlery

Cutlery Rack Arrangement Guide

Proper cutlery placement for efficient washing and drying.

Loading the Racks - Upper Rack

Upper Rack Loading Example

How to load delicate items like glasses, cups, and saucers.

Upper Rack Height Adjustment

Adjusting Rack Height Mechanism

How to raise or lower the upper rack for better capacity.

Loading the Racks - Foldable Flaps

Adjustable Foldable Flaps

Positioning flaps at different heights for crockery arrangement.

Loading the Racks - Lower Rack

Lower Rack Loading Guidance

Loading pots, plates, and using tip-up supports for pans.

Technical Memo: Door Removal - Plint Panel

Plint Panel Removal Procedure

Step 1: Remove the plint panel by pulling both sides.

Technical Memo: Door Removal - Screws

Lower Front Screw Removal

Step 2: Remove the 2 screws at the lower front.

Technical Memo: Door Removal - CCU

CCU Locks and Terminal Disconnection

Open CCU locks and disconnect the wire/terminal.

Technical Memo: Door Removal - Side Panels

Side Panel Screw Removal

Remove screws from upper, left, and right side panels.

Technical Memo: Door Removal - Insulation

Foam Insulation and Hinge Screw Removal

Remove insulation and the main door hinge screw.

Technical Memo: Door Removal - Hinges

Final Hinge Screw Detachment

Remove remaining screws on both sides of the door panel hinged.

Technical Memo: Door Removal - Detached

Door Detachment Confirmation

The door is now detached from the unit.

Technical Memo: Electronic Components - Main Board

Main Board (Central Control Unit) Information

No part number listed for the main board.

Technical Memo: Electronic Components - Terminal Block

Terminal Block Information

No part number listed for the terminal block.

Technical Memo: Heating Coil Rating

Heating Coil Electrical Specifications

Rating is 230Volts / 50Hz / 1800W.

Warranty Information

Warranty Period and Coverage

1 Year Warranty for Parts and Services.
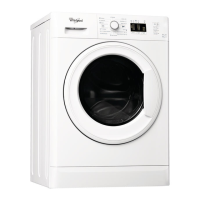
Related product manuals