SAFETY
GUIDES
for the operation
of
CARBIDE
TIPPED
SAW BLADES
Read Completely Before Attempting To Operate Carbide Tipped Saw Blades
This leaflet of safety and
operating
instructions
is
not
intended to
be
and
is
not
totally comprehensive: that is. it
does not, and cannot. cover every
possible safety problem
which
m11y
arise in using specialized and standard
tooling on varying machines and
applications.
This
leaflet is
rather
intended to generally describe
many
of
the basic safety and operating
procedures which should be followed,
and
to
describe the types
of
safety
considerations
which
should
be
considered in operating
cutting
tools
.
None
of the statements
or
information
presented in this leaflet
should
be
interpreted
to
imply
any
warranty
or
safety
protection.
The drawings
do
not
depict
any
particular design, type,
or
size
of
tools.
equipment
or
machines.
The
drawings
are illustrative
only
and
are
not
to
be construed to establish
any
exact mode,
method
or
procedure
.
All Federal and State laws and
regulations having
jurisdiction
covering the safety requirements
of
cutting
tools at
the
point
of
usage take
precedence over the statements
and
information
presented in this leaflet.
Users
of
cutting
toots
must
,
of
course,
adhere to all such
regulations
. As an
aid to
cutting
tool
users a
number
of
such regulations are listed
below
. The
list does not
include
all
regulations
that may apply:
1. The Federal Register dated
June
27,
1974, Dept.
of
Labor,
Office
of
Safety
and Health
Administration
(The
OSHA Act)
2. American National Standards
In-
stitute,
01
.1-1975 (Safety Regu-
lations for Woodworking Machinery)
3. American National Standards In-
stitute,
02
.1-1969 (Safety Require-
ments for Sawmills)
4. American National Standards In-
stitute,
P1
.1-1969 (Safety Require-
ments for Pulp, Paper and Paper-
board Mills)
5. Other ANSI, State and/
or
Federal
Codes and Regulations
which
may
apply in
your
operation
SAFETY RULES WHICH APPLY TO
THE OPERATION
OF
ALL
CARBIDE
TIPPED CUTTING TOOLS
1. Always inspect the
cutting
tool
completely before
mounting
. Never
attempt to operate a
tool
which
has
chipped or bent teeth or
cutting
edges
or teeth that are
not
sharp. You
must
be familiar
with
normal wear
conditions
for the type
of
tooling
to be
used. The
tool
must be
completely
clean to allow
proper
visual
inspection.
2.
Do not
attempt
to operate
cuttfng
tools
or
machinery
with
which
you
are
not
familiar
or have
not
received
operational
training-get
assistance
from
your
supervisor.
his
designated
representative
or
a trainer
who
is
familiar
and
properly
trained
and
eKperienced
on
the
machine
to
insure
your
safety.
Become
completely
familiar
with
all
of
the
machinery
manufacturer
's
written
instructions
,
guides and manuals before
operating
machine
. You
must
use and be
familiar
with
all
controls
, safety devices and
emergency
stop
mechanisms
to
operate a
machine
safely.
3.
Never
operate
a
cutting
tool
that
is
not
properly
aligned
to
the
direction
of
feed. Do
not
allow
sideward,
twisting
or
other
than
forward
pressure on
the
cutting
tool
in feeding material
into
a
cut
.
c.
Make sure
the
tool
is
mounted
to
rotate in the
proper
direction
before
cutting
any material. The
tool
must
rotate against. rather than with,
the
direction
of
feed
on
all hand feed
machines.
Do
not
climb
on
hand feed
machines.
5.
Do
not
cut
materials
of
a type,
hardness'
or
density'
other
than
that
which
the
cutting
tool
was designed
to
cut. Never
attempt
to
cut
materials
with
a
tool
unless
you
have personally
checked
with
your
supervisor
to
make
sure the
cutting
tool
was designed
for
the
specific
type
of
material
you
wish
to
cut, and
for
the
depth
of
cut
desired.
This
is
particularly
important
when
attempting
to
cut
"stacked" material,
i.e
.,
cutting
more
than one piece at a
time
.
6. Never force-feed materials
into
a
cutting
tool
such that it causes
the
toot
or
machine
motor
to
slow
down
below
operating
speeds. A safe and
proper
cutting
operation
will not require
much
force
in feeding material. If
material begins
to
"ride
up
" on the
cutting
tool, or requires
undue
pressure to feed the material i
nto
the
tool
,
or
if
undue
vibration is
experienced.
do
not
cont
inue the
cut-turn
off
all
power
and correct the
condition
.
7.
l<.eep
body
and
clothing
well clear
of
all
cutting
tools
and other
moving
parts while the machine is in
operation. Use
work
holding
fixtures
and mechanical feed devices in all
possible cases. When
cutting
material
of
such size. shape or type that it
necessitates close
approximation
to
the
cutter
and
mechanical
feed
1. Hardness is the resistance of a
materi
al
to
being
cul
or the
strength
of a materi
al
to
res
i
st
tearing or
breaking .
2. Density
is
the compactness of a
material compared to its volume.
mechanisms
cannot be used, use a
wood
"
push
stick"
to
feed the material
so
that
no
part
of
your
body
or
clothing
comes close
to
the
cutting
tool
.
a. Never attemp
to
clean a
cutting
tool
or
clear pieces
of
material from
the
cutting
area while
machine
power
is
"
on"
or
when
cutting
tools, material
or
any
part
of
the
machine
is
moving.
Allow
cutter
rotation
to
stop
by
itself,
or
by use
of
a brake if
supplied
on th!!
machine
. Never
attempt
to
stop
or
slow
a
rotating
cutting
tool
by
applying
a hand-held
or
any
other
object
to
the
cutter
.
arbor
, spindle
or
drive as a brake.
I. Do
not
ptace
your
body
in the
rotational
path
of
a
cutting
tool
unless
absolutely
necessary, and then only
ii
there is a
complete
and adequate
barrier
between you and the
cutting
tool. Remember that carbide tips are
very
hard
and, therefore,
brittle
. The
tips can break away
under
incorrect
side
thrust
or
twisting
forces,
or
if
foreign
material
is
allowed
to
contact
the
tips
. An
operator
can reduce the
danger
of
being hurt
by
a
"kickback"
of
the material if he always stands
bealde
the
material he is feeding
into
the
machine
rather than in back of it.
10. Never leave machines unattended
while
cutting
tools are still rotating
or
any part
of
the machine
or
material is·
moving
.
11. Never operate a
machine
without
using all
of
the hoods,
guards
,
hold-
downs
and
safety devices
for
the
machine
being operated.
12.
Machines
must
be
maintained
to
the
manufacturer's
standards and
current
safety standards.
13. Always wear safety glasses or face
shield
to
completely
protect
your
eyes
when
operating
cutting
tools.
CIRCULAR
SAW
BLADES AND
SAW MACHINE TOOLS
MOUNTING
INSTRUCTIONS
1. TURN OFF AND
LOCK
OUT
ALL
MACHINE
POWER. Clean the saw
arbor, saw collars, sleeve and arbor
nut. Remove nicks and burrs by very
lightly
honing
any nicked or burred
area. (Do
not
use coarse files or
abrasives).
2.
WITH
ALL
MACHINE
POWER OFF
AND
LOCKED
OUT,
pull
and
push
on
the
machine
arbor sideways in and
out
by hand (
without
rotating the arbor).
There
should
be no feeling of
movement. Next. rotate the arbor by
hand. If
the
bearings are in
proper
conditi
on
.
the
arbor
should
turn
freely
with
no
sticking
or
rubbing
.
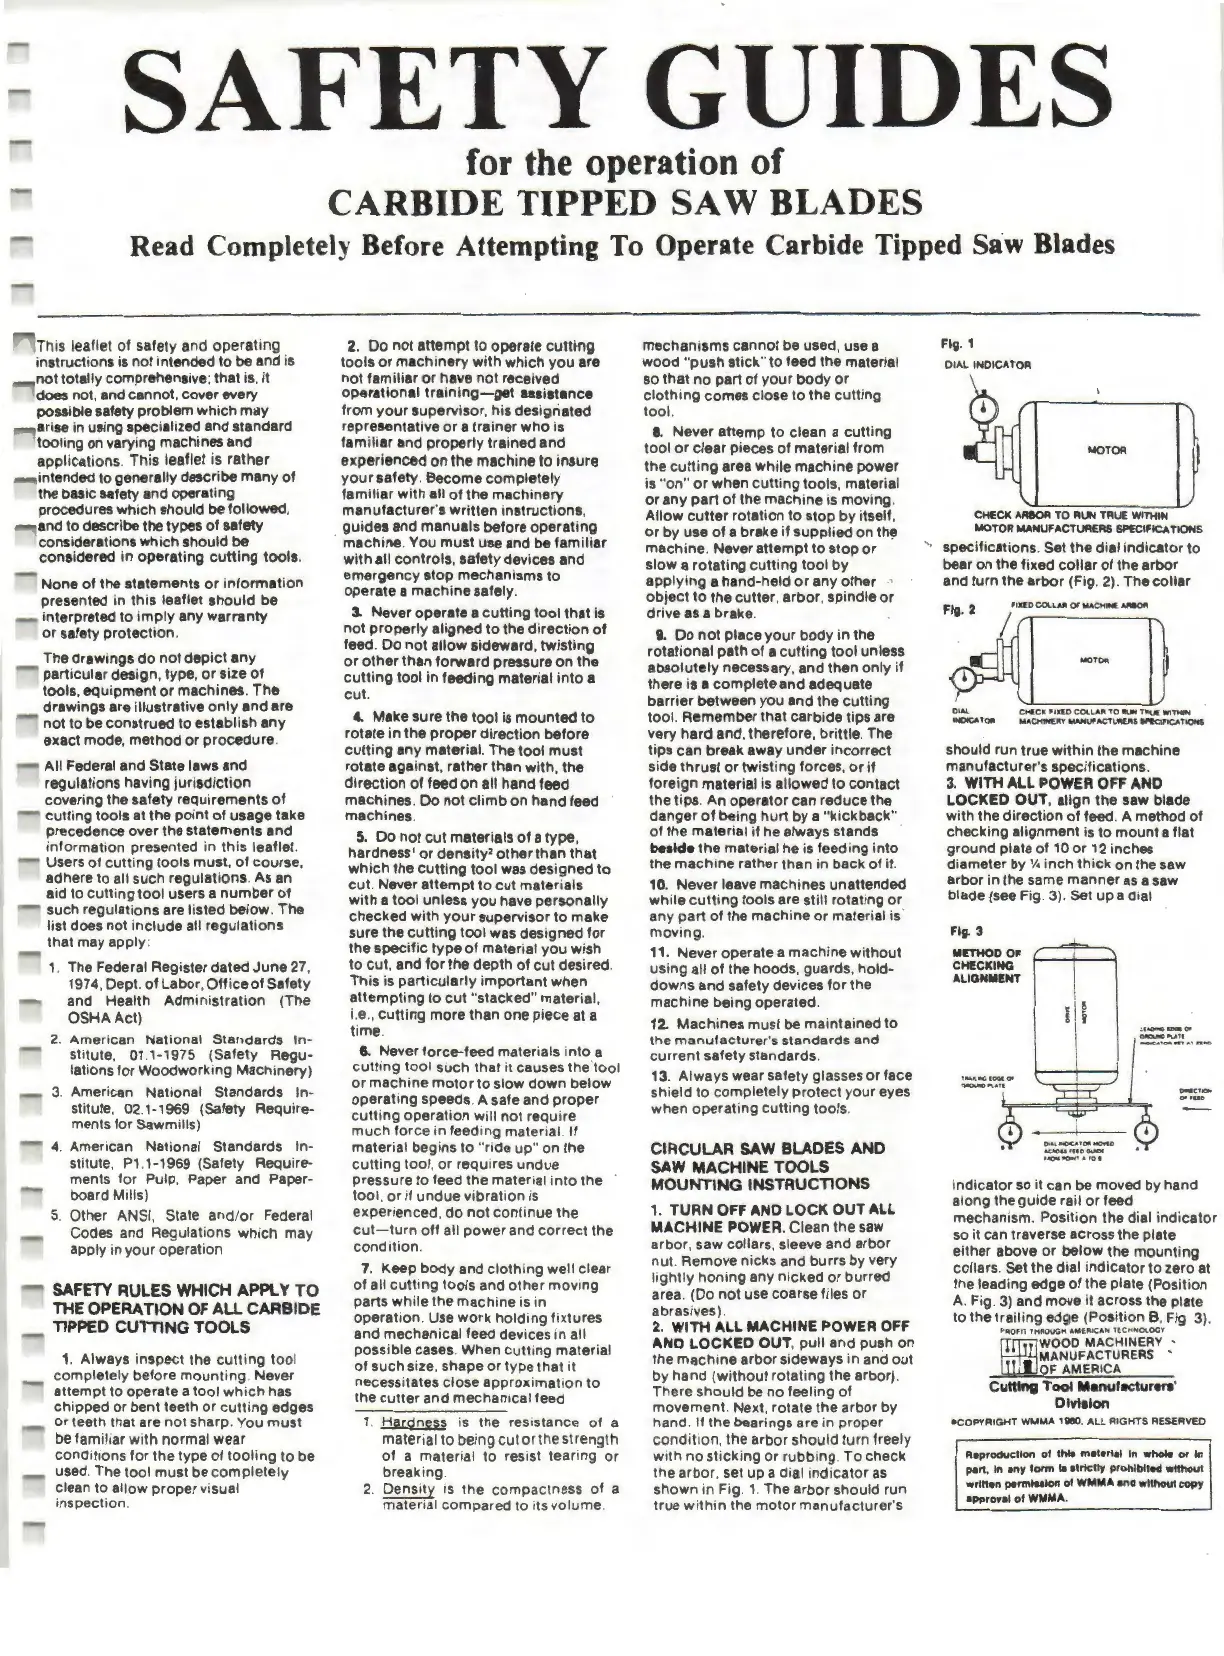
To
check
the
arbor
, set up a dial
indicator
as
shown
in Fig. 1. The
arbor
should run
true
with
in the
motor
manufacturer's
Fig. 1
0 1
._
l INDICATOR
MOTOR
CHECK ._RllOR TO RUN TRUE
WITHIN
MOTOR MANUF•CTUAERS SPECIFICATIONS
.
.,
specifications. Set
the
dial indicator
to
bear on the fixed
collar
of
the arbor
and turn the arbor (Fig. 2). The collar
Fig. 2
flXfO cou
...
ui
OJ
MA
C
HN.
~
I
MO
TOO
OIAl CHI.CK FIXED
COll,.Att
'TO RUN TlllU( WITMIN
INOtCATOfll MACMIN£R'T
MAHUfACT'-""CRS
IW'EO'ICATIC>Mi
should run
true
within
the machine
manufacturer's specifications.
3.
WITH
All
POWER OFF
AND
LOCKED OUT,
align
the
saw blade
with the
direction
of
feed. A method
of
checking alignment is
to
mount
a flat
ground
plate
of
10
or
12
inches
diameter by
V.
inch
thick
on
the saw
arbor in the same
manner
as
a saw
blade (see Fig. 3). Set
up
a dial
Fig. 3
METHOD
0,
CHECKING
ALIGNMENT
~l
aootC.
lOGt
00
GlllCIUe"Votl
-...~-~
.. •
nOC>
indicator so it can
be
moved by hand
along the guide rail
or
feed
mechanism. Position the dial
indicator
so
it can traverse across the plate
either above or below the
mounting
collars. Set the dial
indicator
to
zero at
the leading edge
of
the plate (Position
A. Fig.
3)
and move it across the plate
to the trailing edge (Position
B,
Fig
3)
.
PROFll
THROUGH AMERICA,,.
TlCHNOlOG'I'
WOOD MACHINERY •
MANUFACTURERS '
OF AMERICA
Cutting
Tool
Manufacturers'
Dlvlalon
•COPYRIGHT
WMMA
HBO.
ALL
RIGHTS
RESERVED
A•productlon
ol
tttt.
m•tertal
In whole
or
In
port,
In
ony torm
11
1lrtctly prohlbtto•f without
wrlHon pormlsalon ol
WMMA
and
without copy
approwel
of
WMMA.
 Loading...