Installation en
Installation and operating instructions Wilo-Control MS-L 19
ƒ Follow local guidelines if residual-current devices (RCD, type A, sinusoidal current,
universal-current-sensitive) are installed.
ƒ Route connection cable in accordance with the local guidelines.
ƒ Do not damage the connection cable during routing or installation.
ƒ Earth the switchgear and all electrical consumers.
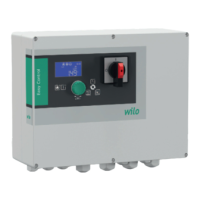
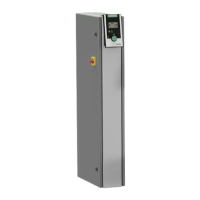
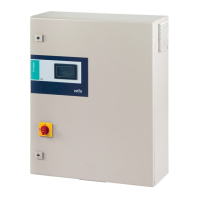
6.5.1 Overview of components
Fig.3: Components and connection diagrams
Control MS-L1...
1 Main switch, in the cover
2 Motor contactor
3 Terminal strip: Sensors
4 Terminal strip: Earth (PE)
5 Potentiometer for follow-up time
6 Slot 9V rechargeable battery
7 Terminal strip: Mains connection
8
DIP switch1
10
DIP switch3: Setting the switching points (only MS-L...-LS)
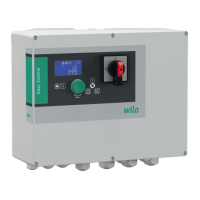
Control MS-L2...
1 Main switch, in the cover
2 Motor contactor
3 Terminal strip: Sensors
4 Terminal strip: Earth (PE)
5 Potentiometer for follow-up time
6 Slot 9V rechargeable battery
7 Terminal strip: Mains connection
8
DIP switch1
9
DIP switch2
10
DIP switch3: Setting the switching points (only MS-L...-LS)
6.5.2 DIP switch
The switchgear is equipped with DIP switches. These DIP switches are used to switch
various functions on/off.
Description
DIPs
Control MS-L 1...
Control MS-L 1...-O
Control MS-L 1...-LS
Control MS-L 2...
Control MS-L 2...-O
Control MS-L 2...-LS
DIP switch1, above the potentiometer
Motor protection: Adjustment rated current
1-5 • • • • • •
Pump kick: On/Off
6 • • • • • •
Internal buzzer: On/Off
7 • • • • • •
Pre-selected mains voltage: 1~230V or 3~400V
8 • • − • • −
DIP switch2, below the potentiometer
Monitoring operating parameters
1-3 − − − − − •
Specifying the service intervals
4/5 − − − • • •
Activating/deactivating the connected pumps
6/7 − − − • • •
DIP switch3, left next to the buttons
Setting the switching points
1-3 − − • − − •
Key
ƒ • = available , − = not available
ƒ DIP on: DIP top (ON)
ƒ DIP off: DIP bottom (OFF)
 Loading...