10
Place the microwave assembly close to the cabinet
opening and plug the power cord into a properly
grounded electrical outlet.
11
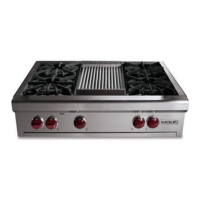
Insert the microwave assembly into the opening.
12
Pre-drill two pilot holes and use two #8-15 x
1
/
2
"
screws to secure the bottom duct to cabinetry.
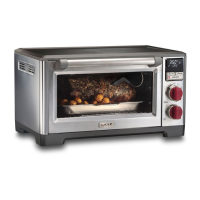
13
Temporarily place the trim over the opening and look
for gaps that may be visable between the microwave
and trim. Attach foam tape to the microwave to
eliminate gaps. The foam tape can be cut to achieve a
proper fit.
14
For stainless trim, attach the frame assembly to the
side mounting brackets with four #6-32 x
3
/
4
" screws.
For black trim, attach the frame assembly directly to
the cabinet with four #6-18 x 1" screws.
15
Remove the protective covering from the side trim and
install one piece per side.
Convection Microwave - E Series Trim Installation
wolfappliance.com 800.222.7820
Convection Microwave - E Series Trim Installation (continued)
Page 2 of 2