Shutdown
Greenstar 8000 + – 6721890759 (2024/06)
10
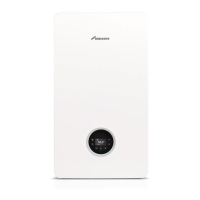
Fig. 8 Locking mechanism
Ā The lever [2] of the locking mechanism is located right hand side of
the Key housing. Ensure that it is in its Open position before pulling
lever [2] towards front.
Ā Turn on the power.
LED [1] starts blinking green.
Ā Wait until LED is constantly yellow.
Note the display:
Ā Set time and date if necessary.
5.2 Key LED
Key LED status
The LED on the Key displays different states with flashing or constant
colours.
Table 6 LED status
5.3 Setting the time program
Time program
The same method for setting the time program for heating is used to set
the time program for hot water.
Ā Press the key.
Ā Select and confirm the Heat. time prog. or DHW time prog.menu.
Ā Select and confirm the Time program menu.
The menu items Mon - Fri, Sat - Sun, Mon ... Sun are displayed.
Possible items to change:
• Mon - Fri to change switching times for all weekdays together
• Mon ... Sun to change switching times for individual days
• Sat - Sun to change switching times for weekends
Ā Select and confirm item you want to change.
Ā Select and confirm time entry you want to change.
Ā To change the time, press the c or d key.
Ā Press the ok key.
The new time is saved. Next time entry is selected.
Add one additional switching time block by selecting +. Delete an
existing switching time block by selecting .
6Shutdown
6.1 Setting frost protection
NOTICE
Risk of damage to the system from frost!
The heating system can freeze up after a prolonged period (e.g. during a
power failure, switching off the power supply, faulty fuel supply, boiler
fault etc.).
Ā Ensure that the heating system is in constant use (particularly when
there is a risk of frost).
If you are leaving your property unoccupied during cold weather, please
leave your external programmer on constant and your room thermostat
set to 12 °C.
7 Thermal disinfection
To prevent hot water from becoming contaminated by bacteria such as
legionella, we recommend thermal disinfection after long downtimes.
CAUTION
Risk of scalding.
During thermal disinfection, discharging unmixed hot water can cause
serious scalding.
Ā Only use the maximum adjustable hot water temperature for thermal
disinfection.
Ā Inform occupants of the premises of the risk of scalding.
Ā Perform thermal disinfection outside of the normal operating times.
Ā Do not discharge DHW unmixed.
Proper thermal disinfection involves the DHW system including the
draw-off points.
Ā Set the thermal disinfection in the hot water program of the heating
controller (Æ heating controller operating instructions).
Ā Close DHW draw-off points.
Ā Set any DHW circulation pump to continuous operation.
Ā Wait until the maximum temperature is reached.
Ā Open all DHW draw-off points, from the nearest to the one furthest
away, and draw off hot water until hot water at a minimum of 70 °C
has flown from all draw-off points for at least 3 minutes.
Ā Restore the original settings.
Description of the LED displays Example
Flashing red:
Fault, e.g. no communication between the Key and
appliance:
Ā Install the Key again, restore the last functioning
status.
Flashing yellow:
No fault, user please wait.
Flashing green:
No fault, initialisation process is running.
Constant red:
Temporary fault:
Ā Wait for normal operating condition to be resumed.
Constant yellow:
No fault, time and date not available:
Ā Set the time and date on the appliance.
-or-
Ā Key with touch-sensitive indicator: Press touch-
sensitive indicator on Key to start pairing.
Constant green:
No fault, normal operating condition.
LED Off:
No fault, power-saving mode or appliance without power.
1
2