The X-Tronic Model #3020-XTS Soldering Station is a professional-grade tool designed for safe and effective soldering, offering a range of features to ensure precision, ease of use, and longevity. This manual provides comprehensive instructions for its setup, operation, and maintenance, emphasizing safety precautions throughout.
Function Description
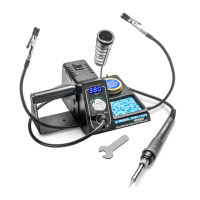
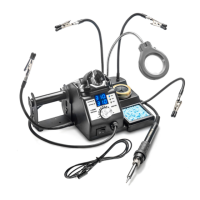
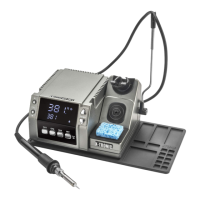
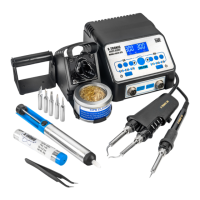
The core function of the X-Tronic 3020-XTS is to provide a controlled heat source for soldering applications. It consists of a main power unit with an LED display, a 75-watt soldering iron with an ergonomic grip, and various accessories that enhance its utility. The station allows users to set and maintain precise temperatures for different soldering tasks, ranging from 392°F to 896°F (200°C to 480°C). The digital LED temperature readout provides real-time feedback, and a temperature adjustment knob allows for fine-tuning.
A key feature of this soldering station is its "Sleep Function." When the soldering iron is placed in its holder for 10 minutes, it automatically enters sleep mode, indicated by "SLP" on the display. In this mode, the temperature ramps down to 392°F (200°C), conserving energy and extending the life of the heating element and tip. Upon removal from the holder, the iron quickly ramps back up to its previously set working temperature within 5-10 seconds, ensuring minimal downtime.
The unit also includes a temperature conversion toggle, allowing users to switch the temperature readout between Fahrenheit (°F) and Celsius (°C) as preferred. This flexibility caters to different regional standards and user preferences.
Usage Features
Setting up the X-Tronic 3020-XTS is straightforward. Users begin by attaching the solder roll holder to the left side of the unit and firmly pressing the steel spring soldering iron holder into place on the right side of the base. The 3-prong AC cord is then plugged into a grounded outlet to ensure electrical safety. Once powered on via the switch on the control module, the blue LED screen illuminates, and the desired working temperature can be set using the aluminum knob. Turning the knob clockwise increases the temperature, while counter-clockwise rotation decreases it.
Proper tip preparation is crucial for effective soldering and tip longevity. Before use, the soldering iron tip should be removed from its cradle and "flooded" with a good quality rosin core solder (preferably 63/37 or 60/40 grade). This process, known as tinning, ensures the tip is bright and shiny, free from dull or discolored spots, and ready for use. After tinning, excess solder can be removed by wiping the tip across a moist sponge or dipping it into the brass sponge cleaner. The station includes both a wet sponge and a brass sponge with rosin flux for efficient tip cleaning.
The station is equipped with "Helping Hands," a set of two attachable arms that can hold small components, freeing up the user's hands for soldering. A small wrench is provided to tighten these helping hands securely. The solder roll holder keeps solder conveniently accessible, integrating seamlessly with the main unit.
Safety is paramount during operation. Users are advised never to touch the metallic components of the soldering iron while it is hot, as this can cause severe burns. The unit should only be used for soldering applications, and the tip should not be tapped against the work surface to remove residual solder, as this can damage the tip or heating element. Good ventilation is also recommended, as the soldering process can produce smoke.
Maintenance Features
Regular maintenance is essential to ensure the X-Tronic 3020-XTS remains in proper working condition and to extend its lifespan. The unit should always be kept plugged into a grounded outlet during operation. It is important to keep the unit and all its components free from dirt, debris, and liquids. The power cord should be plugged in correctly and safely positioned to prevent accidents, and all cords in the workspace should be managed to avoid hanging off tables or benches. When needed, the unit can be wiped down with a dry, static-free cloth.
Soldering tip preparation and maintenance are critical for performance and longevity. The tip should always be properly tinned with rosin flux solder to prevent de-wetting. Filing or attempting to reshape the tip is strongly discouraged, as this will destroy the plating and shorten its life. Chloride and acid fluxes should also be avoided for the same reason. To maximize tip life, solder should always be applied to the heated connections or joints, rather than directly to the tip repeatedly. A warning is issued against using anti-seize or any other lubricant on the tip retainer or heater.
Replacing the soldering tip is a common maintenance task. This should only be done when the iron is cool and unplugged. The small metal tip retaining screw cap at the bottom of the iron's metal shaft is unscrewed, and the retaining collar is slid off, allowing the old tip to be removed and a new one to be slid over the ceramic heating element. The collar and screw cap are then replaced and hand-tightened. It's important to note that the black Bakelite screw cap does not need to be removed for tip replacement; it is only for accessing the heating element.
Replacing the heating element is a more involved process. After ensuring the unit is cool and unplugged, the black Bakelite screw cap is unscrewed, and the full tip assembly is slid off. The cord is then pushed through the bottom of the iron while gently pulling the heating element to expose its circuit board. The two thin (red or white) wires and two thick (blue) wires with heat shielding are de-soldered from the circuit board, and the old heating element is removed. When installing a new element, careful attention should be paid to the wire locations for proper re-soldering. The circuit board is then aligned with the slots on the iron, the cord is pulled back, and the Bakelite screw cap is replaced and hand-tightened (not over-tightened). Finally, the soldering tip and retaining collar are reinstalled. The manual clarifies that the wires on the heating element can be soldered onto either side of the circuit board, as there is no polarity for the element.
Troubleshooting guidance is provided for common issues such as the unit not having power, the soldering iron "rattling," an "S-E Error," or the tip not heating up as expected. These solutions range from checking the power cord and outlet to replacing the heating element, which can be purchased from the manufacturer's website. The manual also notes that running the iron within the normal temperature range (600°F ~ 650°F / 315°C ~ 343°C) typically allows the heating element to last 6 to 12 months, depending on usage hours.