Do you have a question about the XLT Ovens X3G-3240 Series and is the answer not in the manual?
Explains safety alert symbols and signal words like DANGER, WARNING, and CAUTION.
Provides critical safety instructions regarding installation, ventilation, and service.
Outlines precautions for safe operation, storage, and maintenance of the appliance.
Details warranty coverage, duties of the owner, and exclusions for XLT ovens and hoods.
Lists responsibilities for the Service Company and Owner/Contractor during installation.
Instructions for inspecting equipment upon receipt and reporting any shipping damage.
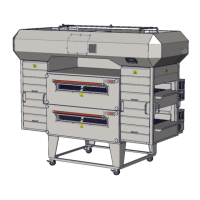
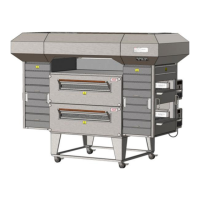
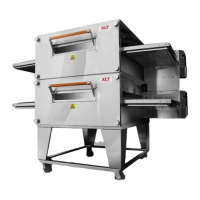
Introduces various XLT oven and hood models, explaining model number conventions and features.
Identifies and illustrates key components of the XLT oven, such as the control box and conveyor.
Provides dimensions for domestic wood crates used for XLT ovens.
Details the physical dimensions and weights of single-stack XLT ovens.
Details the physical dimensions and weights of double-stack XLT ovens.
Details the physical dimensions and weights of triple-stack XLT ovens.
Details the physical dimensions and weights of quad-stack XLT ovens.
Specifies gas oven heating values and required orifice sizes for different models.
Lists gas type compatibility (Natural/LP) with country-specific gas groups.
Outlines requirements for gas supply lines, pressure, and materials according to codes.
Details procedures for testing gas supply pressure and requirements for gas hose installation.
Specifies electrical requirements per oven, including voltage, amperage, and grounding.
Defines necessary clearances for installing ovens on combustible/non-combustible surfaces and walls.
Illustrates acceptable and unacceptable placement of utilities relative to the oven.
Provides critical safety warnings and precautions for moving and stacking ovens.
Illustrates base assembly procedures for single/double, triple, and quad stack configurations.
Introduces the steps for safely stacking ovens using lifting equipment.
Details the placement of tripod legs and lifting pipes for oven stacking.
Illustrates the final steps of lifting and stacking ovens, emphasizing safety.
Describes how to remove transportation clips and install the sandwich door.
Illustrates the installation of accessories like the conveyor flap and control box plate.
Specifies physical placement requirements and the need for oven restraint kits.
Details the design and installation of the fire suppression system for ovens.
Outlines the need for powered ventilation hoods and proper air replenishment.
Details the steps for initial oven start-up and checklist completion.
Explains how to turn the oven on/off and adjust temperature and belt speed.
Guides users through navigating the Large User Interface (LUI) for oven settings.
Describes various operator-adjustable settings like Fuel Type, High/Low Temp, and Belt Direction.
Explains how to use menu mode, change settings, and lock/unlock controls.
Illustrates how to control time settings for split belt conveyors.
Provides instructions for cleaning stainless steel surfaces and specific components like the fan filter.
Outlines the steps for safely removing the oven for cleaning or servicing.
Details how to remove front panels for cleaning, including safety notes on weight.
Illustrates the removal of internal components for cleaning purposes.
Provides warnings and instructions for cleaning specific internal areas.
Presents a schedule for daily, weekly, monthly, and semi-annual cleaning and inspection tasks.
Discusses factors affecting cooking performance and how to adjust settings.
Provides a checklist for troubleshooting common mechanical and operational issues.
Lists the responsibilities of the purchaser regarding hood installation and compliance.
Describes the main parts of the XLT Hood System, including canopy, shrouds, and controller.
Provides crate dimensions for domestic hoods and shrouds.
Identifies the labeling of physical dimensions (A-K) for hoods relative to the finished floor.
Lists detailed hood dimensions, weights, and crated weights for various models.
Specifies recommended exhaust airflow volumes (CFM) for different hood and oven configurations.
Specifies recommended exhaust airflow velocities (FPM) for different hood and oven configurations.
Details the electrical utility requirements for the XLT Hood system.
Illustrates the rough-in layout for hood installation, including ducting and electrical connections.
Identifies components within the VFD control box for the hood system.
Identifies components within the non-VFD control box for the hood system.
Shows the electrical connection diagram for input power to the ovens.
Shows the electrical connection diagram for input power to the VFD controller.
Shows the electrical connection diagram for output power from the VFD to the exhaust fan.
Illustrates wiring for MUA damper relays with a single output.
Illustrates wiring for MUA damper relays with multiple outputs.
Details how to connect wires for the fire alarm relay.
Outlines safety precautions and initial steps before beginning hood assembly.
Details preparing ovens by removing lid screws and control box brackets.
Illustrates installing front and rear shroud brackets on the ovens.
Details installing bottom rail brackets and control box side closeouts.
Shows the installation of rear shroud brackets on the ovens.
Illustrates the preparation steps for the hood itself before installation.
Explains how to set up lifting gear for moving and stacking hoods.
Details the procedure for setting up lifting jacks for hood installation.
Illustrates the process of stacking the hood onto the ovens using lifting jacks.
Provides instructions and diagrams for suspending the hood from ceiling joists.
Details the installation of grease trays, lights, covers, and filters within the hood.
Illustrates installing shroud hanging brackets onto the hood.
Shows how to install corner posts for the hood assembly.
Illustrates the initial steps for installing bottom rails on the hood.
Shows the final steps for installing bottom rails and provides measurements.
Details the installation of the control box upper closeout panel.
Illustrates installing shroud panels and conveyor shelves.
Shows the installation of the back shroud panel.
Explains how to install hood relocation cords and connect them to ovens.
Details the step-by-step process of connecting hood relocation cords.
Guides users on adjusting VFD settings for fan speed and air balance.
Explains how to operate the hood, including starting/stopping ovens and lights.
Details software version, serial number, belt length, width, and time settings.
Explains VFD exhaust fan, oven quantity, makeup air, and air balance settings.
Describes the optional valance kit and its determination based on hood size and ceiling height.
Illustrates installing valance brackets and front/back panels.
Details the installation of corner and end panels for the valance kit.
Shows how to install duct wrap brackets and panels.
Provides a schedule for cleaning hood components like grease filters and exhaust fans.
Presents the electrical schematic for a standard 1-box oven, left-hand configuration.
Presents the electrical schematic for a standard 1-box oven, right-hand configuration.
Presents the electrical schematic for a standard 2-box oven, left-hand control.
Presents the electrical schematic for a standard 2-box oven, left-hand control, right-hand configuration.
Presents the electrical schematic for a standard 2-box oven, right-hand control, left-hand configuration.
Presents the electrical schematic for a standard 2-box oven, right-hand control, right-hand configuration.
Shows the electrical schematic for a standard hood with fire suppression and VFD.
Shows the electrical schematic for a hood without fire suppression and with VFD.
Lists certifications for XLT Gas Ovens and XLT Electric Ovens.
Lists certifications for XLT Hoods, including UL, NSF, and ULC standards.
Fields for documenting start-up details, installer information, and contact details.
Outlines steps for checking gas pressure, serial numbers, and oven features.
Checklist for verifying correct hood installation, electrical connections, and fan operation.
Illustrates a typical store installation setup for ovens and hoods, showing component placement.