6-11
PERIODIC MAINTENANCE AND MINOR REPAIR
1
2
3
4
5
6
7
8
9
9. Install the engine oil drain bolts,
and then tighten them to the
specified torques.
10. Add the specified amount of the
recommended engine oil, install
and tighten the oil filler cap, and
then install the oil filler cap cover.
EC000072
cC
8 In order to prevent clutch slip-
page (since the engine oil also
lubricates the clutch), do not
mix any chemical additives with
the oil or use oils of a higher
grade than “CD”. In addition, do
not use oils labeled “ENERGY
CONSERVING II” or higher.
8 Make sure that no foreign
material enters the crankcase.
Tightening torques:
Engine oil drain bolt
(crankcase):
30 Nm (3.0 m0kg)
Engine oil drain bolt (oil tank):
18 Nm (1.8 m0kg)
Recommended oil:
See page 8-1
Oil quantity:
Without oil filter element
replacement:
2.7 L
With oil filter element
replacement:
2.8 L
Total amount (dry engine):
3.3 L
EC000076
cC
After changing the engine oil, be
sure to check the oil pressure as
described below.
11. Remove the air bleed screw,
then start the engine. If oil does
not seep out of the hole after a
few minutes, immediately stop
the engine and have a Yamaha
dealer check for the cause. If oil
seeps out of the hole, turn the
engine off and install the air
bleed screw.
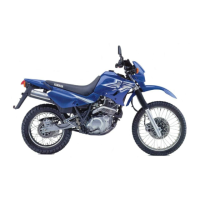
6. Remove and replace the oil filter
element.
7. Check the O-rings for damage
and replace them if necessary.
8. Install the oil filter element cover
by installing the bolts, then tight-
ening them to the specified
torque.
NOTE:
Make sure that the O-ring is properly
seated.
1. Oil filter element
2. O-ring (×2)
Tightening torque:
Oil filter element cover bolt:
10 Nm (1.0 m0kg)
3WR-9-2A (E) 6 6/28/00 11:17 AM Page 12
ProCarManuals.com