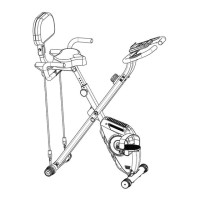
Step 8: Install the Monitor
Required parts:
1. Load two pieces of AAA batteries to the Monitor (#12).
2. Remove the pre-installed 2 Cross Recessed Pan Head Tapping Screws (#32) from the
Monitor (#12), align the Monitor (#12) with the two holes on the monitor support of the
Handlebar (#6), secure with 2 Cross Recessed Pan Head Tapping Screws (#32) that you
just removed, and tighten with Socket Head Screw Wrench S5 (#33).
3. Insert the sensor wire to the holes on the bottom of the Monitor (#12).
1 Monitor (#12) 2 AAA Batteries
2 Cross Recessed Pan Head Tapping Screws (#32) 1 Socket Head Screw Wrench S5 (#33)
 Loading...