Do you have a question about the Zepro Z 10 and is the answer not in the manual?
Important warnings and symbols used in the manual for user safety and product care.
Details on CE marking compliance with EU Machinery Directive and installation restrictions.
Statement on product compliance with EN 1756-1:2001 + A1:2008 standards.
Specifies approved hydraulic oils for replenishment and tank filling.
Requirements for registering the delivery card for guarantee validity after installation.
Explains the model identification code, lifting capacity, and cylinder model designations.
Guidelines on what parts must not be painted to prevent damage and ensure durability.
Instruction to remove the transport plug and replace it with the normal tank cap after installation.
Safety warning regarding clearance for moving cylinders to prevent collision during inspection.
Critical warnings regarding platform installation height and approved assembly kits.
Steps involved in installing the support frame, including dimension calculation and jig use.
Steps for connecting the controller, cables, and main power.
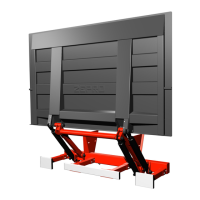
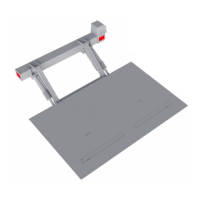
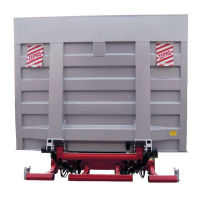
Steps for installing the platform, seals, end stops, and armstops.
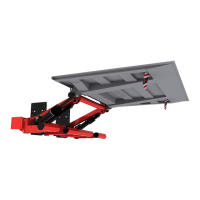
Steps for adjusting and testing the tilting cylinders.
Instruction to attach various stickers to the installed unit.
Defines the C dimension as the distance between the support frame top and vehicle floor.
Defines the D dimension as the space needed for the lift from the rear edge of the body.
Defines the A dimension as the space for the rear member, between the 1st boom and vehicle floor.
Defines the H dimension as the height from ground to vehicle floor, ensuring ground clearance.
Steps for measuring, positioning, and securing the support frame using a mounting jig and brackets.
Instructions for routing and connecting the control power cable to the vehicle's electrical system.
Guidelines for fitting controllers, ensuring safe positioning and correct distance from the vehicle rear.
Instructions for connecting and routing cables for warning lighting and foot controls on the platform.
Rules for routing the main power cable from the lift to the battery, ensuring protection and proper connection.
Steps for installing the fuse box, connecting cables, and ensuring correct fuse installation.
Details chassis requirements, statutory dimensions, and installation steps for underrun protection.
Instructions for fitting end stops between booms and the rear beam for proper positioning.
Steps for marking, drilling, and fitting horizontal sealing strips and rubber inserts.
Steps for fitting vertical sealing tracks, rubber strips, and securing them.
Instructions for checking, lubricating, and fitting the platform and tilting cylinders.
Instructions for purging the lift cylinders to remove air from the hydraulic system.
Explanation of how the electric hose rupture valves function as a hydraulic lock for transport.
Schematic diagram showing the electrical and hydraulic connections for the Z 10/15/20 model.
Specific hydraulic schematic illustrating the autotilt function for the Z 10/15/20 model.
Wiring diagram detailing connections to the circuit board for 4-button operation and remote controls.
Diagram showing the electrical connections for an open platform alarm system.
Wiring diagram for connecting warning lights and foot controls to the lift system.
Diagrams illustrating connections for various controller models (CD4, CD9, CD10, CD14) to the system.
Instructions for affixing load diagrams showing capacity and load centre for different models.
Information about the location and contents of the tail lift's identification plate.
Guidance on affixing the work area sticker for safety visibility.
Instructions for applying warning tape to platform edges for visibility in the lowered position.
Guidance on affixing controller stickers, including standard and reversed versions.
Instructions for affixing the danger area sticker near the hand control unit.
Instructions for attaching warning flags to the platform edges for visibility.
Lists all lubrication points on the lift and recommends frequency and lubricant type.
Instructions for checking and topping up the hydraulic fluid level and specifies fluid types.
Procedure for testing platform deformation and drift under static load conditions.
Procedures for testing lift operation with maximum load and overload conditions.
Checklist for verifying all safety functions of the tail lift are operational and correctly configured.
Lists the weights of various lift components and chassis models.
Provides data on maximum power consumption and recommended conductor sizes for different models.
Guidelines for battery maintenance during storage and operation to ensure proper performance.
Displays load diagrams for different capacities, showing load centre positions for safe operation.
Tables detailing the centres of gravity for different steel platform configurations and loads.
Illustrates key components with their specified tightening torques for installation and maintenance.
| Brand | Zepro |
|---|---|
| Model | Z 10 |
| Category | Lifting Systems |
| Language | English |