4
STEP 6: Installation Of Source Water Piping
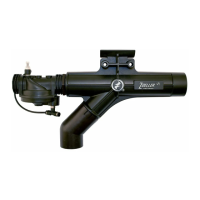
6.1) The FLEX
®
includes a eld installed Push-to-Connect tting (D), a 1” x 3/4” reducer tting (E), as well as an optional 1”x1” street elbow for
vertical installations. The Push-to-Connect is designed to be used with 3/4” PEX, CPVC, or copper pipe. For horizontal installations, install the
reducer tting, followed by the Push-to-Connect. For vertical installations, the street elbow may be used before the reducer. The reducer or
street elbow must be installed on the 1” NPT thread of the diaphragm valve inlet. Caution must be used when installing the tting to not over
tighten and crack the body. Using a backup wrench, hold the inlet tting while tightening the reducer and Push-to-Connect ttings. If the
Push-to-Connect tting is not used, the same precaution must be used when installing any other tting to the inlet tting. A union or quick-
connect tting should be installed to make the pump accessible for servicing.
STEP 7: Testing of Pump Operation
7.1) Verify that pump is functioning properly. Raise the oat to ensure the pump activates and that water visibly ows from the oat valve (A)
before releasing the oat. As a rule of thumb, the FLEX
®
should continue to run for ~5 seconds after the oat valve reaches the OFF position
and will then deactivate. If this amount of time varies greatly, the control valve may need to be adjusted. See instructions below.
Control Valve Adjustment
The FLEX
®
’s control valve (located on the diaphragm valve (B)) is preset and threadlocked from the factory for ideal performance at most municipal
water pressures/installation heights. Depending on the available water pressure and height of installation, the control valve may need to be adjusted
to achieve optimal performance. This is an uncommon occurrence and is not advised unless experiencing issues. If necessary, the following is
provided for this adjustment:
1. Check the FLEX
®
’s pump time after the oat valve reaches the OFF position and water stops owing through the oat valve. This should be
~5 seconds. This can be checked by raising the oat to actuate the pump and then releasing the oat. The pump should continue to run for ~
5 seconds.
2. If this time is signicantly longer, the control valve is overtightened and needs to be loosened. If this time is signicantly shorter, the control
valve is under tightened and needs to be tightened.
3. Unscrew lock nut so that the thumb screw may be adjusted. Note: Thumb screw is threadlocked and must be broken free for adjustment.
4. Make adjustment to thumbscrew (In half-turn increments, clockwise to tighten, counterclockwise to loosen) and recheck pump’s run time
after the oat reaches the OFF position.
5. Tighten lock nut to secure thumbscrew’s position.
• If pump will not start – Control valve is under tightened. Refer to control valve adjustment for adjustment instructions.
• If pump will not shut off – Control valve is over tightened. Refer to control valve adjustment for adjustment instructions.
INCOMING WATER PRESSURE:
40 PSI minimum with valve open.
80 PSI maximum with valve open.
100 PSI maximum with valve closed.
EFFICIENCY:
The pumping capacity increases with an increase in household water pressure and ow.
At an eight foot static head and a supply pressure of 40 PSI at water supply inlet with water owing, it takes one (1) gallon of supply water to
remove one and a half gallons from the sump. As the supply pressure increases with the static head constant, less supply water is required.
INSTALLATION, continued
© Copyright 2020 Zoeller
®
Co. All rights reserved.
 Loading...