EasyManua.ls Logo

Zoom 4630 - User Manual

Zoom 4630
10 pages
Print Icon
To Next Page IconTo Next Page
Loading...
Z O O M C E L L U S B C E L L U L A R
M O D E M QUI C K S T A R T
This Quick Start is for your Zoom USB cellular modem. This Quick Start
describes how to plug a micro SIM card into the SIM slot of the modem,
connect one or two antennas, power up the modem, and then send
commands through the USB port of a Windows, Macintosh or Linux
computer to connect to the Internet. More information, including Windows
Drivers and the AT command manual, are available on the web at
www.zoomtel.com/4630support
Powering Your USB Modem
Your modem is designed to use the power supplied by your USB port. In
some modes your modem may draw up to 800 mA. If your USB port is not
capable of supplying that much current, you may use the supplemental
Micro USB port on the side of the unit for power or you may reduce the
transmitted power using commands to the modem. For more details, please
see www.zoomtel.com/power .
Question and Answer IconNeed help?

Do you have a question about the Zoom 4630 and is the answer not in the manual?

Summary

Zoomcell USB Cellular Modem Quick Start Guide

Introduction and Overview

Overview of the Zoom USB cellular modem quick start guide, covering initial setup and connection.

Modem Physical Setup and SIM Installation

Installing the Micro SIM Card

Step-by-step guide to removing the SIM cover and inserting the micro SIM card into the modem slot.

Connecting Antennas and System Setup

Attaching the Antennas

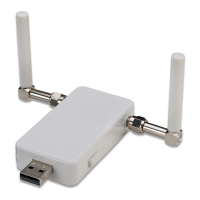
Instructions on how to screw the SMA antennas into the modem's connectors on the unit.

Windows Modem Installation

Guides users through the process of installing and setting up the modem on a Windows computer.

Operating System Specific Setup

Macintosh Modem Installation

Steps for connecting and configuring the modem on a Macintosh computer via System Preferences.

Linux and Raspberry Pi Modem Configuration

Initial Linux;Raspberry Pi Setup

Covers installing the PPP package and preparing scripts for modem connection on Linux systems.

Linux Connection Scripts

Details the content and placement of 'zdial' and 'lte_dial' chat scripts for establishing a connection.

Connecting to Internet via Linux

Command to initiate the internet connection and important notes for Linux users.

Troubleshooting Internet Connectivity

Terminal Program and COM Port Setup

Install terminal software and find the modem's COM port for troubleshooting connection issues.

SIM Card and APN Verification

Verifies SIM installation and checks APN configuration using specific AT commands.

Network Status and PDP Context Activation

Commands to check network status (AT^SMONI) and activate PDP context for data transmission.

Error Codes and Support Contact

Explains AT+CEER for error codes, common issues, and provides Zoom support contact details.

Product Information and Support

Limited Warranty and Return Policy

Outlines the one-year warranty, return process, and responsibilities for defective units.

Regulatory Notices

Notes the availability of FCC interference statements in the full-length user manual.

Overview

This document describes the ZoomCell USB Cellular Modem, a device designed to provide internet connectivity via a cellular network. It functions as a USB modem that connects to a computer (Windows, Macintosh, or Linux) and uses a micro SIM card for cellular data.

Function Description:

The ZoomCell USB Cellular Modem allows users to access the internet through a cellular network. It connects to a host computer via a USB port and utilizes a micro SIM card to establish a cellular data connection. The modem supports various operating systems, including Windows (7, 8.1/8, 10), Macintosh, and Raspberry Pi/Linux. It enables dial-up connections on Windows and Macintosh, and uses the pppd dialer command for Raspberry Pi/Linux systems. The device is designed to draw power from the USB port, but also includes an optional 5V Micro USB port for supplemental power if the host USB port cannot supply sufficient current (up to 800 mA).

Important Technical Specifications:

  • SIM Card Type: Micro SIM card (3GFF SIM card).
  • Power Supply: Primarily USB-powered, with an optional 5V Micro USB port for supplemental power.
  • Current Draw: Up to 800 mA in some modes.
  • Antenna Connectors: SMA Antenna Connectors for external antennas.
  • USB Interface: Connects to computers via a standard USB port.
  • Operating Systems Supported: Windows (7, 8.1/8, 10), Macintosh, Raspberry Pi/Linux.
  • AT Command Support: The modem is controlled using AT commands, with a full manual available online.
  • Drivers: Specific drivers are required for Windows installations, available for download.

Usage Features:

  • SIM Card Installation:
    1. Remove the screw securing the SIM cover.
    2. Slide the SIM cover off.
    3. Insert a micro SIM card into the designated slot, ensuring correct orientation.
    4. Slide the SIM cover back and secure it with the screw.
  • Antenna Connection: Screw the included SMA antennas into the SMA connectors on the side of the unit.
  • Powering the Modem: Plug the modem into an available USB port on your computer. If the USB port cannot provide enough power, use the supplemental Micro USB port for additional power. Transmitted power can also be reduced via modem commands to lower current draw.
  • Internet Connection Setup:
    • Windows:
      1. Download and unzip drivers from the Zoom website.
      2. Run setup.exe to install drivers.
      3. Plug the modem into a USB port.
      4. Set up a Dial-up connection through the Control Panel / Network and Sharing Center (or Settings / Network and Internet for Windows 10).
      5. Use *99# as the phone number, leaving username and password blank.
      6. Click "Connect" to establish the internet connection.
    • Macintosh:
      1. Plug the modem into an available USB slot.
      2. Go to System Preferences > Network.
      3. Select the ELSx device (with a Dial-up icon) from the list.
      4. Enter *99# as the phone number, leaving Account Name and Password blank.
      5. Click "Connect" to establish the internet connection.
    • Raspberry Pi/Linux:
      1. Plug the modem into an available USB port (a USB extender cable may be needed for Raspberry Pi).
      2. Open a terminal and enter sudo su for root access.
      3. Install the ppp package using apt-get install ppp.
      4. Create two scripts: zdial (in /etc/ppp/peers) and lte_dial (in /etc/chatscripts). These scripts contain configuration details for the pppd command, including modem settings, debug options, and chat script commands for dialing.
      5. To connect, enter pppd file /etc/ppp/peers/zdial.
      6. To disconnect, press ctrl-c.
  • Terminal Program Access: For advanced troubleshooting or direct command input, the modem can be accessed via a terminal program (e.g., Putty on Windows, Minicom on Linux). The backspace key may not work in most terminal emulators, requiring retyping of commands if a mistake is made.
  • Troubleshooting:
    • SIM Card/Modem Communication: Use ATE1 (to enable command echo) and AT+CIMI (to check for a 15-digit SIM number) in a terminal.
    • APN Configuration: Use AT+CGDCONT? to check the APN. If incorrect or returning ERROR, set it using AT+COPS=2, AT+CGDCONT=1, "IPV4V6", "apn name", and AT+COPS=0. Common APN names for AT&T and T-Mobile are provided.
    • Connection Status: Use AT^SMONI to check the connection state (CONN, NOCONN, SEARCH, LIMSRV).
    • PDP Context and Network Registration: Use AT+CGACT=1,1 and AT+CGATT=1 to confirm PDP context activation and network attachment/registration.
    • Error Codes: If commands return ERROR, use AT+CEER to get the reason. Common errors include incorrect APN, unsupported data plan type, roaming issues, or inactive/suspended cellular accounts.
    • Raspberry Pi/Linux Specifics: If already connected via Ethernet, remove the Ethernet cable. If connected via WiFi, disconnect using ifconfig wlan0 down.

Maintenance Features:

  • Driver Updates: Drivers for Windows are available for download from the manufacturer's website.
  • Firmware/Manual Access: The full-length user manual and AT command manual are available online for detailed information and advanced configurations.
  • Technical Support: Voice-call, email, and user forum support are available for qualified engineers, programmers, and system developers.
  • Warranty: The product comes with a 1-year limited warranty against defects in material and workmanship.
  • Return Policy: Defective units should first be handled through the retailer. If that's not possible, contact Zoom Technical Support. Shipping charges for repairs may apply after the first year.
  • Regulatory Notices: Complete FCC interference statements are available in the full user manual.

Zoom 4630 Specifications

General IconGeneral
BrandZoom
Model4630
CategoryModem
LanguageEnglish

Related product manuals