Do you have a question about the Zte ZXHN H560N and is the answer not in the manual?
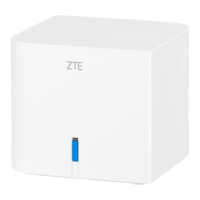
Facilitates quick and safe WLAN configuration with other WLAN devices using the WPS button.
Allows users to reset the ZXHN H560N device by pressing this button.
Provides electrical current to charge mobile devices, with a maximum output of 1A.
Selects operating mode: Access Point (AP) or Extender (Ext).
Indicates device booting, hardware error, or no connection in Extender mode.
Shows normal operation, data transmission, or WPS mode activity.
Set the AP/Extender slide switch to the Extender position.
Press and hold the H560N WPS button for 0.5 seconds; LED flashes green at 5Hz.
Press the existing router's WPS button. Ensure its SSID is visible and unencrypted.
Verify successful configuration by flashing green light; SSID and password will match.
If WPS fails or is unavailable, manually configure via web interface (192.168.1.253).
Set the AP/Extender slide switch to the AP position.
Assign a static IP address (192.168.1.x) to your computer for bridge mode.
Access the H560N interface by entering 192.168.1.253 in a web browser.
Utilize the provided Wizard for configuring the H560N.
After configuration, revert the computer's IP setting back to DHCP.
Maintain good ventilation, keep device away from heat, and ensure dryness during use.
Disconnect power and cables from the H560N during thunderstorms or rainy weather.
| Brand | Zte |
|---|---|
| Model | ZXHN H560N |
| Category | Wireless Router |
| Language | English |