18
3.0 Installation
3.1 PLANNING: Plan your fall protection system before starting your work. Account for all factors that may affect your safety
before, during, and after a fall. Consider all requirements and limitations dened in Section 2.
;
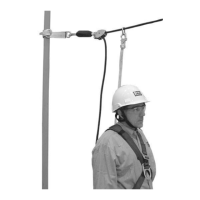
In most applications, the Nano-Lok SRD can be connected to the anchorage or the harness Dorsal location. Either
orientation is allowed; except as noted in Section Section 4
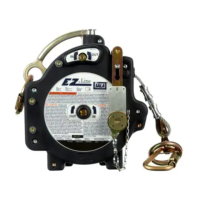
3.2 ANCHORAGE: Figure 7 illustrates typical SRD anchorage connections. Select an anchorage location with minimal free fall and
swing fall hazards (see Section 1). Select a rigid anchorage point capable of sustaining the static loads dened in Section 1.
Where anchoring overhead is not feasible, Nano-Lok SRDs may be secured to an anchorage point below the level of the user’s
Dorsal D-Ring. For users up to 140 kg (310 lbs), the anchorage point must not be more than 5 ft (1.5 m) below the Dorsal
D-Ring.
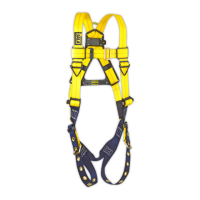
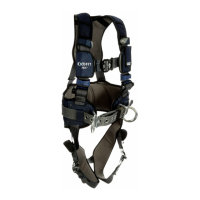
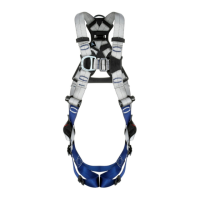
3.3 HARNESS MOUNTING: Some SRD models include a Single SRD or Twin SRD Harness Interface for mounting the SRD(s)
on a Full Body Harness just below the Dorsal D-Ring:
;
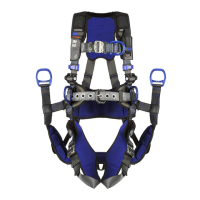
Some Full Body Harnesses are equipped with a Personal SRD Link (PSRL Link) that integrates the Dorsal D-Ring
with attachment elements for Harness Mounted Self-Retracting Devices (Figure 8). It is also acceptable to connect the
SRD to the Harness Dorsal D-Ring with a Carabiner or Snaphook.
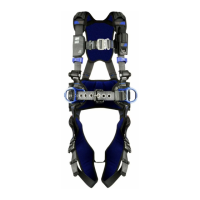
• Single SRD Harness Mounting: Where worker mobility is critical, an SRD Harness Interface can be used to mount the
SRD on the back of a Full Body Harness just below the Dorsal D-Ring (see Figure 9). The worker can then connect to varied
anchorage points located throughout the site with the Lanyard End of the SRD without repeatedly reinstalling the SRD. To
mount the SRD on a Full Body Harness with the SRD Harness Interface:
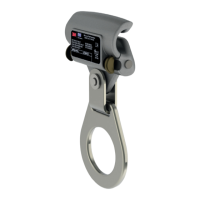
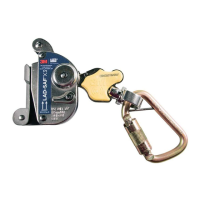
1. Loosen the Harness Webbing: Pull out on the Web Straps (A) where they pass through the bottom of the
Dorsal D-Ring (B) until there is sufcient space to slide the SRD Harness Interface between the Web Straps and
D-Ring Pad.
2. Open the Harness Interface: Push down on the Locking Buttons (C) simultaneously and slide the Locking Pin
(D) out.
3. Position the SRD on the Harness Interface: Insert the open gate on the Harness Interface through the
Swivel Eye on the SRD (E). Thread the Interface through the Swivel Eyes so the SRD hangs from the backbone
of the Harness Interface (F).
4. Position the Harness Interface around the Web Straps: Position the open gate of the Harness Interface
around the loose Web Straps (A).
5. Close the Harness Interface: Push the Harness Interface Locking Pin (D) through the loose Web Straps (A)
until it locks in place in the opposite end of the Harness Interface. Pull the Web Straps back through the Dorsal
D-Ring and Back Pad to secure the Harness Interface.
;
The Red Band on the knob end of the Harness Interface Locking Pin will be exposed if the Harness
Interface is unlocked. To avoid accidental release of the connection, always make sure the Harness Interface
is locked before using the Harness and attached SRD. Failure to do so could result in injury or death.
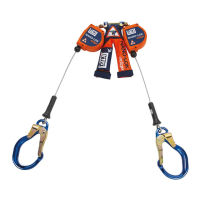
• Twin SRD Harness Mounting: In climbing applications where 100% tie-off is required, the SRD Harness Interface
can be used to mount two SRDs side-by-side on the back of a Full Body Harness just below the Dorsal D-Ring (see
Figure 9) To mount two SRDs on a Full Body Harness with the SRD Harness Interface:
1. Loosen the Harness Webbing: Pull out on the Web Straps (A) where they pass through the bottom of the
Dorsal D-Ring (B) until there is sufcient space to slide the SRD Harness Interface between the Web Straps and
D-Ring Pad.
2. Open the Harness Interface: Push down on the Locking Buttons (C) simultaneously and slide the Locking Pin
(D) out.
3. Position the SRDs on the Harness Interface: Insert the open gate on the Harness Interface through the
Swivel Eye on each SRD (E). Thread the Interface through the Swivel Eyes so the SRDs hang from the backbone
of the Harness Interface (F).
4. Position the Harness Interface around the Web Straps: Position the open gate of the Harness Interface
around the loose Web Straps (A).
5. Close the Harness Interface: Push the Harness Interface Locking Pin (D) through the loose Web Straps (A)
until it locks in place in the opposite end of the Harness Interface. Pull the Web Straps back through the Dorsal
D-Ring and Back Pad to secure the Harness Interface.
;
The Red Band on the knob end of the Harness Interface Locking Pin will be exposed if the Harness
Interface is unlocked. To avoid accidental release of the connection, always make sure the Harness Interface
is locked before using the Harness and attached SRD. Failure to do so could result in injury or death.
 Loading...