3M™ PROTÉGÉ PLUS
PORTABLE MULTI-GAS MONITOR
MAINTENANCE
8006569, Rev. C/June 2018
7-6
9. Verify the device responds to target gas and activates 1 green LED flash every 5 seconds, 1
sounding beep every 5 seconds, and 1 vibration every 5 seconds. Press the right button or wait
60 seconds to go to Exit screen.
10. After an unsuccessful calibration, the monitor will beep and flash and continues to display FAIL.
Verify the device activates 1 red LED flash every 2 seconds, 1 sounding beep every 2 seconds and
1 vibration every 2 seconds.
11. Turn off gas cylinder and remove Calibration Adapter. The device automatically returns to gas
monitoring mode.
7.1.3. BUMP TEST
Perform Bump Test as follows:
1. Refer to Section 7.1.1.1. Connecting the Gas Cylinder to Monitor to install the calibration kit.
2. Apply gas and attach Calibration Adapter to monitor (refer to Figure 7-2: Span Calibration- Cal-
ibration Adapter Attached).
3. With the device powered on, press and hold the Left Button until the release IN 3 SECONDS
screen appears, then BUMP display. Press the left button to confirm bump test.
4. A screen stating SEN 1 appears. Select SEN 1 by pressing left button or press the right button to
scroll down the Sensor Types.
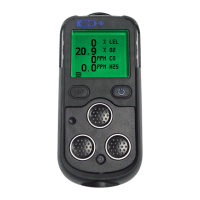
Figure 7-5: Gas Position
5. Verify monitor responds to target gas and wait for the display to read PASS then REMOVE GAS.
NOTE: Span calibration is not required for the O
2
sensor. Different sensor has different span
time, when span all the sensors at the same time, the LCD shows the maximum
duration.
NOTE: SEN 1, 2, 3, 4 represents the sensor types that are shown on the LCD (refer to
Figure 7-5:). SEN 4 represents Bump All Sensors. If selecting EXIT, the device turns
back to the BUMP screen.
CAL
Sensor Type
PPM
PPM
%
PPM
ZERO
Sensor Type
Sensor Type Sensor Type
SEN 1
SEN 3
SEN 2
SEN 4