IM/C50 Rev. C 09/2018
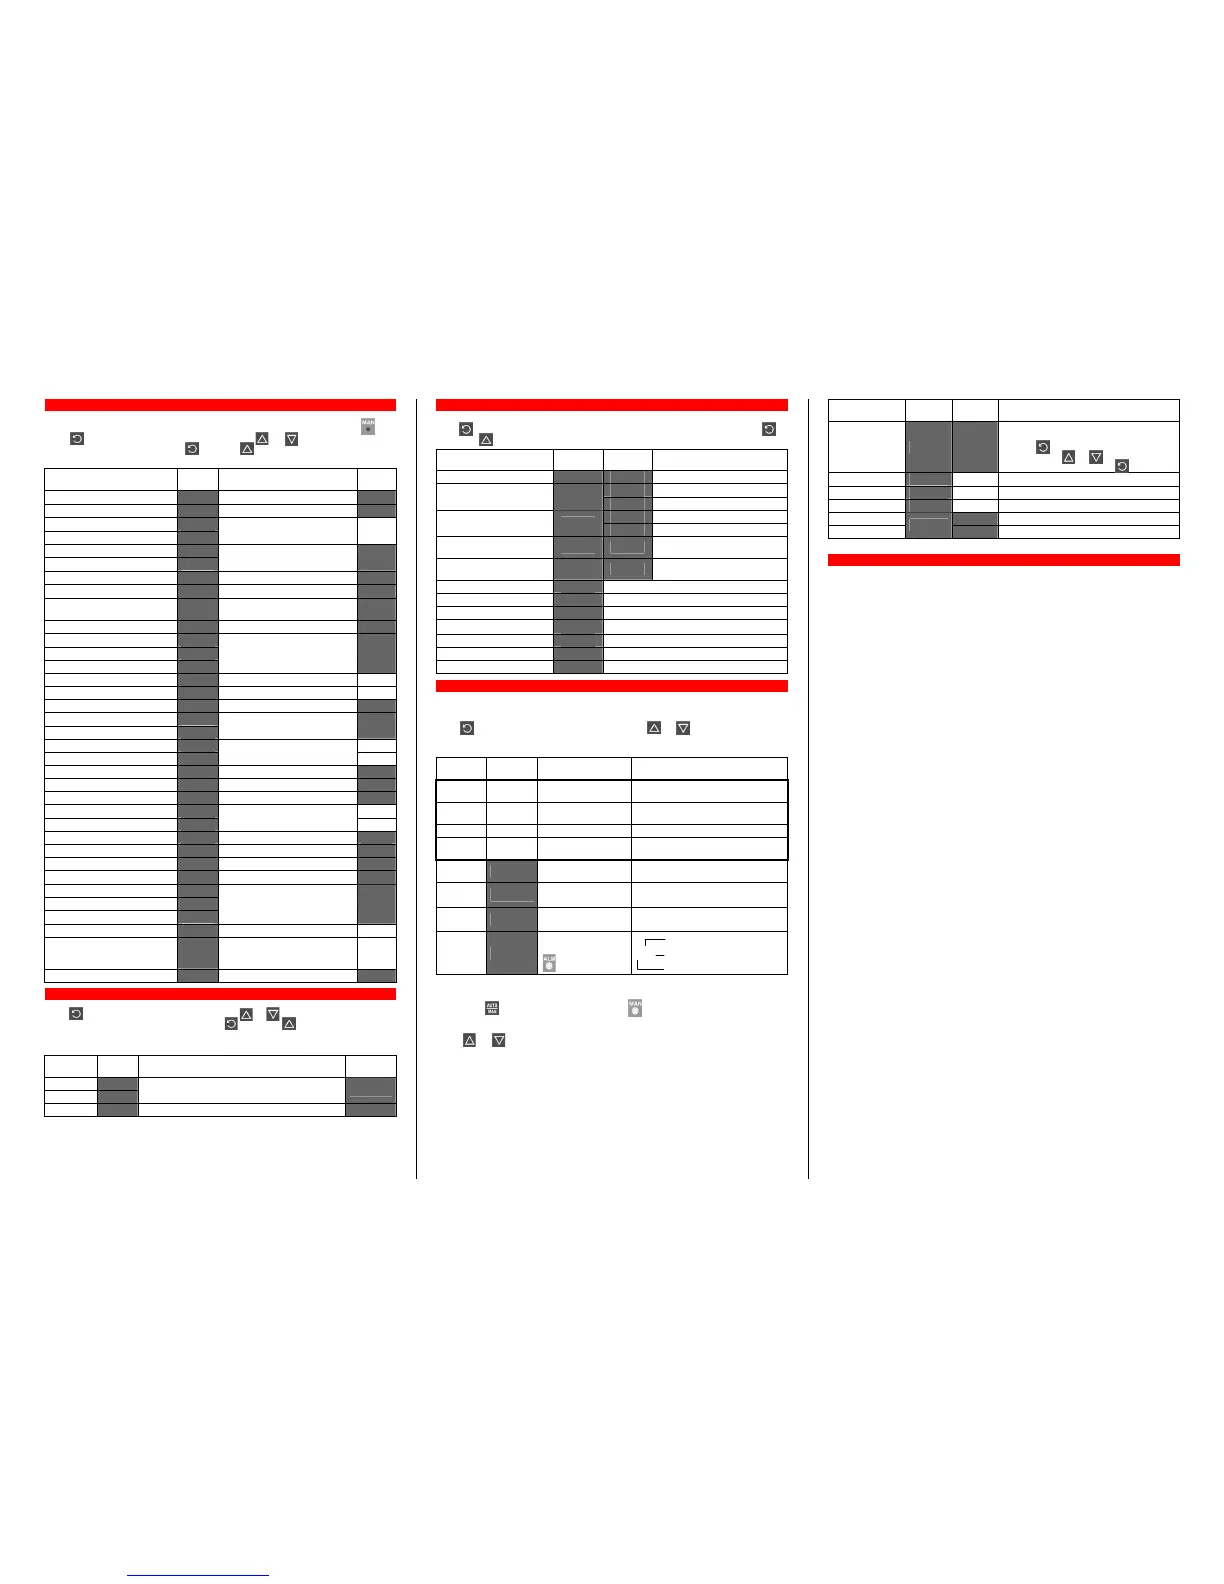
Note: Configuration must be completed before adjusting Setup parameters.
First select Setup mode from Select mode (refer to section 2). While in Setup Mode is lit.
Press to scroll through the parameters, then press or to set the required value.
To exit from Setup mode, hold down and press , to return to Select mode.
Note: Parameters displayed depends on how instrument has been configured.
Parameter Lower
Display
Upper Display
Adjustment Range
Default
Input Filter Time constant
OFF or 0.5 to 100.0 secs
.
Process Variable Offset
+/- Span of controller
Primary (Heat) power
PPWw
PPWwPPWw
PPWw
Secondary (Cool) power
SPWw
SPWwSPWw
SPWw
Current power levels (read only) N/A
Primary Proportional Band
Secondary Proportional Band
0.0% (ON/OFF) and 0.5% to
999.9% of input span.
.
Automatic Reset (Integral Time)
1 sec to 99 mins 59 secs and OFF
Rate (Derivative Time)
00 secs to 99 mins 59 secs
.
Overlap/Deadband
-20 to +20% of Primary and
Secondary Proportional Band
Manual Reset (Bias)
0%(-100% if dual control) to 100%
Primary ON/OFF Differential
Secondary ON/OFF Diff.
Prim. & Sec. ON/OFF Diff.
0.1% to 10.0% of input span
centered about the setpoint
.
Setpoint Upper Limit
Current Setpoint to Range max R/max
Setpoint Lower limit
Range min to Current Setpoint R/min
Primary Output Power Limit
0% to 100% of full power.
Output 1 Cycle Time
Output 2 Cycle Time
0.5, 1, 2, 4, 8, 16, 32, 64, 128,
256 or 512 seconds
High Alarm 1 value
R/max
Low Alarm 1 value
Range Min. to Range Max.
R/min
Deviation Alarm 1 Value
+/- Span from SP in display units
Band Alarm 1 value
1 LSD to span from setpoint
Alarm 1 Hysteresis
1 LSD to full span in display units
High Alarm 2 value
R/max
Low Alarm 2 value
Range Min. to Range Max.
R/min
Deviation Alarm 2 Value
+/- Span from SP in display units
Band Alarm 2 value
1 LSD to span from setpoint
Alarm 2 Hysteresis
1 LSD to full span in display units
Loop Alarm Time
1 sec to 99 mins. 59secs.
.
Auto Pre-tune
Auto/manual Control selection
Setpoint ramping
disabled or
enabled
SP Ramp Rate Value
rP
rPrP
rP
1 to 9999 units/hour or Off (blank) Off
Setpoint Value
SP
SPSP
SP
Scale range upper to lower limits Scale
Range
min
Setup Lock Code
0 to 9999
First select Automatic tuning mode from Select mode (refer to section 2).
Press to scroll through the modes, then press or to set the required value.
To exit from Automatic tuning mode, hold down and press , to return to Select mode.
Pre-tune is a single-shot routine and is thus self-disengaging when complete.
If
in Setup mode =
, Pre-tune will attempt to run at every power up*.
Parameter Lower
Display
Upper Display
Adjustment Range
Default
Pre-Tune
Self-Tune
On
OnOn
On or Off
OffOff
Off. Indication remains OFF
OFFOFF
OFF if automatic
tuning cannot be used at this time*.
Off
OffOff
Off
Tune Lock
0 to 9999
* Note: Automatic tuning will not engage if either proportional band = 0. Also, Pre-tune
will not engage if setpoint is ramping, or the PV is within 5% of span of the setpoint.
First select Product information mode from Select mode (refer to section 2).
Press to view each parameter. To exit from Product Information mode, hold down
and press to return to Select mode. Note: These parameters are all read only.
Parameter Lower
Display
Upper
Display
Description
Input type
Universal input only
No option fitted. Option 1 module type
fitted
Relay
No option fitted. Option 2 module type
fitted
Relay
Option 3
Option 3 not available on this
product
Option A
Option A not available on this
product
Firmware type
Value displayed is firmware type number
Firmware issue
Value displayed is firmware issue number
Product Revision Level
Value displayed is Product Revision level.
Date of manufacture
Mm
MmMm
Mm
Manufacturing date code (mmyy)
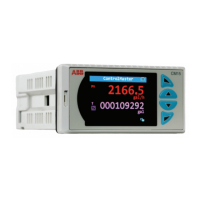
Serial number 1
First four digits of serial number
Serial number 2
Middle four digits of serial number
Serial number 3
Last four digits of serial number
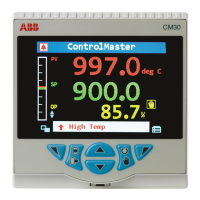
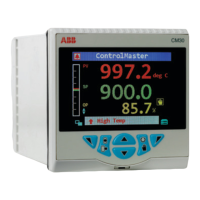
This mode is entered at power on. It can also be accessed from Select mode (see section 2).
Note: All configuration mode and Setup mode parameters must be set as required
before starting normal operations.
Press to scroll through the parameters, then press or to set the required value.
Note: All parameters in Display strategy 6 are read only, and can only be adjusted via
Setup mode.
Upper
Display
Lower
Display
Display Strategy
When Visible
Description
PV Value Active SP
Value
1 & 2 (initial screen) PV and target value of selected SP
SP adjustable in Strategy 2
PV Value Actual SP
Value
3 & 6 (initial screen) PV and actual value of selected SP
(e.g. ramping SP value). Read only
PV Value (Blank) 4 (initial screen) Process variable only. Read only
Active SP
Value
(Blank) 5 (initial screen) Target value of selected setpoint only.
SP Value
SP
SPSP
SP
1, 3, 4, 5 & 6 Target value of SP
Adjustable except in Strategy 6
Actual SP
Value
SPrP
SPrPSPrP
SPrP
enabled and rP
rPrP
rP
is not zero
Actual (ramping) value of selected SP
Ramp
Rate
rP
rPrP
rP
enabled in Setup
mode
SP ramping rate, in units per hour.
Adjustable except in Strategy 6
Active
Alarms
AL
ALAL
AL
t
tt
t
When one or more
alarms are active.
ALM indicator
will also flash
L Alarm 2 active
L21
L21L21
L21 Alarm 1 active
L Loop Alarm active
Manual Control
If
is set to
in Setup mode, manual control can be selected/de-selected by
pressing the key while in Operator mode. The indicator will flash while in the
instrument is in Manual Control mode and the lower display will show
xxx (where xxx is the
current manual power level). Switching to/from manual mode is via Bumpless Transfer.
Press or to set the required output power. Caution: Not restricted by
limit.
Parameter Upper
Display
Lower
Display
Description
Instrument
parameters are in
default conditions
Configuration & Setup required. Seen at first
turn on or if hardware configuration changed.
Press to enter the Configuration Mode,
next press or to enter the unlock
code number, then press to proceed.
Over Range
Normal Input > 5% over-range
Under Range
Normal Input > 5% under-range
Sensor Break
Normal Break in input sensor or wiring
Option 1 Error
Option 1 module fault
Option 2 Error
Option 2 module fault
UNIVERSAL INPUT
Impedance: >10MΩ resistive, except DC mA (5Ω) and V (47kΩ ).
Isolation: Isolated from relay outputs and power supply at 240VAC.
OUTPUTS
Relay
Contact Type/Rating: Single pole double throw (SPDT); 2A resistive at 120/240VAC.
Lifetime: >500,000 operations at rated voltage/current.
Isolation: Isolated from input, other relay outputs and power supply at 240VAC.
OPERATING CONDITIONS FOR INDOOR USE
Ambient Temperature: 0°C to 55°C (Operating)
Ambient Temperature: –20°C to 80°C (Storage)
Relative Humidity: 20% - 95% non-condensing
Supply Voltage: 100 - 240VAC 50/60Hz 7.5VA for mains powered versions.
ENVIRONMENTAL
Standards: CE, UL, ULC
EMI: Complies with EN61326 (Susceptibility & Emissions)
Safety Considerations: Complies with EN61010-1 & UL3121
Pollution Degree 2, Installation Category II
Front Panel Sealing: To IP66
PHYSICAL
Dimensions Depth: 110mm (behind panel)
Front panel height: 48mm
Front panel width: 48mm
Weight: 0.21kg maximum
 Loading...