(2 • SETUP
)
Battery Choice & Temperature Range
Extended periods of cold temperatures I below -4°F / -20°C I can cause alkaline
batteries to function improperly. This will cause the outdoor wireless sensor to
stop transmitting temperature readings. Use lithium batteries in these low
temperature conditions to ensure continued operation for wireless sensors placed
outdoors. NOTE: Rechargeable batteries are not recommended due to higher
operating voltages.
LITHIUM ttf,i:)LW,.
BA TT ERIES
■
■
iil-liil
-M-
_._M-lliil
ALKALINE
BATTERIES
PLEASE DISPOSE OF OLD OR DEFECTIVE BATTERIES IN AN ENVIRONMENTALLY
SAFE WAY AND IN ACCORDANCE WITH YOUR LOCAL LAWS AND REGULATIONS.
BATTERYSAFETY:Follow diagram Promptlyremovedead batteries the polarity(+/·) in the battery compartment. from the device.
Disposeof used batteries Only batteries or equivalent are to be used. incinerateusedproperly. of the same type as recommended DO NOT
batteries.DO NOT disposeof batteries in fire, as batteries may explode or leak. DO NOT mix old and new batteriesor types of batteries
(alkaline/standard).DO NOT use rechargeable DO NOT non-rechargeable DO NOT the supply terminals.batteries. recharge batteries. short-circuit
A/B/C Wireless Identity Selection
To allow for more than one main unit and wireless sensor network to be
used in close proximity, the main unit and the wireless sensor have a
small switch labeled "A B C" within the battery compartments. This
switch selects one of 3 wireless identities to use, and both switches
MUST be set in matching positions (either A, B, or C) for wireless
communication to take place successfully.
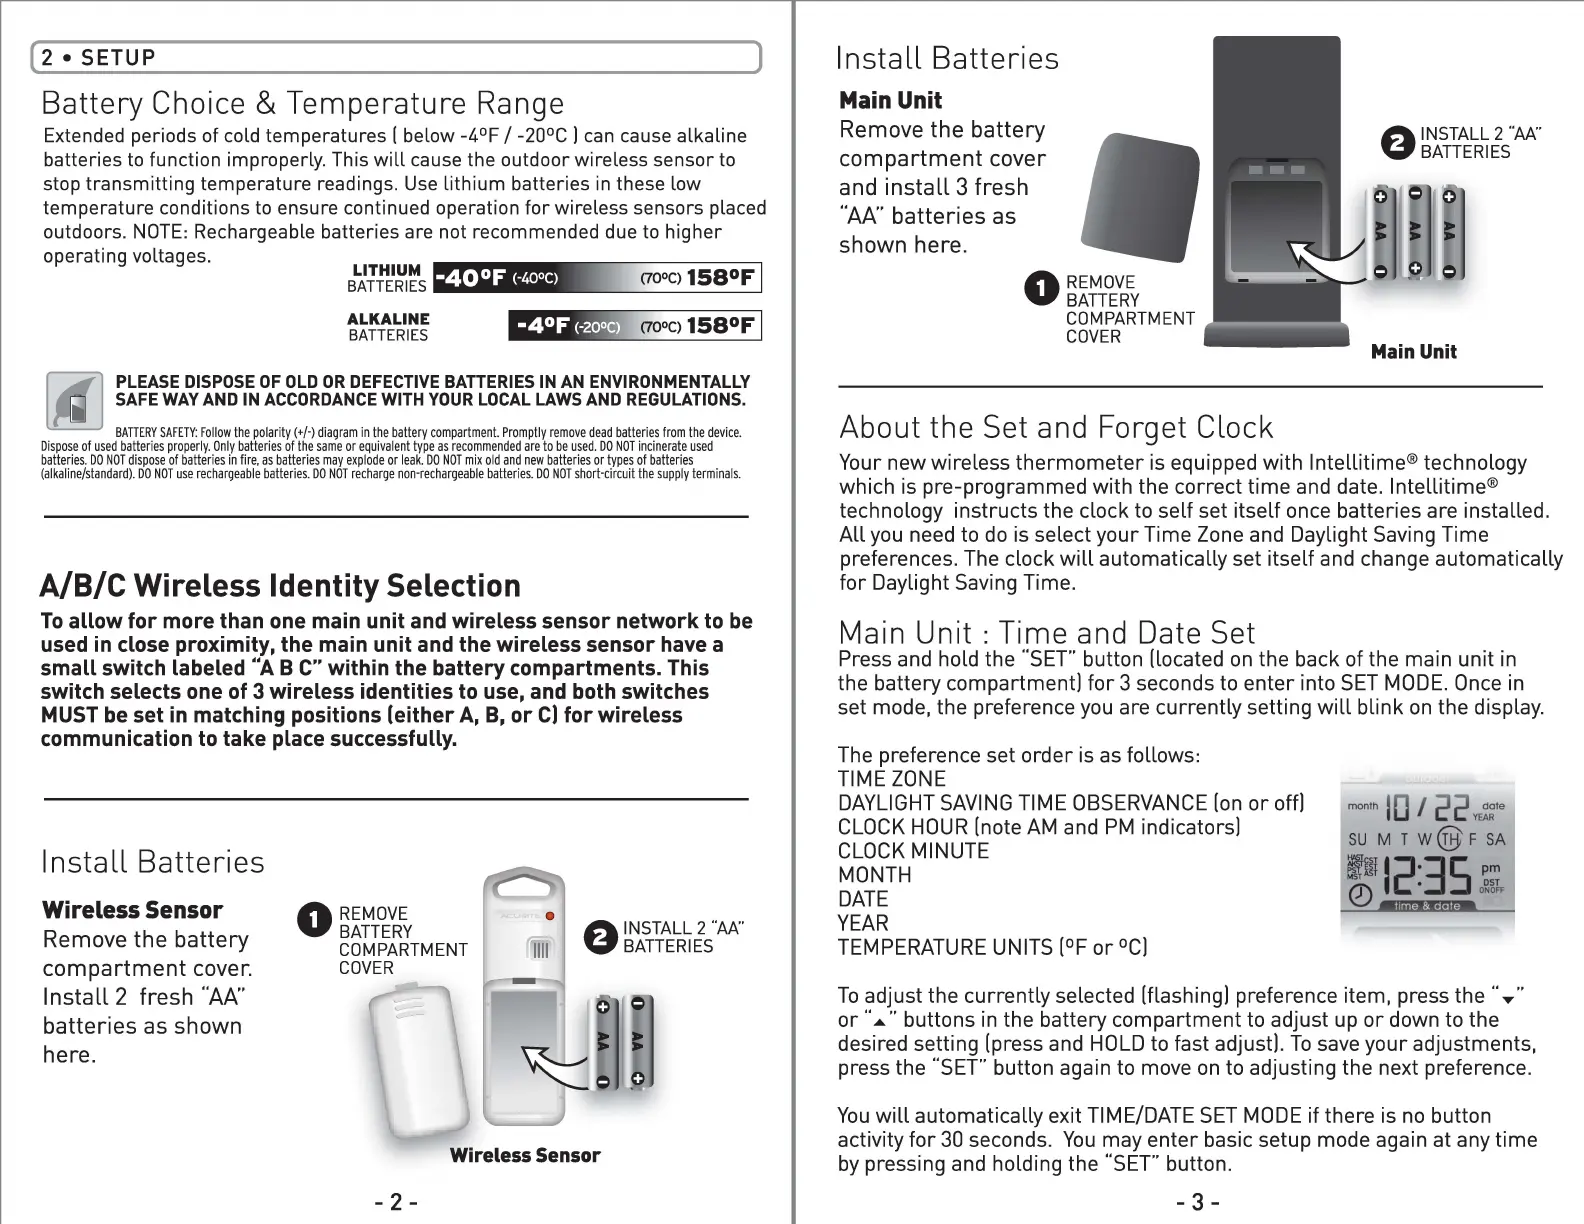
Install Batteries
Wireless Sensor
0
REMOVE
8
INSTALL 2 ··w,.:·
BATTERY
Remove the battery
BATTERIES
COMPARTMENT
compartment cover.
COVER
Install 2 fresh "AA"
batteries as shown
here.
Wireless Sensor
- 2 -
Install Batteries
Main Unit
Remove the battery
8
INSTALL 2 "AA•·
BATTERIES
compartment cover
and install 3 fresh
"AA" batteries as
shown here.
0
REMOVE
BATTERY
COMPARTMENT
COVER
Main Unit
About the Set and Forget Clock
Your new wireless thermometer is equipped with lntellitime® technology
which is pre-programmed with the correct time and date. lntellitime®
technology instructs the clock to self set itself once batteries are installed.
All you need to do is select your Time Zone and Daylight Saving Time
preferences. The clock will automatically set itself and change automatically
for Daylight Saving Time.
Main Unit : Time and Date Set
Press and hold the "SET" button (located on the back of the main unit in
the battery compartment) for 3 seconds to enter into SET MODE. Once in
set mode, the preference you are currently setting will blink on the display.
The preference set order is as follows:
TIME ZONE
DAYLIGHT SAVING TIME OBSERVANCE (on or off)
month dateI /
YEAR
CLOCK HOUR (note AM and PM indicators)
SU MT w@F SA
CLOCK MINUTE
MONTH
~I~:~-~~;.
DATE
YEAR
TEMPERATURE UNITS (°For °CJ
To adjust the currently selected (flashing! preference item, press the " .....
or ........buttons in the battery compartment to adjust up or down to the
desired setting (press and HOLD to fast adjust!. To save your adjustments,
press the "SET" button again to move on to adjusting the next preference.
You will automatically exit TIME/DATE SET MODE if there is no button
activity for 30 seconds. You may enter basic setup mode again at any time
by pressing and holding the "SET" button.
-3-
 Loading...