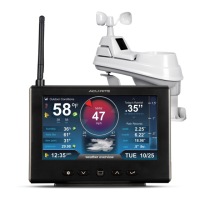
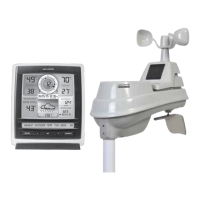
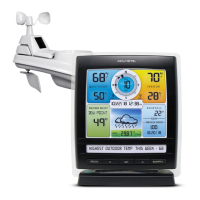
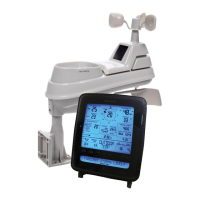
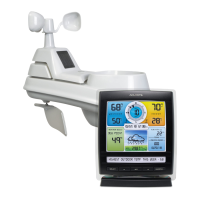
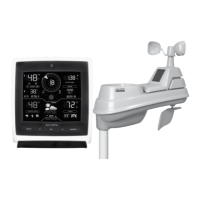
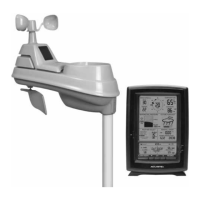
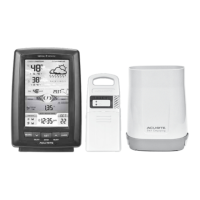
The AcuRite High Resolution Weather Station, model 01535, is a comprehensive weather monitoring system designed to provide accurate, real-time weather information and forecasts. It consists of two main components: a 5-in-1 outdoor sensor and an indoor display unit with a Weather Overview Dashboard. The system is engineered to offer personalized weather data, helping users plan their day with confidence.
Function Description
The core function of the AcuRite Weather Station is to measure and display various environmental conditions. The 5-in-1 sensor, designed for outdoor placement, continuously monitors temperature, humidity, wind speed, wind direction, and rainfall. This data is wirelessly transmitted to the indoor display unit, which then processes and presents the information in an easy-to-understand format.
One of the key features is its patented Self-Calibrating Forecasting. This technology pulls data from the 5-in-1 sensor to generate a personalized 12 to 24-hour weather forecast with pinpoint accuracy for the user's exact location. The system enters a "Learning Mode" for 14 days, during which it analyzes changes in pressure over time to determine the altitude, fine-tuning the self-calibrated pressure for superior weather prediction.
The display unit also provides a range of indoor environmental data, including current indoor temperature and humidity, along with daily high and low records for both. It features a "Humidity Level Indicator" to show whether indoor humidity is high, low, or ideal for comfort.
Beyond current conditions, the weather station offers historical data and records. Users can view rainfall history for the current week, month, and year, as well as daily high and low temperature and humidity records since midnight. The display also tracks peak wind speed from the last 60 minutes and average wind speed over the past 2 minutes, along with current and previous wind directions.
An alarm system is integrated, allowing users to set audible alerts for various conditions, including temperature, humidity, wind speed, and rainfall, when they exceed preset values. It also includes an alarm clock feature and a storm alarm, which activates when barometric pressure drops significantly.
The system is expandable, with the option to connect a compatible AcuRite Lightning Sensor (sold separately) to include lightning detection in the weather monitoring capabilities.
Usage Features
The AcuRite Weather Station is designed for user-friendly operation with a clear, high-resolution display and intuitive navigation.
Display Unit:
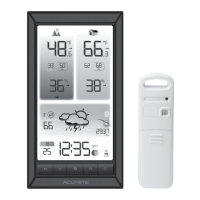
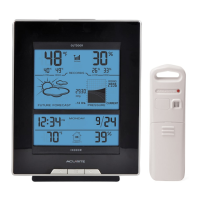
The display unit features a Weather Overview Dashboard that presents a wealth of information at a glance. This includes:
- Outdoor Conditions: Current outdoor temperature, humidity, wind speed, wind direction, and rainfall. It also shows "feels like" temperature, dew point, and barometric pressure with trending arrows.
- Indoor Conditions: Current indoor temperature and humidity, along with a humidity level indicator.
- Rainfall Data: Today's rainfall indicator, showing collection up to 2 inches, and rainfall rate/most recent rainfall.
- Wind Data: Current wind speed with a background color that changes based on speed, current and previous wind directions, peak wind speed, and average wind speed.
- Forecast: A 12 to 24-hour weather forecast icon.
- Time & Date: Clock and date with day of the week.
- Moon Phase: Displays moon phases between 7:00 p.m. and 5:59 a.m. when conditions allow for visibility.
- Messages: The display shows real-time weather information and alert messages, such as "HEAT INDEX - XX," "5-IN-1 SENSOR BATTERIES LOW," or "CAUTION – WIND CHILL IS XXX." Users can manually cycle through these messages.
- Sensor Signal Strength: An indicator for the 5-in-1 sensor's wireless signal.
- Sensor Low Battery Indicator: Alerts when the 5-in-1 sensor batteries are low.
- Alarm ON Indicator: Shows when an alarm is activated.
Setup and Navigation:
Upon initial power-on, the display automatically enters setup mode, guiding the user through setting preferences such as time zone, DST, clock, calendar, pressure units, temperature units, wind speed units, rainfall units, distance units, auto dim, auto cycle, and alert volume. Navigation is done using "∧" and "∨" buttons to adjust items and a "✓" button to confirm and move to the next preference.
The main menu, accessible via the "⚙" button, provides access to several sub-menus:
- Records: View high and low values recorded for each location by date and trends on a graphic chart.
- Alarms: Set and edit alarm values for various conditions and manage the alarm clock and storm alarm.
- Setup: Re-enter the initial setup process.
- Display: Adjust display settings like brightness, contrast, tint, display mode (screen cycle), and backlight (auto dim, sleep mode). "Auto Dim Mode" automatically adjusts brightness based on the time of day, while "Sleep Mode" dims the display during chosen timeframes, showing only essential readings.
- Sensor: Add, remove, or view information about connected sensors.
- Units: Change measurement units for barometric pressure, temperature, wind speed, rainfall, and distance.
- Calibrate: Adjust display or sensor data for specific readings, ensuring accuracy.
- Factory Reset: Revert the display to factory defaults.
5-in-1 Sensor Installation:
The 5-in-1 sensor requires 4 AA batteries (lithium batteries are recommended for temperatures below -4°F / -20°C). A rain gauge stabilizer (plastic tab) must be removed from the bottom of the sensor before use. The sensor should be mounted at a minimum height of 5 feet (1.5 meters) in an open area, with the solar cell facing SOUTH to ensure optimal sun exposure and correct wind direction orientation. The included mounting bracket allows for attachment to wooden posts or 3/4" steel pipe. A bubble level on the sensor helps ensure it is perfectly level for accurate rainfall measurements.
Placement Guidelines:
Both the display and sensor require careful placement for maximum accuracy and wireless communication.
- Display: Place in a dry area, free of dirt and dust. It can be tabletop or wall-mounted.
- Sensor: Choose an open outdoor location without obstructions above or around it.
- Wireless Range: Maintain a distance within 330 feet (100 meters) between units, away from large metallic items or thick walls that may limit signals.
- Wireless Interference: Keep units at least 3 feet (.9 meters) away from electronic devices like TVs, computers, or microwaves.
- Heat/Humidity Sources: Position the sensor away from heaters, air conditioners, chimneys, asphalt, concrete, pools, spas, or other water bodies to avoid skewed readings.
- Sprinkler Heads: Do not install the sensor where it will be sprayed by sprinklers to prevent water ingress.
- Wind & Rain Obstructions: Avoid mounting the sensor with obstructions around it to ensure accurate wind and rain measurements.
Maintenance Features
Regular care and maintenance are essential to ensure the longevity and accuracy of the AcuRite Weather Station.
Display Care:
The display unit should be cleaned with a soft, damp cloth. Avoid caustic cleaners or abrasives, which can damage the screen. Keep the display free of dust, dirt, and moisture. Regularly clean the ventilation ports with a gentle puff of air to prevent dust buildup.
5-in-1 Sensor Care:
- General Cleaning: Clean the sensor with a soft, damp cloth. Do not use caustic cleaners or abrasives, as these can mar the polished surfaces of the rain collection funnel or the solar cell, leading to decreased performance and reliability.
- Insect Prevention: Insects nesting in or on the sensor can obstruct components and interrupt data. To mitigate this, periodically spray the sensor with a household insect repellent, following the repellent's instructions.
- Snow & Freezing Weather: The sensor is designed to withstand freezing conditions. However, if the rain collector cup fills with snow and then melts, it will register as rainfall on the display.
- Clean the Rain Collector Cup: The rain collector funnel contains a debris filter. This filter should be removed by gently squeezing and pulling it out from the top, then emptied and cleaned to prevent blockages.
- Clean the Wind Vane & Anemometer: Remove any foreign matter from the outside of the wind vane and anemometer to ensure free movement. If needed, a small amount of spray lubricant, clear silicone, or graphite powder can be applied to the anemometer for improved movement.
Calibrate the Rain Gauge:
The rain gauge on the 5-in-1 sensor can be calibrated for improved accuracy. This process requires the 5-in-1 sensor, display, a plastic cup, a pin, and a screwdriver.
- Ensure the 5-in-1 sensor is perfectly level using its built-in bubble level.
- Place the display close to the sensor to monitor readings during calibration.
- Make a pinhole in the bottom of a plastic cup. Hold the cup over the rain gauge and fill it with exactly 1 cup (8 oz) of water, allowing it to drip into the rain gauge. Users should hear the internal buckets tip and see water drain.
- After each bucket tip, the display should show rainfall in approximately 0.01" (.25 mm) increments.
- The cup of water should take more than 20 minutes to empty for accurate calibration. A quicker period will result in inaccurate readings. When the cup is empty, the display should register 1.06" (27 mm).
- Tips for Calibration: There should be approximately 25 water drops between bucket tips. If not, adjust the calibration screws on the bottom of the sensor until an equal number of drops cause the buckets to tip.
- Adjustment: If the rain gauge does not register close to 1.06" (27 mm), make an EQUAL adjustment to the two calibration screws on the bottom of the 5-in-1 sensor. Turning screws clockwise increases rainfall, while turning them counter-clockwise decreases rainfall. For example, turning both screws 1/8 of a turn adjusts rainfall by 2%, 1/4 of a turn by 4%, and 1/2 of a turn by 8%.