- 6 -
www.advateklights.com PixLite 16 Mk2 User Manual V210222
4 - Installation
4.1 - Supplying Power
The PixLite 16 Mk2 has two split power banks, each with 8 individual outputs. The split
banks allow two different voltages to be used on the controller simultaneously. (You
could run 5V lights off Bank 1 and 12V lights off Bank 2 for example.
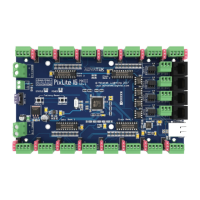
Power to the controller and outputs is applied via the power bank screw terminal
connectors, located on the left-hand edge of the board, as shown in Figure 1 below.
They are both clearly marked on the PCB with the polarity and the power bank
number.
Outputs on channels 1-8 are powered via power bank 1 and outputs on channels 9-16
are powered via power bank 2. The voltage on each bank can be anywhere between
5V and 24V DC independently.
Note: It is the user’s responsibility to ensure that the power supply used matches the
voltage of the pixel fixture they are using and that it can supply the correct amount of
power/current.
The total maximum current per power bank is 32 Amps, giving the board a total
maximum current capacity of 64 Amps.
 Loading...