Do you have a question about the AFL Noyes CSS1 Series and is the answer not in the manual?
Crucial warnings and precautions for safe operation of the equipment.
Overview of the User's Guide purpose and scope.
Details on how to reach NOYES for support and inquiries.
Instructions for checking the equipment upon arrival.
List of necessary accessories for optimal use.
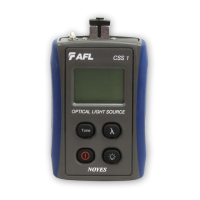
Detailed description of the CSS1 light source front panel features and controls.
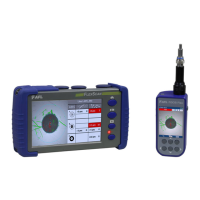
Detailed description of the CSM1 optical power meter front panel features and controls.
Explanation of the information displayed on the device screens.
Procedure for measuring optical power using the CSM1 meter.
Comprehensive guide for testing fiber optic links.
Procedure to establish a reference for fiber link testing.
Method to check the performance of test jumpers for accuracy.
Process to measure the insertion loss of a fiber optic link.
Instructions for replacing the batteries in the devices.
General guidelines for maintaining clean optical ports for accurate measurements.
Step-by-step guide for cleaning the optical port of the CSM1 meter.
Step-by-step guide for cleaning the optical port of the CSS1 light source.
Contact and location details for USA-based repair and calibration services.
Contact and location details for Europe-based repair and calibration services.
This document is a user's guide for the AFL NOYES CSS1 Contractor Series Light Sources and CSM1 Contractor Series Optical Power Meters, designed for test and inspection in fiber optic systems.
The CSS1 Contractor Series Light Sources are devices that emit continuous wave (CW) or modulated light at specific tone frequencies (270, 330, 1000, 2000 Hz). They are used to provide a stable optical signal for testing fiber optic links. The CSS1-MM models are Class 1 LED products, while CSS1-SM models are Class 1 Laser products.
The CSM1 Contractor Series Optical Power Meters are used to measure optical power in dBm or µW, or insertion loss in dB. They can detect enabled wavelengths and tone frequencies. These meters are essential for verifying the performance of fiber optic links and components.
Together, the CSS1 light sources and CSM1 power meters are used for measuring optical power and testing fiber links, including setting reference levels and measuring insertion loss.
CSS1 Light Sources:
CSM1 Optical Power Meters:
CSS1 Light Sources:
CSM1 Optical Power Meters:
Applications:
| Brand | AFL |
|---|---|
| Model | Noyes CSS1 Series |
| Category | Measuring Instruments |
| Language | English |