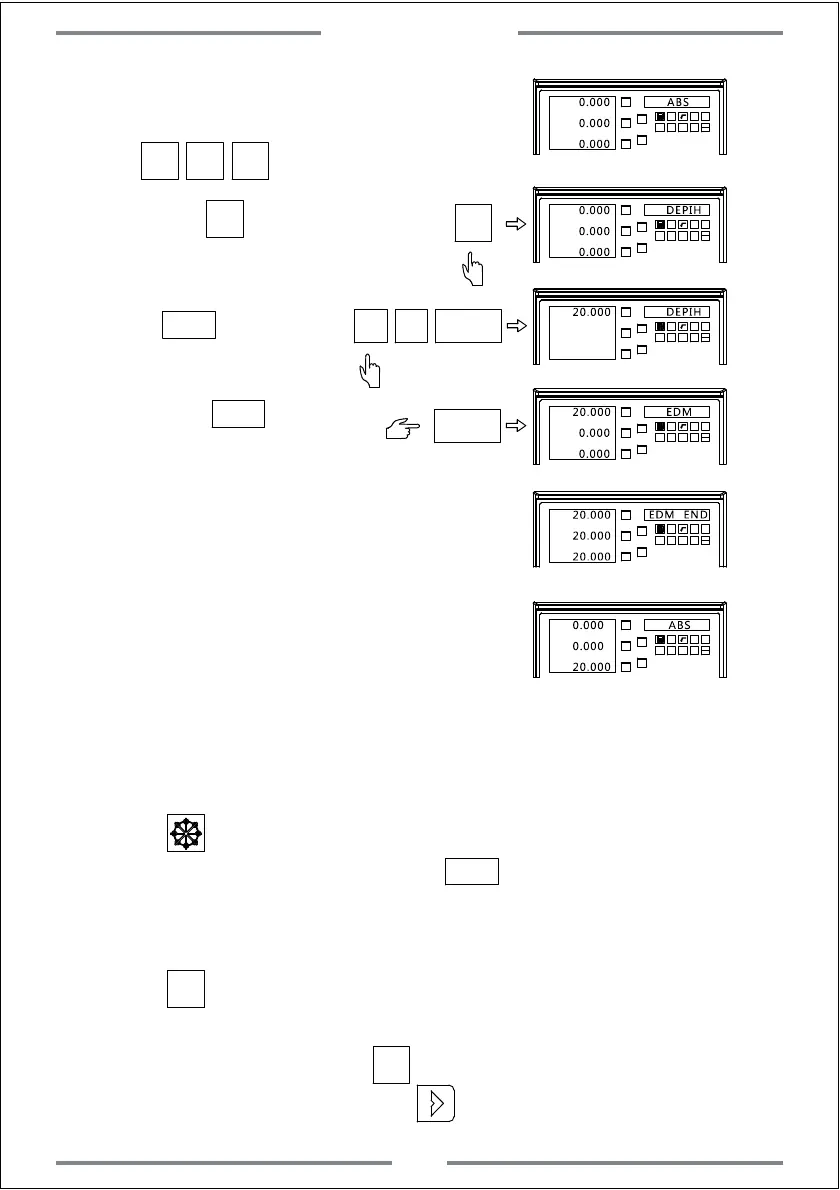
Step 1: Move the electrode to make it contact
with the work-piece
X0 Y0 Z0
Step 2: Press to enter the setting
Step 3: Input the target machining height,
press to confirm.
Step 4: Press again to
start machining.
X0
Y0
X
1 32
-
+
CLS
Arc
sin
TOOL
Z0
Y
0.000 ABS
0.000
0.000
X0
Y0
X
1 32
-
+
CLS Arc
sin
TOOL
Z0
Y
0.000
DEPIH
0.000
0.000
X0
Y0
X
1 32
-
+
CLS Arc
sin
TOOL
Z0
Y
20.000
DEPIH
0
ENT
2
X0
Y0
X
1 32
-
+
CLS Arc
sin
TOOL
Z0
Y
20.000 EDM
ENT
0.000
0.000
ENT
ENT
Step 5: When the value on Z axis is equal to
the preset height.The machining will
stop.The right window will display EDM
END for about 3 seconds.Then the DRO
will exit this function and back to
normal status.
X0
Y0
X
1 32
-
+
CLS Arc
sin
TOOL
Z0
Y
20.000
EDM END
20.000
20.000
X0
Y0
X
1 32
-
+
CLS Arc
sin
TOOL
Z0
Y
0.000 ABS
0.000
20.000
5. Combination using of PCD and EDM function.
When using the PCD function,we could also use the EDM function to
complete the EDM machining for PCD.Detail operations are shown as below:
(1) Press to enter the parameter setting of PCD.(refer the instruction of
PCD setting) After setting well,press to start machining.And the
first position of hole will be displayed.Move the table until the value of
axis become 0 to make the electrode align the first machining hole.
(2) Press to enter EDM parameter setting(refer the instruction of
EDM setting).Input the target height and start machining.Once
machining completed,press to get exit EDM function and get
back to PCD function.Then press to the next hole.
ENT
Press to zero(Figure B)
Special Function
42
SIFT
SIFT
SIFT
SIFT