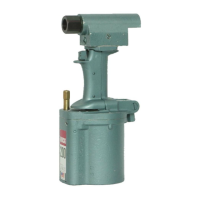
200 Series Tooling Alcoa Fastening Systems
17
A
A
IR
IR
L
L
EAKAGE
EAKAGE
C
C
AUSE
AUSE
AND
AND
R
R
EMEDY
EMEDY
A. Trigger linkage not properly adjusted. With air on
tool and trigger in idle position, it should have
some free motion before actuating air valves. With
trigger in depressed position, trigger (3-31), lever
(3-29) and cross bar (3-28) should not bottom on
handle casting or hand grip (3-32). If either of
these conditions occurs, replace worn, bent, or
broken parts.
B. Brass air valve seat (3-24) leaking. Lap or reseal
with an 11/32 inch ball. Replace seat if leakage still
occurs.
C. Right rear insert (3-2) leaking. Replace spring (3-
19), if broken. Reseat insert with ball (3-18) by tap-
ping against insert. Replace if leakage still occurs.
D. Left insert (3-2) leaking. Reseat ball against insert.
Replace insert if leakage still occurs.
E. Right front insert (3-2) leaking. (See D above.)
F. Slight leakage at this point is permissible.
G. If leakage is excessive, check intensifier gland O-
ring (3-47). (First remove handle assembly from
cylinder assembly.) It is recommended that H and I
also be performed at this time.
H. Remove intensifier gland (3-35) and check O-rings.
Replace if damaged.
I. Remove intensifier gland from piston rod (3- 34).
(First remove small hydraulic piston (3-40) by
removing screw (3-43) and slipping piston from
rod.)
J. If leakage occurs at small hole in acorn nut (3-12)
on swivel fitting, reduce air supply. (90-100 psi air
pressure recommended.) If leak stops but air pres-
sure is then too low, add shims (3-9) as required to
obtain seal at proper pressure. If leakage still
occurs, replace valve (3-8).
K. If leakage occurs at a point other than the hole in
the acorn nut, disassemble nut and swivel bolt
from assembly. Replace O-ring (3-11), quad rings
(3-6) and flat gasket (3-7) as required.
L. Socket head screws loose. Tighten.
M. O-ring seals between faces leaking. Replace.
N. Insufficient bIeeding can appear as a leak into the
hydraulic system. Rebleed.
O. Head assembly to handle assembly and/or handle
assembly to cylinder assembly screws loosened.
Tighten screws.
P. Improper hydraulic fluid. Poor substitutes can dam-
age O-rings and seals, and cause foaming. See
instructions for proper fluid and procedure.
Q. Rubber reservoir diaphragm (4-4) leaking. Replace
as required.
R. Sheared or worn O-rings or seals in oil-to-air joints.
Replace as required .
S. Leakage in weldment or handle subassembly (3-1)
or at plugs in Cylinder Subassembly 100875.
CAUTION: Exercise care to prevent scor-
ing Rod. Slip off Gland and replace lower
internal QUAD Ring.