BEFORE USING THE COOKER/CANNER FOR THE FIRST TIME
1. Read all important safeguards located on the inside of the front cover.
2. Hand wash the cover and bottom with hot, soapy water to remove any manufacturing oils. Do not
submerge the dial gauge in water. Rinse all parts with warm water and dry. Note: Do not put pressure
cooker canner in dishwasher.
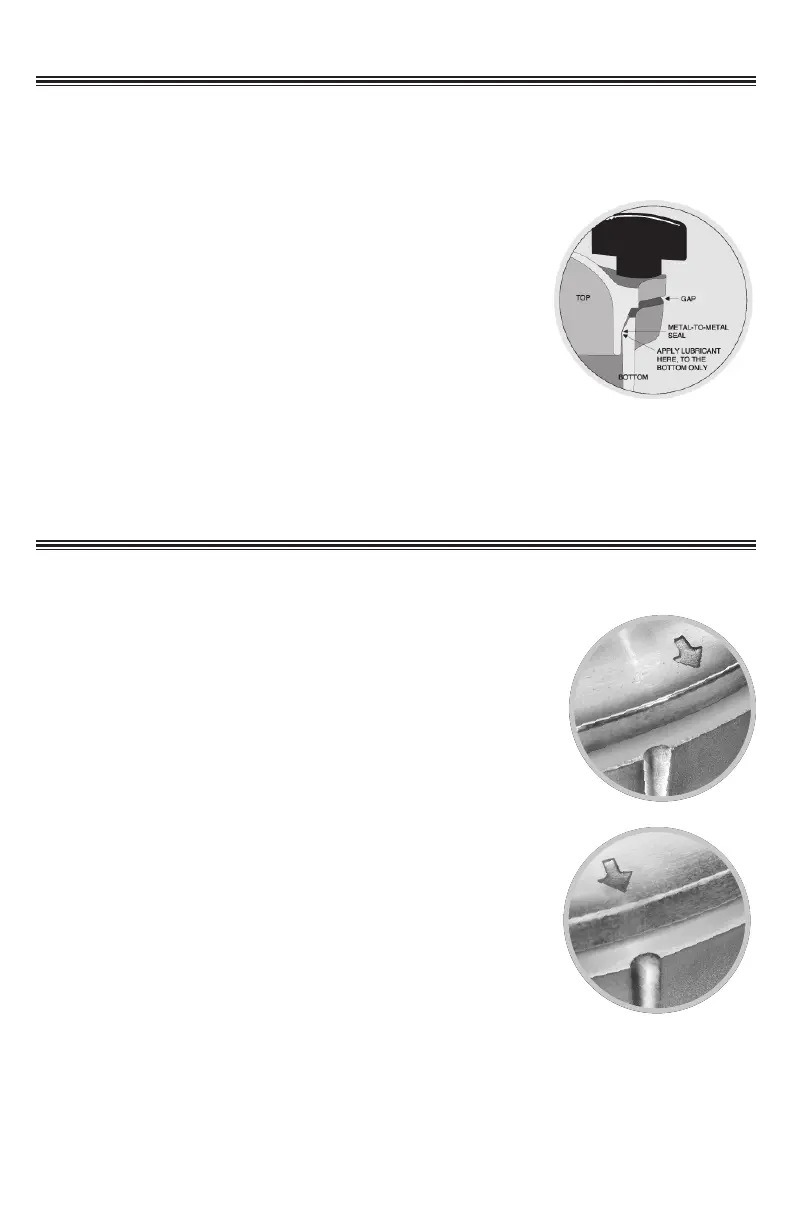
3. Apply a thin film of olive oil (preferred) or petroleum jelly onto the beveled
edge of the bottom where the cover touches. (See Diagram A) Use just
enough to wet the edge. (also see page 10, Metal-to-Metal Seal)
4. To help understand the operation of the pressure cooker/canner, do a trial
run by pouring 2-3” of water into the cooker/canner after you have
lubricated the sealing surface, and follow the step-by-step instructions
on page 20, starting with step 5. This will help familiarize you with the
metal-to-metal seal, tightening the cover down using the wing nuts, and
the proper jiggling of the pressure regulator weight. For actual usage of the
canner, follow the complete instructions beginning on page 20 for pressure
canning and on page 45 for pressure cooking.
5. Go to www.aa-cd.co and click “VIDEO” for a demonstration video of how to use your cooker/canner. Also,
see page 5 for DVD’s.
PUTTING THE COVER ON
The cover of your pressure cooker/canner is designed to seal tightly without the use of a rubber gasket. The
metal surfaces where the cover and cooker meet are beveled to produce the exclusive metal-to-metal seal.
As a result, the cover will wobble slightly when placed on the bottom before the wing
nuts are fully fastened. When the cover is properly seated, there is a small even
gap all the way around between the cover and the bottom. To secure the cover,
read the following:
1. Using the cover handle, set cover on top of cooker/canner bottom so the
arrow on the cover is a little to the right of the notch mark on the bottom.
(See Diagram B)
2. Using the handle, turn the cover clockwise to line up the arrow on the cover with
the notch mark on the cooker/canner bottom. This will engage the bayonet clamps
under the lugs. (See Diagram C)
3. Grasp two opposite wing nuts, one in each hand, and flip them up above the
cover into the notches. (You may need to loosen the wing nuts by turning them
counter clockwise in order to get them to fit over the cover.)
4. Gradually and evenly tighten those two opposite wing nuts down by turning
them clockwise. At that point, make sure the gap between the cover and
bottom is even under those two wing nuts by getting an eye level view of the
gap. Never tighten just one wing nut at a time.
If the gap is not even under the two opposite wing nuts, loosen the side that is low
and tighten the side that is high until the gap is even.
5. Repeat steps 3-5 until all the wing nuts are secured.
6. Turn each wing nut one more time to assure they are snug. Hand-tighten only. Do not use a wrench or
any other tool.
7. Double check the gap between the cover and bottom to make sure it is even all the way around. If it is not,
you will need to undo the wing nuts and repeat the above steps.
9
Diagram A
Diagram B
Diagram C