Start-up and inspection
Preparations
Connect L8 SPLIT/L12 SPLIT to HM 8-12 SPLIT (refrigerant
pipe and wiring) and connect HM 8-12 SPLIT to the climate
system.
Filling the climate system
1.
Ensure that the pressure gauge (BP5) is visible.
2.
Connect a hose to the filling valve (QM1) and open
the valve to fill the
3.
After a while note that the pressure on the
4.
When the pressure has reached about 0.25 MPa (2.5
bar) the safety valve (FL2) starts to release air mixed
with water. Close the filling valve (QM1).
Venting the climate system
Bleed HM 8-12 SPLIT via the vent valve (QM20), and the
rest of the climate system via the relevant vent valves.
Keep topping up and venting until all air has been removed
and the correct pressure has been obtained.
Filling the hot water coil
The hot water coil is filled by opening a hot water tap.
Commissioning
NOTE
Do not start L8 SPLIT/L12 SPLIT at outdoor air temper-
atures of -20 C or less.
1.
Check that the miniature circuit breaker (FA2) in HM
8-12 SPLIT is on.
2.
Check that the temperature limiter (FD1) has not
tripped.
3.
Switch on the circuit breaker and check that the mini-
ature circuit breaker (FA1) in HM 8-12 SPLIT is on.
4.
Set switch (SF1) to " 1" (the switch should be switched
on 6 hours before the compressor can be started).
When switch (SF1) is set to "0" - wait at least 1 minute
before setting it back to "1".
5.
Select operating mode "Add. heat only" by holding in
the operating mode button for 7 seconds).
6.
Set the date and time in menu 7.1 and 7.2.
7.
Select “Service" in menu 8.1.1.
8.
Select additional heat type in menu 9.2.8.
9.
Set the fuse size on knob (R24). Check the value in
menu 8.3.1.
10.
Set the max immersion heater output on knob (R25).
Check the value in menu 8.3.2.
11.
Select the desired curve slope in menu 2.1.2 and set
the parallel offset using the knob. Also see section
Default setting on page 9.
12.
Check that the hot water temperature in menu 1.0
exceeds 25 C.
13.
When point 11 has been carried out, select operating
mode "Auto".
The heat pump starts after 30 minutes.
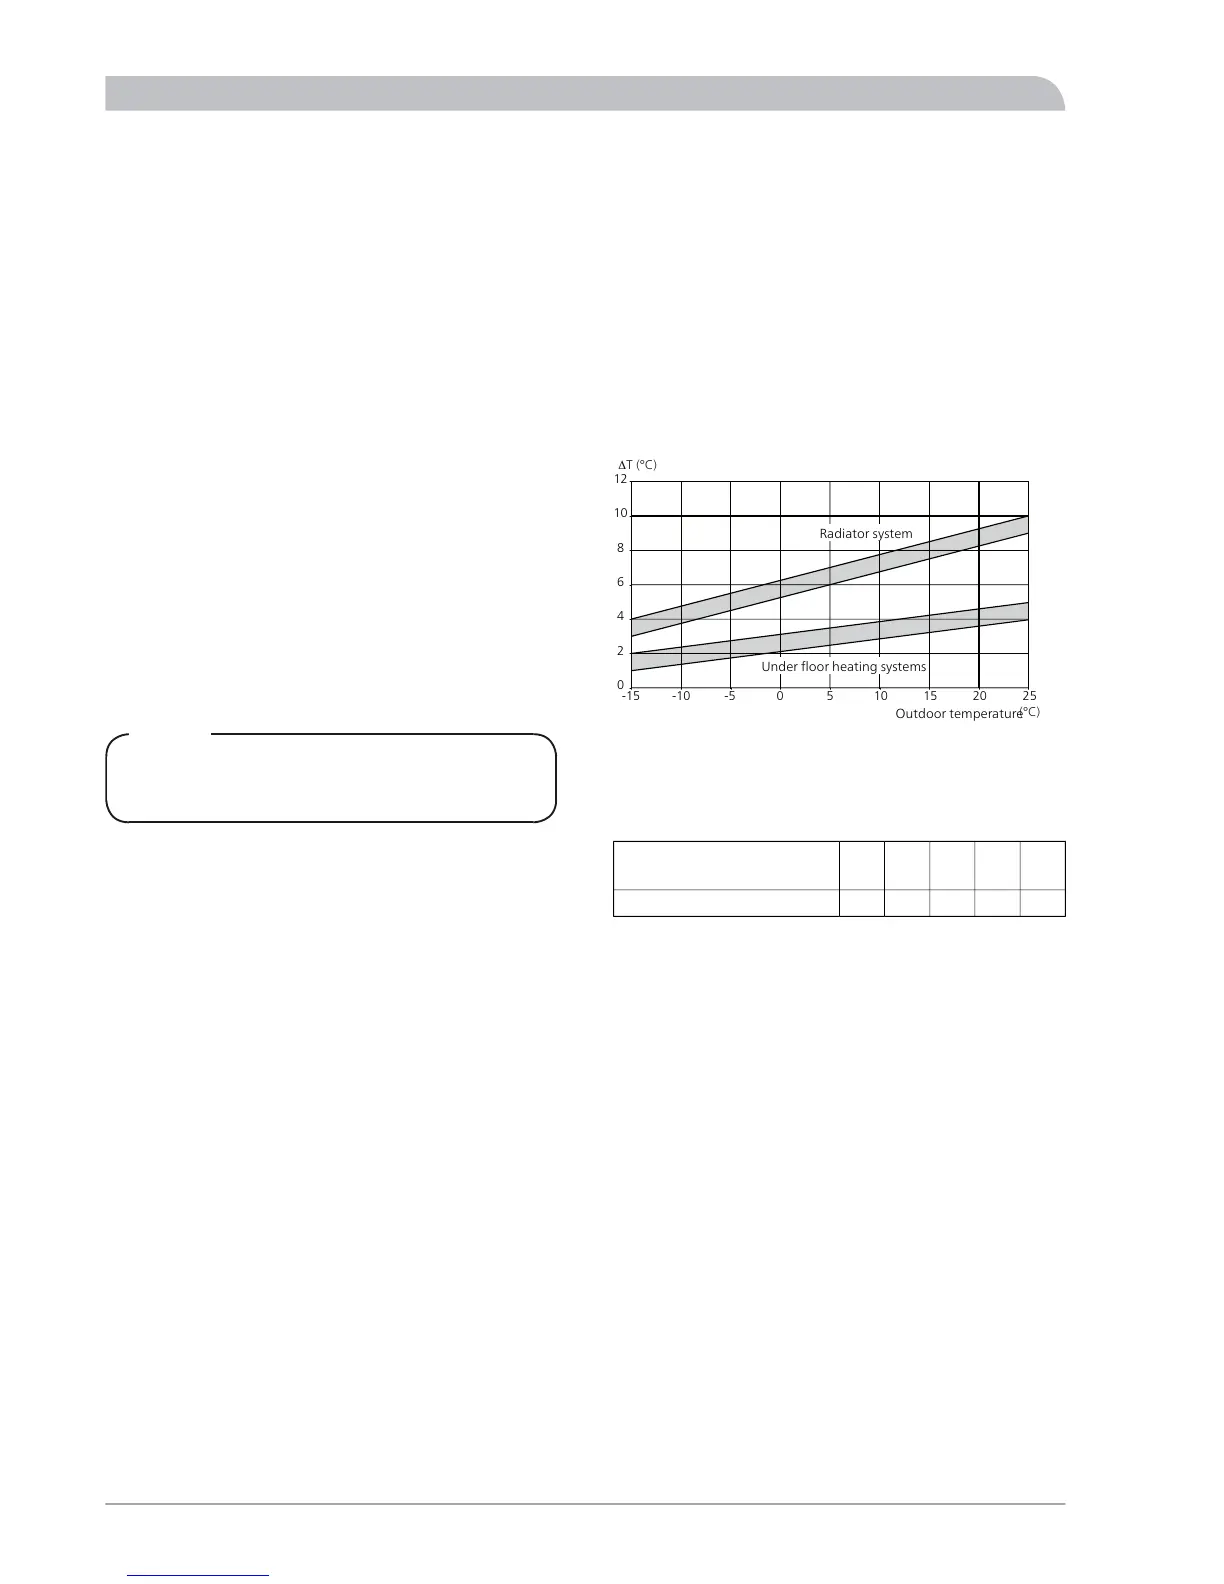
Setting system flow heating
1.
Ensure that the heat pump produces heating for the
climate system.
2.
Select “On” in menu 9.6.2.
3.
Select ”40
4.
Check the supply and return temperatures in menu
2.5. Adjust the circulation pump speed in menu 2.1.5
so that the difference between these temperatures is
according to the diagram below.
5.
Select ”Off” in menu 9.6.2.
Setting system flow cooling
A temperature difference of dt=7 K is recommended in
most cases. To achieve this, the following setting can be
selected:
9753kWDimensioned cooling output
Qc
90706060%Menu 2.2.5
The table shows the recommended output position, de-
pending on the dimensioned cooling output. Go to menu
2.2.5 for further adjustment of pump speed.
The result should be checked and adjusted further, if ne-
cessary.
Commissioning HM 8-12 SPLIT without L8
SPLIT/L12 SPLIT connected
1.
Check that the temperature limiter (FD1) has not
tripped.
2.
Switch on the circuit breaker and check that the mini-
ature circuit breaker (FA1) in HM 8-12 SPLIT is on.
3.
Set switch (SF1) to ”1”.
4.
Select operating mode "Add. heat only" by holding in
the operating mode button for 7 seconds.
5.
Set the date and time in menu 7.1 and 7.2.
6.
Select “Service" in menu 8.1.1.
7.
Select additional heat type in menu 9.2.8.
8.
Set the fuse size on knob (R24). Check the value in
menu 8.3.1.
9.
Set the max immersion heater output on knob (R25).
Check the value in menu 8.3.2.
10.
Select the desired curve slope in menu 2.1.2 and set
the parallel offset using the knob. Also see section
Default setting on page 9.
SPLIT40
For the Installer
Start-up and inspection