EasyManua.ls Logo

AnyTone BT01 - User Manual

AnyTone BT01
20 pages
Print Icon
To Next Page IconTo Next Page
Loading...
A1.221121
www.anytone.net
Question and Answer IconNeed help?

Do you have a question about the AnyTone BT01 and is the answer not in the manual?

Summary

Precautions

APPLICABLE MODELS

1.Accessories

1.1-Standard Accessories

Lists standard accessories included with the BT01 microphone.

1.2-Optional Accessories

Lists optional accessories available for purchase.

2.Charge The Battery

Charging Instructions

Details the steps for charging the BT01 Bluetooth Microphone.

3.Getting Started

Indicator Instructions

Explains the meaning of indicator light colors and patterns.

4.Basic Operation

4.1-Power ON

Guides on powering on the microphone and selecting connection mode.

4.2-BT MODE connect to AT-D578 UV

Provides steps for pairing the microphone with the radio via Bluetooth.

4.Basic Operation (Continued)

4.3-CABLE MODE connect to AT-D578 UV

Explains connecting the microphone to the radio via a 4m cable.

4.4-Power Off

Details how to turn off the BT01 Bluetooth Microphone.

4.5-Adjust The Volume

Guides on adjusting the volume using the microphone's buttons.

4.Basic Operation (Continued)

4.6-Set Up VFO Frequency

Instructions for assigning a key to VFO mode and setting frequencies.

4.7-Select a Channel

Explains how to switch between channels using the microphone.

4.Basic Operation (Continued)

4.8-Select a Zone

Guides on switching between radio zones using the microphone.

4.9-Make a Call

Details how to initiate a call using the PTT button.

4.10-Receive a Call

Explains how to receive a call and indicators.

4.11-Noise Reduction function

Describes the noise reduction feature and its effect on audio.

4.12-Menu Operation

BT Pairing and Connection Management

Manages Bluetooth pairing, connection hold time, and RX delay.

4.12-Menu Operation (Continued)

Bluetooth Audio and Gain Settings

Controls audio output and gain levels for radio and microphone.

PTT and Pairing Configuration

Configures PTT button actions and Bluetooth pairing options.

4.13-Programmed Key

Programmed Key Press Modes

Explains operation for short, long1, and long2 press functions for programmed keys.

5.Technical Specifications

EU Declaration of Conformity

Overview

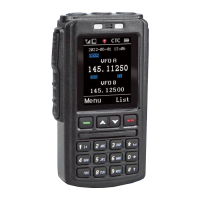
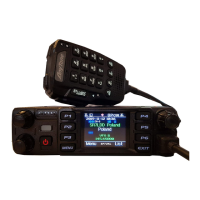
The AnyTone BT01 is a Bluetooth Microphone designed to enhance the functionality and user experience of the AT-D578UV DMR mobile radio. This device utilizes a dedicated master-slave Bluetooth module to enable wireless communication and control over all functions of the connected radio. A key feature of the BT01 is its integrated noise reduction function, which effectively minimizes background and ambient noise, thereby facilitating high-definition intercom calls.

Function Description

The primary function of the BT01 is to provide a wireless interface for the AT-D578UV mobile radio, allowing users to operate the radio's features remotely. It supports both Bluetooth (BT MODE) and wired (CABLE MODE) connections. In BT MODE, the microphone pairs with the radio via Bluetooth, enabling wireless talk and configuration. In CABLE MODE, a 4-meter cable connects the microphone to the radio, providing a wired connection and also charging the microphone when the channel is free.

The BT01's display mirrors the content of the AT-D578UV radio, ensuring a consistent user interface. It allows users to access the radio's menu, make and receive calls, adjust volume, set VFO frequencies, and select channels and zones. The device features a PTT (Push-To-Talk) button for initiating calls, a [POW] button for power on/off and volume adjustment, and dedicated keys ([P1], [P2], [P3]) that can be programmed for various functions.

A significant feature is the noise reduction capability, which can be configured for both receiving (RX) and transmitting (TX) audio. This function adapts to noise intensity, reducing more noise in strong noise environments, though this may introduce more audio distortion. Conversely, in slight noise conditions, less noise is reduced, resulting in less distortion. Users can adjust the noise reduction level to achieve an optimal balance between noise suppression and audio quality.

The BT01 also supports various programmed key functions, including checking battery voltage, switching transmit power levels, toggling TalkAround and Repeater modes, enabling/disabling frequency reverse, selecting digital encryption groups, sending DTMF/5TONE/2TONE encodes in analog mode, switching between VFO and memory channel modes, initiating scans, turning on/off AM air band or FM radio reception, activating alarms, enabling/disabling recording, starting/stopping recording, accessing SMS messages, manually dialing, checking GPS information, and monitoring weak signals or signals with unmatched IDs. Advanced functions like "Main CH Switch," "Hot Key 1~6," "Work Alone," "Nuisance Delete," "Digi Monitor," "Sub CH On/Off," "Priority Zone," "Program Scan," "Enhanced Sound," "LastCall Reply," "Switch ChType," "Ranging," "Roaming," and "CH Ranging" are also available, providing comprehensive control over the radio's operations.

Usage Features

To begin using the BT01, users must first power it on by pressing the [POW] button. The device will then prompt the user to select a connection mode: BT MODE or CABLE MODE.

In BT MODE, the BT01 connects wirelessly to the AT-D578UV radio. The pairing process involves enabling Bluetooth on the AT-D578UV radio, selecting "Seek BT" from the radio's Bluetooth pairing menu, and waiting for the radio to display "ALL DATA CHECKING" and then "EXTERNAL BT MODE." Once paired, the BT01 will automatically reconnect to the radio after reboots. It's important to note that the cross-band repeater function is not available in BT MODE as the audio path is occupied by the Bluetooth function.

In CABLE MODE, the BT01 is connected to the radio using the provided 4-meter cable. This mode also allows the BT01 to be charged when the channel is free.

Basic Operations:

  • Power ON/OFF: Press the top [POW] button to power on. Press and hold the [POW] button to power off.
  • Volume Adjustment: In standby, press the [POW] button to switch the [CH-]/[CH+] buttons to volume adjustment mode. Then, use [CH-] to decrease and [CH+] to increase the volume. The device also offers a "RfBT SPK Gain" setting in the Bluetooth menu to adjust the Bluetooth gain level for increased volume, which reverts to default level 3 after radio reboot for optimal effect.
  • VFO Frequency Setup: Assign a key function to [VFO/MR] in the radio's menu. Press this key to enter VFO frequency mode, then use the up/down keys to change frequency in MHz steps. Frequencies can also be input directly using the keypad, supporting 8-digit inputs for precise frequency changes.
  • Channel Selection: Switch to channel mode using the [VFO/MR] key, then use the [POW] button to switch the [CH-]/[CH+] buttons for channel adjustment. For faster channel access, especially in BT mode where rapid button presses might have a slight delay, it is recommended to input the channel number directly via the keypad.
  • Zone Selection: Switch to channel mode using the [VFO/MR] key. Zones can be changed using the up/down keys, or by navigating through the radio's menu (Menu → Zone), or by assigning a key function to [Zone Select] and inputting the zone number.
  • Making/Receiving Calls: Press and hold the [PTT] button to transmit. Release it to stop. The left red indicator lights up during transmission, and the right green indicator lights up when receiving a call.
  • Noise Reduction: Enable and configure noise reduction levels (RX and TX) via the radio's menu (Menu → Settings → Radio Set → Voice Func → Noise Reduce). Recommended setting is level 3 for both analog and digital transmissions.

Programmed Keys:

The [P1], [P2], and [P3] side keys can be programmed for various functions with short, long1 (approx. 1.5s press), and long2 (approx. 3s press) press actions. Programming can be done either through the radio's menu (Menu → Settings → Radio Set → Key Func) or via PC software (Public → Optional Setting → BT → Bluetooth handset).

Bluetooth Menu Functions:

The BT01's Bluetooth menu, mapped from the AT-D578UV radio, offers several settings:

  • BT Pairing: Disconnects from the radio.
  • BT Names: Displays the BT name of the BT01 microphone.
  • Paired Names: Shows the BT name of the device connected to the AT-D578UV radio.
  • BT Hold Time: Configures how long the BT01 stays connected after signal drops. Options include OFF (disconnects immediately), 1-30S (stays connected for a set time), and infinite (stays connected indefinitely).
  • BT RX Delay: Sets a delay (30ms-5.5s) for ignoring short RX signals, preventing interference.
  • BT + int spk: Determines whether audio comes from the BT01 speaker or the AT-D578UV radio speaker.
  • RfBT Mic Gain/RfBT SPK Gain: Adjusts transmit and receive audio levels on the AT-D578UV radio (levels 1-5).
  • H-BT Mic Gain: Adjusts transmit audio level on the BT01 microphone (levels 1-5).
  • BT Pin Code: Allows entry of a BT Pin Code during pairing, primarily for car audio systems.
  • BT PTT Pair: Pairs the small BP-02 BT PTT button.
  • PTT Hold: Configures the BP-02 PTT button for continuous transmission (ON) or press-and-hold transmission (OFF).
  • PTT Name: Displays the BT name of the BP-02 PTT button.
  • PTT Sleep: Sets the dormant mode time for the BP-02 PTT button (Infinity or 1-4min).
  • PTT BatVolt: Shows the battery level of the BP-02 PTT button.

Maintenance Features

Proper maintenance ensures the longevity and optimal performance of the BT01.

  • Charging: The BT01 should be charged before use. Connect the USB-C charging cable to a 5V/1A power adapter (USB Adaptor and Cigarette lighter charger must be 5V voltage and ≥1A current output) and then to the microphone's charging/upgrade interface. A red charging indicator will illuminate during charging and turn off when complete.
  • Firmware Updates: To ensure correct operation and access the latest features, the AT-D578UV radio's firmware should be updated to the latest version. Firmware updates are available on the Anytone website. A radio reset is required after a firmware upgrade.
  • Care and Handling:
    • Do not disassemble or modify the BT01 Bluetooth Microphone without permission, as this can cause damage.
    • Avoid placing the microphone in dusty or damp environments.
    • Adhere to the walkie-talkie usage rate of 1 minute for transmission and 4 minutes for reception to prevent the AT-D578UV mobile radio from overheating during long-term or continuous high-power use.
    • Do NOT insert a micro SD card into the SD-card slot, as the BT01 microphone does not support SD card use.

By following these guidelines, users can maximize the utility and lifespan of their AnyTone BT01 Bluetooth Microphone.

AnyTone BT01 Specifications

General IconGeneral
ConnectivityBluetooth
PTT ButtonYes
Talk TimeUp to 8 hours
Operating TimeUp to 8 hours
TypeBluetooth Microphone
CompatibilitySmartphones, Tablets, PCs
Range10 meters
BatteryRechargeable Lithium-Ion
Standby TimeUp to 7 days
Charging Time2 hours

Related product manuals