Do you have a question about the Ape Labs ApeStick4 and is the answer not in the manual?
The ApeStick 4 generates heat during operation and charging. Ensure adequate ventilation.
When charging in the Tourcase, the ApeStick 4 Tourcase must remain open.
Do not use the ApeStick 4 in areas where radio equipment use is prohibited.
Use only Ape Labs charging/power cords. Using a different source may void your warranty.
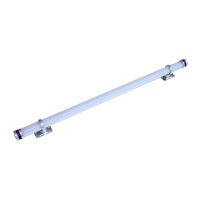
The ApeStick 4 is an all-purpose battery LED lamp in the shape of a tube.
The internal battery provides power for 8 or more hours of operation.
The ApeStick 4 features two magnetic feet for quick attachment to metallic objects.
Use the enclosed metal sheets to mount the ApeStick 4 on non-magnetic surfaces.
The position of the magnetic feet can be varied individually for flexible mounting.
Press the button at one end for about one second to turn the ApeStick 4 on or off.
Assign ApeStick4s into groups to independently control them in different rooms.
Control programs, brightness, speed, and sound active mode using the remote control's keys.
Device shows battery state via LEDs when brightness is set to zero.
The ApeStick 4 flashes red while charging and green when fully charged.
Use multiple W-Apes in the same room on different universes by setting different groups.
W-Ape offers modes like Sound Master, DMX, and Receiver for flexible control.
Set-up mode displays fixture battery level, serial number, and firmware version.
Select DMX mode (Off, 3C, 4C, 8C) for fixture control via DMX controller.
The red/green battery status indicator can be disabled for user preference.
Pair Ape Labs lights and ApeRemotes for synchronized control and custom grouping.
Step-by-step guide to pair an ApeRemote with a fixture using specific button presses.
Instructions for updating firmware, including device restart and update mode.
Details for 3 Channel Mode (Dimmer, Program, Speed) compatible with Ape Labs products.
Default 4 Channel Mode (Red, Green, Blue, White / 8Bit) for Ape Labs fixtures.
Details for 8 Channel Mode (Red, Green, Blue, White / 16Bit) for Ape Labs fixtures.
| Brand | Ape Labs |
|---|---|
| Model | ApeStick4 |
| Category | Lighting Equipment |
| Language | English |