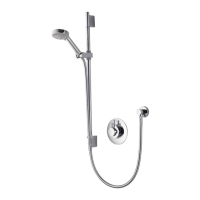
Positioning the controller
Think about the location of the controller.
Choose a suitable height so all users can easily see and use the controller.
Some controllers are activated by a proximity sensor. Refer to the user guide
for details and further information. If the ceiling height is over 2.4m (8ft), a
550mm riser rail extension kit will be required. Contact our Customer Service
Department to purchase a riser rail extension kit (part no: 910920).
201
CONTROLLERS EXPOSED SHOWER
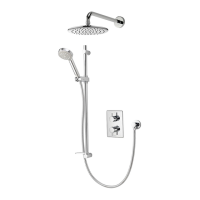
The centre of the riser rail stands 45mm from the wall. If this is not suitable, the
spacers provided with the fixing brackets will increase the depth to 70mm from
the wall.
Locate a suitable entry point into the ceiling for the riser rail, avoiding joists and
services.
2
Drill a hole through the ceiling, a minimum of Ø30mm, maximum Ø40mm.
The ceiling plate cannot be sited against an uneven surface. If there is coving or
an alternative obstruction, please ensure the entry hole is neat and unobtrusive;
otherwise the inner tube could be visible within the showering area. Remove
ceiling plate if required.
3
Feed the data cable through
the hole in the ceiling followed
by the riser rail assembly
containing the supply pipe.
Ensuring the controller is at
the desired height, the rail
is vertical, and that there is
adequate working clearance
above the top of the rail in the
roof space.