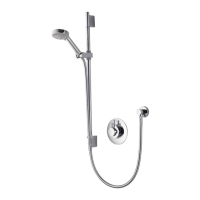
For shower head A: Ensuring the hose washers are in the correct position, depress
the anti-swivel locking button on the handset and secure the handset to the hose.
Place the handset into the handset holder.
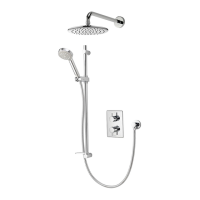
For shower head B: Disengage the pivot clip by pushing in the outer grey button
on the front of the shower head, as shown. Remove the threaded spigot from the
bottom of the handset by loosely attaching the hose to the thread and pulling clear.
Ensure the hose washer is in the correct position, tighten the threaded spigot into
the hose using a suitable spanner, taking care not to over-tighten. Reinsert the
spigot into the handset and engage the pivot clip prior to placing the handset into
the handset holder.
20
WALL MOUNTED HEAD
Run a 15mm outlet pipe from the Aqualisa SmartValve™ or diverter (where supplied)
to the preferred position for the fixed head.
1
Cut the outlet pipe to the finished length (55mm-150mm measured from the
finished wall surface) using a suitable cutter. If a hacksaw is used, the pipe end must
be carefully de-burred and chamfered.
2
Installation videos are available on our website www.aqualisa.co.uk/installation-
videos or alternatively, scan the QR code on the reverse of this guide.
Oer the fixed head arm over the projecting pipework and ensuring it is visibly
straight, mark the four fixing points.
3
Ensuring the pipe is clean and free of dust, slide the wall spacer followed by the
fixing bush onto the pipe flush with the finished wall surface.
5
Remove the fixed head arm and drill and prepare using the fixings provided (if
suitable) taking care to avoid pipework hidden in the wall.
4