14
2.2.3.3 On-Wall Mounting
The AN-100-SW-R is designed to be mounted on-wall if desired by using the same parts
meant for rack-mounting. This allows for a low-prole installation for the switch, eliminating
the need for extra shelving or racks when providing a network switch solution. To wall-
mount the switch:
4. Locate the included wall-mounting ears and screws from the packaging and a #2
Philips screwdriver.
5. Attach the ears to each side of the switch as shown:
6. After attaching the ears, mount the switch on the wall in the desired location as shown
using drywall screws or fasteners suitable for the wall surface material (not included).
O
N
10
0
-
24
0V
A
C
O
FF
50
-6
0H
z
1
3 5
7
9
1
1
1
3
1
5
2
4
6 8
1
0
1
2 1
4 1
6
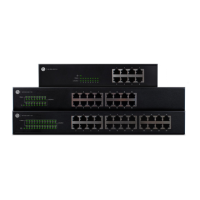
Figure 10. AN-100-SW-R-8/16/24 Wall Mounting Option
2 | INSTALLATION
For wall mounting, we recommend using 4 drywall screws, minimum of 1-1/4” X 8 GA with
anchors
 Loading...