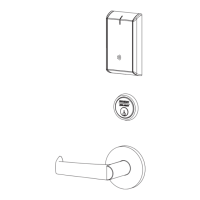
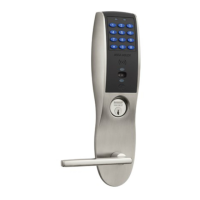
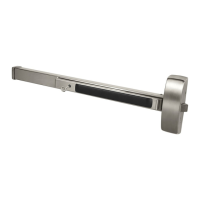
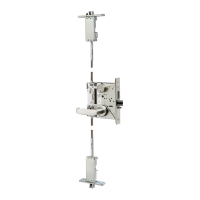
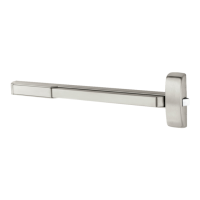
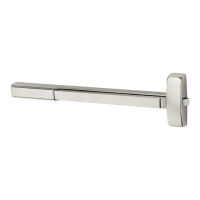
The SARGENT PE8600 Series (12-MD, MD, & AD) are concealed vertical rod exit devices designed to provide secure and reliable egress solutions. These devices are engineered for ease of installation and long-term performance, ensuring a safer and more open environment.
Function Description
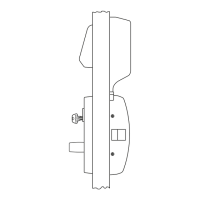
The PE8600 Series exit devices are primarily designed to facilitate emergency egress from buildings. When the push rail is depressed, the concealed vertical rods retract, disengaging the top and bottom bolts from their strikes, thereby allowing the door to open. This mechanism ensures quick and unhindered exit during emergencies. The "concealed" aspect means that the vertical rods and associated hardware are hidden within the door itself, providing a clean aesthetic and preventing tampering from the outside.
Different models within the series cater to specific needs:
- AD (Active Device) models typically include both top and bottom rod assemblies, offering full two-point locking for enhanced security.
- MD (Mortise Device) models integrate with a mortise lock body, providing a robust and secure locking mechanism often preferred for high-traffic areas or where additional security features like key access are required.
- 12-MD models are likely a variation of the MD series, possibly indicating a specific configuration or feature set within the mortise device category.
- NB (No Bottom Rod) models are designed without a bottom rod assembly, offering a single-point locking mechanism at the top. This can be advantageous in applications where a clear threshold is desired or where the bottom rod might interfere with door operation or floor coverings.
The device is handed, meaning it is configured for either right-hand reverse bevel or left-hand reverse bevel doors. Proper handing ensures correct installation and operation, aligning the internal mechanisms with the door's swing direction.
Usage Features
The PE8600 Series offers several features that enhance its usability and adaptability:
- Push Rail Assembly: The core of the device, the push rail, is designed for intuitive operation. A simple push on the rail retracts the bolts, allowing for quick exit.
- Concealed Design: The primary aesthetic advantage is the concealed nature of the vertical rods. This provides a sleek, unobtrusive appearance on the door face, making it suitable for architectural applications where visual appeal is important.
- Strike Compatibility: The devices are compatible with various strike types, including 640 and 650 strikes for metal frames, 650 strikes for wood frames, and 606 bottom strikes for fire-rated applications. This versatility ensures the device can be integrated into a wide range of door and frame constructions.
- Cylinder Dogging (16-prefix models): For models with a "16-prefix" (e.g., 16-Cylinder Lockdown), cylinder dogging is available. This feature allows the exit device to be held in an unlatched (dogged) position, enabling free passage without operating the push rail. This is particularly useful in high-traffic areas during business hours when the door needs to remain unlocked. The cylinder dogging mechanism slides into the mounting rail, providing a convenient way to engage or disengage the dogging function.
- Exit Trim Compatibility: The device is designed to work with various exit trims (if used), allowing for external access control or aesthetic coordination with other door hardware. The installation instructions emphasize installing P700 series trim at a specific point during the chassis attachment, highlighting the integrated design approach.
- Adjustable Bolt Projection: The top and bottom bolts feature an adjustment mechanism, allowing installers to fine-tune their projection. This ensures proper engagement with the strike, accommodating minor variations in door and frame alignment and ensuring a secure lock. The adjustment is made using a 5/32" Allen wrench, turning clockwise to retract the bolt and counter-clockwise to extend it.
- Rail Cutting Guide: For doors that require the push rail to be cut to size, a rail cutting guide is provided. This tool, along with detailed instructions, ensures precise and clean cuts, which are crucial for the proper function and appearance of the device. The guide helps determine the correct cut-off dimension based on door width and ensures the plastic insert support is correctly positioned.
Maintenance Features
While the manual primarily focuses on installation, several aspects contribute to the device's maintainability and long-term performance:
- Robust Construction: The use of durable materials and robust construction is implied by the detailed screw chart and the emphasis on proper installation. Components like the chassis, mounting plate, and rod assemblies are designed to withstand regular use and provide lasting security.
- Clear Installation Instructions: The comprehensive, step-by-step installation instructions, complete with diagrams and screw charts, are a key maintenance feature. Proper initial installation is critical for preventing premature wear and ensuring the device operates as intended. Incorrect installation is explicitly warned against, as it can lead to product damage and void the factory warranty.
- Adjustability: The adjustable bolt projection is not only a usage feature but also a maintenance one. Over time, doors and frames can shift slightly due to environmental factors or building settlement. The ability to adjust the bolt projection allows for easy recalibration, ensuring continued proper engagement with the strike without needing to replace components.
- Component-Based Design: The exploded view illustrates a component-based design, suggesting that individual parts like the top bolt, rod silencer, and chassis cover can be accessed and potentially replaced if necessary, although specific replacement instructions are not detailed in this manual.
- Warning for Lead Exposure: The explicit warning about lead exposure (P65warnings.ca.gov) indicates a commitment to user safety and transparency, even if it's a regulatory compliance point rather than a direct maintenance feature. It informs users about potential hazards associated with the product's materials.
- Customer Support: The inclusion of a customer service number (1-800-727-5477) and website (www.sargentlock.com) provides a direct channel for users to obtain assistance, inquire about parts, or seek troubleshooting advice, which is essential for effective maintenance.
In summary, the SARGENT PE8600 Series concealed vertical rod exit devices are designed for reliable emergency egress with an emphasis on concealed aesthetics, versatile application, and straightforward installation and adjustment, all contributing to a safer and more open environment.