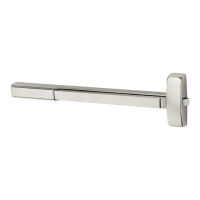
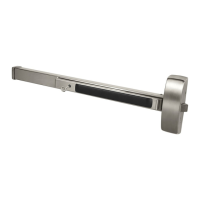
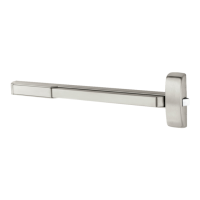
The SARGENT PE8400 Series (12-MD, MD, & AD) is a line of narrow concealed vertical rod exit devices designed to provide secure and reliable egress for various door applications. These devices are engineered for ease of installation and offer a range of features to ensure safety and functionality in commercial and institutional settings.
Function Description
The PE8400 Series exit devices are primarily designed to facilitate emergency egress from a building. When the push rail is depressed, the vertical rods retract, disengaging the top and bottom bolts from their strikes, allowing the door to open. This mechanism ensures that occupants can exit quickly and safely during an emergency, even if the door is otherwise locked from the outside. The concealed vertical rod design means that the rods and bolts are hidden within the door, providing a clean aesthetic and protecting the components from tampering or damage.
The series includes models for different applications:
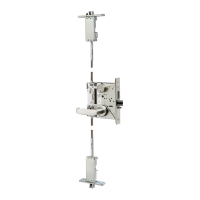
- AD-PE8400: This model utilizes specific bottom plate and strike configurations, secured with #10-24 x 3/8" oval head screws (DD) for the bottom plate and #10-24 x 1/2" flat head screws (EE) for the 640 strike. The 640 strike is designed to attach to the threshold with supplied fasteners.
- MD-PE8400 and 12-MD-PE8400: These models use a different bottom plate and strike setup. The bottom plate is secured with 1/4-20 x 1/2" flat head screws (GG), and the 650 strike (for MD-PE8400) or 606 bottom strike (for 12-MD-PE8400, fire-rated) attaches to the floor with anchors and supplied fasteners. The top strike for these models (650 strike) is attached to the metal frame with #10-24 x 1/2" flat head screws (EE) or to a wood frame with #10 x 1-1/4" flat head wood screws.
The device's handing (right hand reverse bevel or left hand reverse bevel) is crucial for proper installation and operation, and installers are instructed to check the device's handing against the application.
Usage Features
The PE8400 Series offers several features that enhance its usability and adaptability:
- Concealed Design: The vertical rods and bolts are hidden within the door, providing a sleek, unobtrusive appearance that blends well with various architectural styles. This also protects the components from external damage or vandalism.
- Adjustable Bolts: The top and bottom bolts are adjustable to ensure proper engagement with the strikes, accommodating variations in door and frame alignment. This adjustment is critical for maintaining the security and functionality of the exit device.
- For a 1/8" gap or less between the door top/bottom and frame/high point, the bolt should be rotated to be even with the door's edge.
- For a gap greater than 1/8", the bolt must extend above/below the door, equal to the gap minus 1/8".
- Final adjustments for bolt projection can be made using a 5/32" Allen wrench, turning clockwise to retract the bolt and counter-clockwise to extend it.
- Dogging Feature (16- Cylinder Lockdown): Some models (excluding fire-rated devices) include a "Lock Down Key" feature, also known as cylinder dogging. This allows the push rail to be held in a depressed position, keeping the door unlocked and unlatched for extended periods, such as during business hours or for high-traffic areas. To operate, the push rail is depressed, a hex key is inserted, and turned counter-clockwise. This feature is integrated into the mounting rail insert with a cylinder.
- Compatibility with Exit Trim: The device is designed to be compatible with external exit trim (e.g., PE700 series ET trim), which must be installed at a specific point during the chassis installation process.
- Strike Options: The series provides various strike options to suit different door frame materials and fire rating requirements, including strikes for metal frames, wood frames, and fire-rated applications.
- Rail Cutting Guide: For doors that require the rail to be cut to size, a rail cutting guide is provided. This guide ensures precise and clean cuts, which is essential for proper device function and aesthetic integration. The process involves determining the cut-off dimension "X" by subtracting 2-7/8" from dimension "Y," marking the cut point, and using a hacksaw or chop saw with the guide.
- Material and Construction: The device is constructed with durable components, including various machine screws, flat head screws, and wood screws, ensuring a robust and long-lasting installation. The use of star washers in certain connections further enhances stability.
Maintenance Features
While the manual primarily focuses on installation, some aspects imply maintenance considerations:
- Adjustability for Wear and Tear: The adjustable top and bottom bolts allow for compensation for minor shifts in door or frame alignment that may occur over time due to building settlement, door sag, or wear on hinges. This helps maintain proper latching and security without needing to replace the entire unit.
- Clearance Requirements: The instruction to ensure the door surface is flush and to clear away any raised projections before installation highlights the importance of maintaining proper clearances for optimal device operation. If a shim kit is required, it indicates a need to address surface irregularities that could impede the device's function.
- Regular Operation Checks: The final step of "Check for proper operation" after installation implies that periodic checks should be performed to ensure the device continues to function correctly, especially regarding bolt retraction, release, and engagement with the strike.
- Component Replacement: The detailed list of screws and their locations, along with the exploded views of assemblies, would aid in identifying and replacing specific components if they become damaged or worn, extending the life of the exit device.
- Warning for Improper Installation: The "Attention Installer: Improper installation may result in damage to the product and void the factory warranty" warning emphasizes the importance of correct installation for device longevity and to avoid potential issues that would require maintenance or replacement.
In summary, the SARGENT PE8400 Series is a versatile and robust line of concealed vertical rod exit devices designed for secure and reliable egress, with features that support flexible installation, adaptable usage, and long-term functionality through adjustability and clear maintenance guidelines.