CAUTION: Be sure pump o-ring is properly
aligned in pump groove when replacing pump
and/or flow control valve. A pinched or misaligned
o-ring may result in pump leakage.
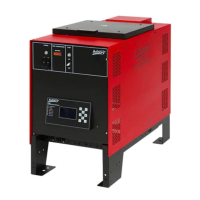
8.4 V4 Pump (.450 and .675), Flow Control & Drive Shaft Replacement
8.4.1 V4 Pump Replacement - .450 and .675
1. If it is possible and can be done safely, pump out all the hot
melt material in the melt unit, then switch off the system power
switch and allow the melt unit to cool down completely.
Otherwise switch off system power switch and allow adhesive
in tank to completely solidify.
2. Switch on system power switch for 10 minutes to allow pump
and flow control valve to warm up.
3. Switch off system power switch, disconnect melt unit power,
remove the back panel, and tilt unit forward. Remove the
supply hose according to the procedure in section 8.1 (steps 1
through 7).
4. Refer to section 9 for sequential parts breakdown.
5. Remove the four socket screws attaching the flow control valve
and pump to the pump block.
6. Pull pump out and remove its o-ring and pump block gasket.
Provide new replacement seals. (Refer to section 9 for
appropriate pump kits.) Also, remove flow control connection
piece from the pump block, if applicable.
7. Place o-rings in the pump groove and on the flow control
connection piece after lubricating with high-temperature
silicon-based grease.
NOTE: On units pumping heavy sealants, it is necessary to "slick"
both sides of the pump block gasket using some of the sealant itself
to prevent air from being drawn into the pump.
8. Install flow control and pump as an assembly with screws, o-
ring and gasket in place. Align pump shaft tab with drive shaft
slot. Take care not to cut o-ring on the connection tube during
assembly process.
9. Before tightening screws, check pump o-ring alignment by
manually pressing the flow control valve against the pump.
10. Replace the supply hose according to the procedure described
in section 4.3.
11. To properly align the pump with the motor, turn flow control
adjustment screw all the way out counterclockwise and loosen
pump mounting screws one half turn each.
12. Reconnect melt unit power, turn system power switch on, and
allow unit to warm-up.
!
42 KB30, KB50 and KB100 Series Hot Melt Units 19600-159 Rev. A 04/09/09 © Copyright Astro Packaging 2009