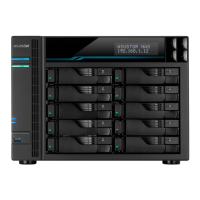
The ASUSTOR Lockerstor 10 Pro NAS is a network-attached storage device designed for high-performance data management and storage. This Memory Installation Guide provides detailed instructions for upgrading or replacing memory modules in the device, ensuring optimal performance and stability.
Function Description:
The ASUSTOR Lockerstor 10 Pro NAS serves as a centralized storage solution, offering robust data storage, backup, and sharing capabilities for various environments, including professional and enterprise settings. Its primary function is to provide reliable and scalable storage for critical data, supporting a wide range of applications and services. The device is designed to handle demanding workloads, making it suitable for tasks such as virtualization, large-scale data backups, and multimedia editing. By allowing memory upgrades, the NAS can further enhance its multitasking capabilities and overall system responsiveness, which is crucial for maintaining performance under heavy loads.
- Memory Support: The Lockerstor 10 Pro supports up to 64GB of memory. This significant capacity allows for substantial improvements in system performance, especially when running multiple applications, virtual machines, or handling large datasets.
- Memory Type: The guide implicitly refers to SO-DIMM modules, which are commonly used in compact systems like NAS devices. Users need to ensure they purchase compatible SO-DIMM modules that meet the device's specifications.
- Compatibility: ASUSTOR emphasizes that it does not guarantee compatibility with third-party memory modules. For optimal performance and to avoid potential issues, users are advised to purchase memory from the ASUSTOR Accessories Store (http://shop.asustor.com). This recommendation helps ensure that the installed memory works seamlessly with the NAS hardware and firmware.
- Installation Process: The installation involves accessing memory slots located on both the rear and front sides of the motherboard. This indicates a design that accommodates multiple memory modules, allowing for flexible upgrade paths. The process requires careful handling of internal components and adherence to specific steps to avoid damage.
Usage Features:
- Enhanced Performance: Upgrading the memory directly contributes to improved system performance. With more RAM, the NAS can handle more concurrent tasks, run applications faster, and manage larger data transfers more efficiently. This is particularly beneficial for users who utilize the NAS for demanding applications such as virtual machines, database servers, or high-resolution video editing.
- Scalability: The ability to upgrade memory up to 64GB provides significant scalability, allowing users to adapt the NAS's performance to their evolving needs without having to replace the entire unit. This extends the lifespan and utility of the device.
- User Menu Shutdown: The guide instructs users to shut down the NAS via the ADM User Menu, ensuring a safe and proper power-off sequence before any hardware modifications. This prevents data corruption and hardware damage that could occur from an abrupt power cut.
- Cable Disconnection: Users are required to disconnect all cables and devices, including the power cable, before opening the NAS. This is a critical safety measure to prevent electrical shock and damage to the device during installation.
- Cover Removal: The process involves loosening three screws on the rear of the NAS and gently pushing the cover towards the rear to remove it. This straightforward access method facilitates user-performed maintenance and upgrades.
- Memory Module Insertion: SO-DIMM modules are inserted at a 45° angle and then gently pushed down until the latches click into place, ensuring a secure connection. This standard installation method is common for SO-DIMM modules and helps prevent improper seating.
- Motherboard Access: For memory upgrades on the front side of the motherboard, additional steps are required, including disconnecting power and fan cables, removing various case screws (rear, left, right, bottom), and carefully removing the backplane and ATX power cables. This indicates a modular design that allows for comprehensive internal access.
- M.2 Assembly Removal: The guide also mentions undoing an M.2 screw and gently lifting the M.2 assembly, suggesting that the NAS supports M.2 storage, and access to this component might be necessary during certain memory upgrade paths or for other maintenance.
- Motherboard Removal: For front-side memory upgrades, the motherboard needs to be gently lifted from the chassis. This step highlights the depth of access required for certain memory configurations.
- Reassembly: After installing memory, users are instructed to replace the cover, tighten the screws, and reconnect all cables, including the power cord, before starting up the NAS. This ensures the device is properly secured and ready for operation.
Maintenance Features:
- Self-Maintenance Capability: The guide is explicitly designed for users to perform memory upgrades themselves, demonstrating that the ASUSTOR Lockerstor 10 Pro is built with a degree of user-serviceability in mind. This can save time and costs associated with professional service.
- Detailed Instructions: The step-by-step instructions, accompanied by illustrations, make the memory installation process accessible even for users who may not be highly experienced with hardware upgrades.
- Safety Precautions: The document includes a comprehensive section on "Notes and Precautions," emphasizing the sensitivity of electronic components and the importance of following instructions to avoid invalidating the warranty or causing injury. Key precautions include:
- Electrostatic Discharge (ESD) Prevention: Users are warned against working on carpets and are advised to wear an antistatic wrist strap connected to a ground line to prevent ESD damage to memory modules. This is crucial for protecting sensitive electronic components.
- Physical Safety: Warnings about sharp edges of internal components and the need to use a screwdriver that matches screw sizes are included to prevent physical injury and damage to the device.
- Warranty Awareness: ASUSTOR clearly states that damage resulting from failure to follow instructions or from modifications by unauthorized personnel is not covered by the warranty. This encourages users to proceed carefully and adhere to the guide.
- Proper Insertion: The guide warns against improper insertion of memory modules, which can damage the module, slot, or motherboard, and is not covered by the limited warranty.
- Troubleshooting Guide: A dedicated troubleshooting section addresses common issues, such as the NAS not starting after a memory upgrade. It provides a systematic approach to diagnosing problems, including checking LED indicators, verifying memory compatibility, reinstalling modules, and testing without the new memory.
- Technical Support Contact: ASUSTOR provides multiple channels for technical support, including email (support@asustor.com), an online support form (http://www.asustor.com/service/online_support), and an online community forum (http://forum.asustor.com/). This ensures users have resources available if they encounter difficulties beyond the scope of the guide.
- Tool Requirement: Only a Phillips head screwdriver is listed as a required tool, indicating that the upgrade process does not necessitate specialized equipment, making it more accessible for the average user.
- Screw Management: The guide explicitly states, "Do not remove or loosen screws not mentioned in this guide," which helps users focus on the necessary steps and avoid accidental disassembly of unrelated components.