EasyManua.ls Logo

ATOMSTACK A 5 Pro - User Manual

ATOMSTACK A 5 Pro
13 pages
Print Icon
To Next Page IconTo Next Page
Loading...
AT O M S TA C K A 5 P r o L a s e r
E n g r a v e r
I n s t a l l a t i o n M a n u a l
English
Deutsche
Français
Italiano
Español
Polskie
Question and Answer IconNeed help?

Do you have a question about the ATOMSTACK A 5 Pro and is the answer not in the manual?

Summary

Part 1: Security Statement and Warning

Part 2: Disclaimer and Warning

Part 3: Installation Steps

Step 1: Install the contour of the engraving machine

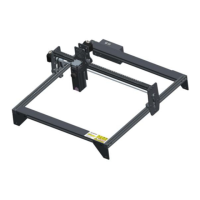
Instruction for assembling the main frame components.

Step 2: Install X axis assembly, control box and support frame

Guidance for mounting the X-axis, control unit, and support structures.

Step 3: Install belt and aluminum profile end cap

Steps for installing the drive belts and finishing profile ends.

Step 4: Install laser and laser protective cover

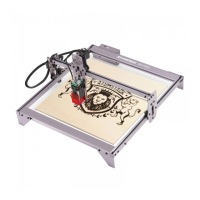
Instructions for attaching the laser module and its protective housing.

Step 5: Install Y-axis limit column and adjust eccentric screws

Details on fitting the Y-axis limit and adjusting guide wheel tightness.

Step 6: Install the cable and fix the cable

Procedure for connecting and securing wiring harnesses.

Part 4: Cautions

Part 5: Maintenance Instructions and Warning

Overview

The ATOMSTACK A5 Pro Laser Engraver is a Class 4 laser product designed for engraving and cutting, requiring careful adherence to safety guidelines and proper installation. This device is not a toy and is unsuitable for individuals under 15 years of age. Children should not be allowed to touch the laser module.

Function Description:

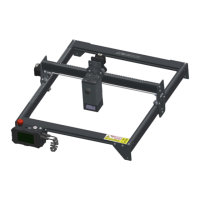
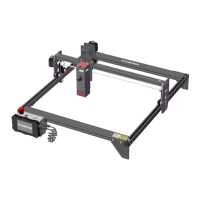
The ATOMSTACK A5 Pro is a laser engraver system component that must be installed into a larger laser engraver framework for operation. It utilizes a collimated laser beam for engraving and cutting various materials. The system is designed to integrate with other manufacturers' laser engravers, provided those systems meet the requirements of IEC 60825-1. The device is capable of precise engraving and cutting, with features designed to ensure user safety during operation.

Important Technical Specifications:

As a Class 4 laser product, the ATOMSTACK A5 Pro emits powerful laser radiation. The laser module itself has an optical lens that produces a collimated laser beam. The light, both direct and reflected, is highly harmful due to its ability to propagate long distances while maintaining high optical density. Specific wavelength ranges for warning devices are mentioned: below 400 nm and above 700 nm for Class 3R equivalent radiation, and for Class 3B or Class 4 equivalent radiation. The device's design incorporates safety features such as a protective cover for the laser itself, fastened by screws, which must be reliably locked when installed on the engraver and cannot be removed while energized. The overall laser engraver housing should have an interlock function to automatically turn off the laser if opened or removed.

Usage Features:

The installation process for the ATOMSTACK A5 Pro involves several steps:

  1. Contour Installation: Assembling the main frame of the engraving machine. This involves placing four large profiles in a specific orientation, paying attention to the direction of the profiles and tightening M5 screws diagonally.
  2. X-axis Assembly, Control Box, and Support Frame Installation: Pushing the X-axis component into the base frame, adjusting the eccentric nut, and installing the control box and support gaskets using M5 screws and an M5 Allen key.
  3. Belt and Aluminum Profile End Cap Installation: Installing two synchronous belts, tightening one end with a T-nut, passing the other end through the roller on the X-axis assembly, and then fixing it with another T-nut. The T-nut fixing method involves pushing the T-nut from the groove on the end of the profile and tightening it with a screw, ensuring it's as close to the end of the profile as possible before cutting off excess belt. Profile end covers are then installed, with the side containing protrusions facing down. The tightness of the timing belt is checked by pressing it with fingers; if there's no obvious deformation, it's tight enough.
  4. Laser and Laser Protective Cover Installation: Fixing the laser head onto the slider board with M58 countersunk head screws, ensuring they are tightened. Green protective covers are then inserted on the left, right, and front sides, with the front cover fixed using M514 flat round head screws.
  5. Y-axis Limit Column and Eccentric Screw Adjustment: Fixing the Y-axis limit column with M3*14 screws on the left slide rail. An eccentric nut is adjusted with a wrench to ensure the X-axis and Y-axis move smoothly without shaking. The tightness of eccentric nuts is determined by lifting one end of the machine to a 45-degree angle and releasing the X-axis or Y-axis bracket; if it slides at a constant speed to the end, the tightness is suitable.
  6. Cable Installation and Fixing: Inserting three wire terminals and tying the machine's fixing hole and cable bundle with a cable tie to prevent loosening.

The engraver should have an emergency stop button to immediately halt laser output in unexpected situations, and a reset button to resume work after confirming safety. Management and control of the equipment should involve physical keys, dongles, or password systems to prevent unauthorized operation. Warning marks should be present on any windows or channels that allow observation or reception of laser radiation.

Maintenance Features:

The ATOMSTACK A5 Pro features a highly integrated design, minimizing the need for maintenance. However, if the laser system requires repair or tuning, specific precautions must be taken:

  1. Power Disconnection: Always unplug the power cord to ensure the laser is in a power-off state.
  2. Safety During Tuning: If laser assistance is needed for tuning:
    • All personnel present must wear appropriate safety glasses (OD5+ protective glass is needed).
    • Ensure there are no flammable or explosive materials in the vicinity.
    • The laser's position and direction must be fixed to prevent accidental movement and shining on people, animals, or dangerous/valuable objects during debugging.
    • Never look directly at the laser beam.
    • Avoid shining the laser on mirror objects to prevent accidental injury from reflections.

In case of skin or eye exposure to the laser, immediate medical examination and treatment at a nearby hospital are required. For detailed warranty policy, users can visit www.atomstack3d.com. Technical support and service can be obtained by emailing support@atomstack3d.com. The manufacturer, Shenzhen AtomStack Technologies Co., Ltd., reserves the right to update, modify, or terminate the terms of the document without prior notice.

ATOMSTACK A 5 Pro Specifications

General IconGeneral
BrandATOMSTACK
ModelA 5 Pro
CategoryEngraver
LanguageEnglish

Related product manuals