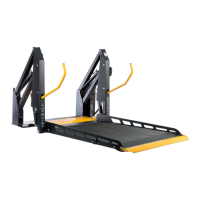
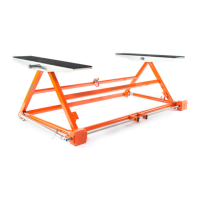
The AUTOLIFT3000 is a lifting device designed for passenger vehicles with unibody construction, enabling them to be raised and tilted for maintenance and repair. It is not intended for lifting body-on-frame vehicles or other types of vehicles. The manufacturer, AUTOLIFT PRODUCTION s.r.o., emphasizes adherence to all safety and usage instructions provided in the manual to prevent injury or damage.
Function Description:
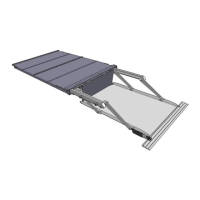
The primary function of the AUTOLIFT3000 is to lift vehicles, allowing access to the undercarriage for various tasks. It can also tilt the vehicle, which is particularly useful for specific repair or maintenance procedures. The lifting mechanism is operated by a manual electric drill, which engages with gearboxes on the device. The device is designed to be positioned under the vehicle's sill braces, ensuring symmetrical support. For tilting, the device needs to be positioned at the vehicle's center of gravity.
Important Technical Specifications:
- Capacity: 3,000 kg / 6,614 lbs
- Dimensions: 1635 x 1300 x 115 mm (64.5 x 51.25 x 4.50 inch)
- Net Weight: 45 kg / 99 lbs
- Max. Height: 60 cm / 23.50 inch
- Lifting Speed: 25 - 30 seconds
- Platform Width: 1300 mm - 1650 mm (51.18 - 64.96 inch)
- Drill Requirements: A manual electric drill with a minimum torque of 55 Nm (40 ft-lb or 487 inch-lb) at low rotation speed, always in first gear, and with the impact/hammer function switched off. A minimum power of 1050 W/220 V/10 Amp is recommended. Air or impact tools are strictly prohibited as they can damage the gearboxes.
Usage Features:
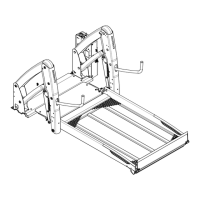
- Assembly: The device requires assembly, which involves installing platforms, axis bolts, bushings, and caster wheels. Tools needed include 8 mm and 30 mm metric combination wrenches, a Phillips screwdriver, a hammer, combination pliers, and a snapp-off knife or scissors.
- Positioning for Lifting: The lifting device should be placed in its starting position under the vehicle, with the gearboxes facing the engine. It must be aligned and centered on the vehicle's longitudinal axis, and the support platforms should be positioned symmetrically under the sill braces. Care must be taken to ensure platforms do not touch fragile parts of the vehicle. For front-engined vehicles, the gearboxes should almost touch the front wheels to lift the front. For rear-wheel drive vehicles, the lifting device should be moved a few centimeters backward to lift the rear.
- Positioning for Tilting: To tilt the vehicle, the device must be positioned at its center of gravity. For front-engined vehicles, the gearboxes should almost touch the front wheels. For family minivans, a distance of 7-10 cm should be maintained. For rear-wheel drive vehicles, a distance of approximately 25-30 cm between the gearboxes and the front wheels is recommended. Tilting is performed manually. A tip for finding the center of gravity is to place the device about 10 cm from the engine axle wheels, raise the vehicle to lighten one axle by about 10 cm, and then attempt to tilt. Adjust the position closer to the axle remaining on the ground if tilting is difficult.
- Lifting Operation: A drill adapter is inserted into the drill and then into the gearbox outlet. The drill must be set to first speed with impact switched off. The drill is operated in the right-hand (clockwise) direction, following the rotation symbols near the gearboxes. Lifting should be slow, and the vehicle should be monitored for deformation. The maximum lift height, marked with red STOP tape, must not be exceeded.
- Safety Pin: After reaching the desired height, the lift must be secured with a safety pin. This pin should be attached to the drill by a chain to prevent it from being forgotten.
- Lowering Operation: Before lowering, the car stand support and safety pin must be removed. The drill head must rotate in the desired direction (indicated by symbols near the gearboxes). Lowering should be slow, and the drill must be stopped immediately once the vehicle's weight rests on its wheels. The lifting device should be easily removable from the side of the vehicle at the lower position.
- Car Stand Support (Premium version accessory): This support is used to secure the lifted vehicle in the tilted position. It should be unfolded to a stable position, adjusted to the correct height, and secured with its safety pin. It must always be placed against strong points of the undercarriage.
- Beam Pads (accessory): These pads are designed for lifting vehicles with uneven or fragile undercarriage parts. They fill the gap between the platform and the solid part of the undercarriage and must lie with their entire surface on the platform.
- Rails for Uneven Surface (Premium version accessory): These rails are recommended for all uneven floors (asphalt, grass, gravel, paint booth grid, stones, pavement) and polished/shiny floors to prevent scratching. They are installed by removing a cotter pin, spacer, and flat washer from the safety system tube, sliding the rail onto the lift, inserting a pin through both holes, and then reassembling the safety system tube with the flat washer and cotter pin. It is crucial that both running wheels always move in the middle of the rails.
Maintenance Features:
- Maintenance-Free: The lifting device is maintenance-free. Gearboxes should never be opened, and no lubricants or oils should be added, as this can cause product seizure and void the warranty.
- Cleaning: Excess lubricant may appear on the moving system after initial uses; this is normal and should be wiped off with a clean, dry cloth, avoiding contact with clothing or skin.
- Rest Cycle: The manufacturer recommends a rest cycle of 5 minutes between lifting cycles to allow the operating lubricants to cool.
- Storage: The lift should be stored in position on gearbox lids or hung on the wall (using optional wall hangers). It should not be left in direct sunlight, as high temperatures can damage the lifting rubber, cause lubricants to leak, or heat metal parts.
- Prohibitions:
- No repairs or modifications to the lifting device are allowed.
- Ensure the stainless steel shaft connecting the gearboxes is not bent.
- Prevent dirt (sand, dust, etc.) from entering moving parts.
- Do not drive over the lifting device.
Warranty:
- The warranty period for the lifting device is 3 years from the date of sale.
- Accessories have a 12-month warranty.
- The warranty covers manufacturing defects only.
- Damage caused by improper assembly, usage, unauthorized modifications, repairs, exceeding load capacity, natural disaster, or improper use of equipment is not covered.
- Failure to follow instructions, such as not removing the safety pin before lowering or exceeding lift limits, will void the warranty.
- To claim warranty, proof of purchase and a description of the malfunction (including photo/video documentation) must be provided to support@autoliftproduction.com.
- All warranty repairs must be performed by AUTOLIFT PRODUCTION s.r.o. or a certified distributor.
- The lifting device must be delivered in an undisassembled condition and packed to prevent transport damage.