5
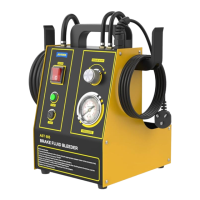
Turn the “ON / OFF” switch ON. Press the “Start” button and
hold. The pump starts to deliver the brake fluid.
Place the adapter over a collection container until the brake
fluid flows without any air bubbles.
Turn the “ON / OFF” switch OFF and wait for the pressure
regulator drops to 0 bar. Remove the adapter.
The brake maintenance device is now ready for use, even
when the pressure gauge displays 0 bar. The pressurized side
of the brake maintenance device should be free of bubbles.
●
●
●
●
The safety instructions in the section “For your safety” must be
strictly observed.
Before starting any work, please note the instructions for the
vehicle manufacturer for the maximum filling pressure and any
other specific instructions.
In general, always follow the recommended instructions and
guidelines for bleeding the brake system as mandated by the
manufacturer for each type of vehicle.
Factory settings for the pressure regulator are set to 1.6-2.0
bar. This ensures that the brake fluid reservoir will not become
deformed and that no leaks occur at the secondary cuff. Bleed-
ing or exchanging brake fluid with a lower or higher working
pressure can be adjusted using the pressure regulator.
1 - Install the supplied adapter, or the appropriate adapter
according to the instructions on the brake fluid reservoir.
2 - Connect the filling hose to the already installed adapter.
3 - Supply power to the brake maintenance device and turn
the “ON / OFF” switch on.
4 - Press the “Start” button and hold until the pressure is at
least 1.0 bar. The operating pressure can be adjusted with
the pressure regulator.
With the pressure build-up successfully, release the “Start”
button and the brake maintenance device will still work.
With the pressure build-up unsuccessfully, release the “Start”
button and the brake maintenance device will stop working
immediately.
●
●
●
●
●
●
Exchanging
brake fluid
Possible cause