EasyManua.ls Logo

Autool BT360 - User Manual

Autool BT360
19 pages
Print Icon
To Next Page IconTo Next Page
Loading...
Autool BT360 Battery System Tester
Trademark
AUTOOL Technology Co, Ltd. has registered its trademarks in several countries
including China, the trademark is .
With regard to the other trademark, service logo, domain, icon and company name
mentioned in this manual, they shall all belong to AUTOOL and its other affiliated
company, in other countries without the registration yet of these trademark, service
logo, domain name, icon and company name of AUTOOL, here we announce they
are owned by AUTOOL. Any company or person shall not use the trademark,
service logo, domain name, icon and company name of AUTOOL before getting
approved by AUTOOL with written certificates. Please visit our website
www.autooltech.com or email at aftersale@autooltech.com to contact us.
Attention
Non- technical person shall not change, disassemble or repair the product,
otherwise all losses caused by this shall be bared by the user himself.
Please do not scratch, bend, twist or stretch the wires. Do not place the wires
in high temperature. Do not press hard or decompose the on-board charging
adapter.
Please do not place nails, pins, and other small debris on the charging port, in
order to avoid damaging the charging connector.
Do not place the product in unstable place such as high altitude area, slope,
or shelf.
This product is powered by electricity and should not be used as a toy for
children.
To avoid short circuit, do not immerse the product in water or other liquid.
Please try to use the power supply and power cord supplied by manufacturer
as standard.
Please do not expose this product to strong light or high temperature when
it’s not at use.

Other manuals for Autool BT360

Question and Answer IconNeed help?

Do you have a question about the Autool BT360 and is the answer not in the manual?

Summary

Product Summary

Product Profile

Overview of the BT-360 Battery Tester's advanced technology and capabilities for vehicle battery analysis.

Product Function

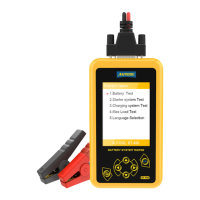
Details the primary functions of the tester: battery testing, cranking test, charging system analysis, and more.

Technical Parameters

Specifies the measure ranges for Cold Cranking Amps (CCA) and Voltage, essential for accurate testing.

Working Environment Requirement

Defines the acceptable operating temperature range and the intended environments for using the battery tester.

Tester Structure

Operation

Pre-Test Procedures

Steps to prepare the tester and battery before conducting a test, including clamp connection.

Connect Tester Procedure

Details how to connect the tester clamps to the battery poles correctly for accurate testing.

Key Description and Controls

Explanation of the tester's keys (UP, DOWN, OK, ESC) and their functions for navigation and selection.

Tester Startup Process

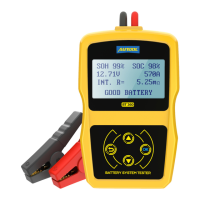
Describes the automatic startup sequence of the tester upon connecting the clamps, showing the initial interface.

Language Selection

Guide on how to select the preferred language for the tester's user interface from available options.

Battery Test Procedure

Detailed steps for performing a battery test, starting from initial setup and inputting parameters.

In-Vehicle vs. Out-of-Vehicle Testing

Instructions on selecting the battery's installation location (in vehicle or external) for the test procedure.

Battery Charge State Selection

How to select the battery's charge state (Before/After Charge) to ensure test accuracy.

Battery Type Selection

Guide to choosing the correct battery type (e.g., AGM, Gel, Flooded) for proper test calibration.

System Standard and Rating Selection

Selecting the appropriate battery system standard (e.g., CCA, JIS) and rating for testing.

Battery Test Result Interpretation

Explanation of the five possible battery test result categories and their meanings for diagnosis.

Cranking Test Procedure

Steps for performing the engine cranking test and understanding its results for starter motor analysis.

Charging System and Diode Test

Guide to testing the vehicle's charging system and rectifier diodes for proper operation.

Daily Maintenance and Troubleshooting

Common Fault Elimination

Steps for resolving general issues encountered with the battery tester, ensuring proper functionality.

Screen Not Lighting Troubleshooting

Specific advice for diagnosing and fixing the problem of a blank or non-responsive tester screen.

Warranty Service Information

Overview

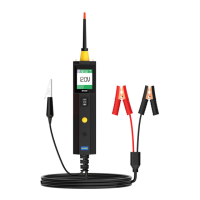
The Autool BT360 Battery System Tester is a diagnostic tool designed to assess the health and performance of vehicle batteries and their associated systems. It employs advanced conductance testing technology to provide quick, accurate measurements.

Function Description

The primary functions of the BT360 battery tester include:

  • Battery Test: This function analyzes the battery's healthy status by calculating its actual cold cranking capability and the extent of its aging. It provides reliable evidence for battery testing and maintenance, notifying the user when a battery is aging and needs replacement.
  • Cranking Test: This test focuses on the starting motor. By measuring the actual required cranking current and cranking voltage, it determines if the starting motor is functioning correctly. Abnormalities can be caused by lubricating system faults increasing the starting loaded torque or rotor friction within the starting motor itself.
  • Charging Test: This function checks and analyzes the vehicle's charging system, including the generator, rectifier, and rectifier diode. It determines if the generator's output voltage is normal, if the rectifier diode works correctly, and if the charging current is within specifications. Issues in these components can lead to overcharging or incomplete charging of the battery, shortening its life and potentially damaging other electrical appliances.
  • Additional Functions: The tester also includes features such as language settings, a voltmeter, and screen brightness adjustment.

The BT360 is capable of testing all automotive cranking lead-acid batteries, including ordinary lead-acid, AGM flat plate, AGM spiral, and Gel batteries. It can directly detect bad cells and offers polarity reverse connection protection, ensuring that reverse connections do not damage the tester, vehicle, or battery. It can also test batteries with power shortage without requiring a full charge beforehand. The tester supports multiple battery standards, including CCA, JIS, DIN, IEC, EN, SAE, GB, BCI, MCA, and CA, and offers multi-language support (English, Russian, Spanish, French, German, etc.).

Important Technical Specifications

  • Cold Cranking Amps Measure Range:
    • CCA: 100-2400
    • JIS: 26A17--245H52
    • DIN: 100-2200
    • IEC: 100-2200
    • EN: 100-2400
    • SAE: 100-2400
    • GB: 30-220Ah
    • BCI: 100-2400
    • MCA: 100-2400
    • CA: 100-2400
  • Voltage Measure Range: 6.5-30VDC.
  • Working Environment Temperature: -20°C to 50°C.
  • Materials: The main unit cover is made of ABS acid-resistant plastic.

Usage Features

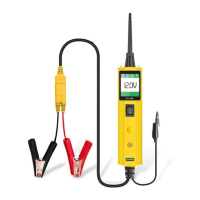
Pre-Test and Connection: Before testing, ensure the clamps are well-connected to the battery poles by shaking them back and forth. If the screen prompts "Check Connection," clean the poles and re-connect. The tester has reverse connection protection; if clamps are reversely connected, the screen will not light, but no damage will occur. For parallel-connected batteries, disconnect the cathode connection first and test each battery individually to avoid errors.

Tester Startup: The tester automatically starts up once the clamps are correctly connected, displaying the AUTOOL startup interface with a voltmeter value (8-30DCV range).

Language Selection: Use the UP/DOWN keys to select the desired language (English, French, German, Spanish, etc.).

Battery Test Procedure:

  1. IN-VEHICLE or OUT-OF-VEHICLE: Select the battery's location. "IN-VEHICLE" means the battery is connected to the vehicle's generator or electrical appliances.
  2. Surface Charge Detection: If surface charge is detected, the tester will prompt "SURFACE CHARGE DETECTED, TURN LIGHTS ON." Turn on the lights as prompted to eliminate surface charge, then turn them off when prompted "TURN LIGHTS OFF" and press OK to continue.
  3. Battery Charge State: Select "Before Charge" for cold vehicles or "After Charge" for hot vehicles to ensure accurate results.
  4. Battery Type: Select the battery type (Regular Flooded, AGM Flat Plate, AGM Spiral, or Gel battery).
  5. Battery Installation Way (IN-VEHICLE only): Select TOP, SIDE, or REMOTE. REMOTE is used for batteries that are difficult to access with test clamps. Note that REMOTE tests may have a slight tolerance; for doubt, remove the battery and test "OUT-OF-VEHICLE."
  6. Battery System Standard and Rating: Select the actual system standard and rating marked on the battery (e.g., CCA, JIS, DIN). Input the correct rating (e.g., 500A CCA) and press OK. The tester will then display "TESTING" for approximately 3 seconds before showing the result.

Battery Test Results: The tester provides five types of results:

  1. Good Battery: (e.g., SOH:96%, SOC:98%, 12.64V, 490A, Rating 500A) – Battery is healthy.
  2. Good, Recharge: (e.g., SOH:78%, SOC:30%, 12.20V, 440A, Rating 500A) – Battery is good but has low current; recharge before use.
  3. Replace: (e.g., SOH:46%, SOC:80%, 12.68V, 340A, Rating 500A) – Battery is nearing or at the end of its life and should be replaced.
  4. Bad Cell, Replace: (e.g., SOH:0%, SOC:20%, 10.60V, 0A, Rating 500A) – Battery has internal damage, a broken cell, or a short circuit; replace the battery.
  5. Charge, Retest: (e.g., SOH:39%, SOC:20%, 12.08V, 310A, Rating 500A) – Unstable battery; recharge and retest. If the same result appears, replace the battery.
    • Note: If "Replace" results from an IN-VEHICLE test, ensure vehicle cables are well-connected. For a definitive decision, disconnect the cable and retest the battery "OUT-OF-VEHICLE."

Cranking Test Procedure:

  1. After a battery test (if IN-VEHICLE), press OK to proceed to Cranking Test.
  2. The tester prompts "CRANKING TEST, START ENGINE."
  3. Start the engine. The tester will automatically complete the test and display results, including cranking time and voltage.
  4. A cranking voltage below 9.6V is considered abnormal; above 9.6V is normal. If the cranking test is abnormal, the battery test result will also be displayed.

Charging System and Rectifier Diode Test Procedure:

  1. After the cranking test, do not shut down the engine. Press OK to enter "Charging Test?"
  2. Press OK again to start the test.
    • Note: Keep all electrical appliances OFF during the test. Turning them on/off will affect accuracy.
  3. Increase engine speed to 3000 RPM or above and hold for 5 seconds. The tester will detect the increased rotation and start the charging voltage test.
  4. After the test, the tester displays effective charging volts, ripple test results, and charging test results.
    • Note: If no increase in rotation is detected after 3 attempts, the tester will skip this step and display "No Volt Output," indicating a potential generator regulator fault or connection issue.

Charging Test Results:

  1. Charging Volt: Normal: Generator output is normal.
  2. Charging Volt: Low: Charging volt is low. Check the generator drive belt (slip/run-off) and connections. If these are good, address generator fault.
  3. Charging Volt: High: Generator output volt is high. Most vehicle generators use internal regulators, so the generator assembly may need replacement. Normal high voltage regulator output is max 14.7±0.5V. High charging voltage overcharges the battery, shortening its life.
  4. No Volt Output: No generator volt output detected. Check generator connection cable and belt.
  5. Diode Test: The tester checks for charging current ripple. High ripple voltage indicates at least one damaged diode; check and replace.

Maintenance Features

Daily Maintenance:

  • Screen Not Light:
    • Check if the connection with the battery is well-made or if it's reverse-connected.
    • Check if the test cable is broken or disconnected.

Warranty Service:

  • Warranty Period: 3 years for the main unit, 1 year for accessories from the date of product receipt.
  • Warranty Access: Repair or replacement is based on specific fault conditions.
  • Replacement Parts: All replacement parts, accessories, or equipment are guaranteed to be brand new.
  • Product Breakdown: If a product breakdown cannot be solved within 90 days, customers should provide video and pictures as proof. AUTOOL will cover freight costs and provide necessary accessories for replacement. If the product has been received for more than 90 days, the customer bears the freight cost, and AUTOOL provides the accessory for free.

Warranty Not Covered:

  • Product purchased through non-official AUTOOL channels.
  • Product failure caused by incorrect use, use for wrong purposes, or human factors.

Disclaimer: AUTOOL Technology Co., Ltd. reserves the right to change product designs and specifications without prior notice. The physical appearance and color may differ from the manual; refer to the actual product. For questions, contact the dealer or Autool service center. The company has the final explanation right and will not bear consequences due to misunderstanding.

Autool BT360 Specifications

General IconGeneral
BrandAutool
ModelBT360
CategoryTest Equipment
LanguageEnglish

Related product manuals