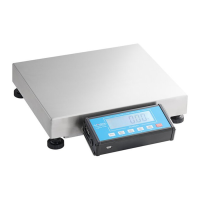
1. Take all the contents out of the box.
2. Remove the (4) inner hexangular
set screws on the rear side of the
shorter post. (Fig. 1)
3. Remove the stainless steel platter
from the scale base and insert the
load cell cable through the short
post. (Fig. 2)
4. Secure the post onto the bracket
of scale base with the (4) inner
hexangular set screws. (Fig. 3)
Make sure the screws are securely
tightened.
5. Remove the (4) screws on the
rear side of the indicator, then
disassemble the locking device on
the indicator bracket. (Fig. 4)
6. Insert the cable through the
bracket, then lay the bracket on the
post. (Fig. 5)
7. Position the bracket in the slot to
the direction desired. (Fig. 6) Lock
the bracket.
8. Place the indicator on the bracket,
and secure with the (4) phillips
screws. (Fig. 7)
9. Plug the female connector from
the load cell to the male socket on
indicator. (Fig. 8)
NOTE: The connector is a snap-
in connector, DO NOT screw the
female end into the male one.
A twisting force will cause inside
wires to break.
10. Put the stainless steel platter back
on the scale base.
11. The scale is now ready to use.
• Phillips Head Screwdriver
• Allen Wrench (Included)
UNPACKING & SETUP
3.
TOOLS REQUIRED
UNPACKING
& ASSEMBLY
Fig. 4
Fig. 5
Fig. 1
Fig. 2
Fig. 3
Fig. 6
Fig. 7 Fig. 8
 Loading...