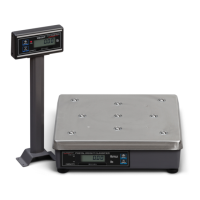
7821 User Instructions 17
5.3 Diagnostics Mode
5.3.1 Step-by-Step Instructions for DIAG Mode
Follow these steps to access the tests in the DIAG menu.
1. From normal weighing mode, move Switch 1 to the MENU Mode or OPEN
position. (See Figure 1).
DIAG is displayed.
2. Press the UNITS key …
DISP is displayed. This stands for display.
3. Press the UNITS key to perform the display test described earlier …
Display test is performed and the display shows DISP after the test is
completed.
4. Press the ZERO key …
RA is displayed. This stands for the RAM test.
5. Press the UNITS key to perform the RAM test …
PASS or FAIL is displayed briefly, then DISP. If the test fails, contact
your local Avery Weigh-Tronix distributor for service.
6. Press the ZERO key to scroll to the ROM test …
RO is displayed. This stands for the ROM test.
7. Press the UNITS key to perform the ROM test …
PASS or FAIL is displayed. If the test fails, contact your local Avery
Weigh-Tronix distributor for service.
8. Press the ZERO key to scroll to the I/O test …
I/O is displayed. This stands for the Input/Output test.
9. With a loopback connector in place, press the UNITS key to perform the I/O
test …
PASS or FAIL is displayed. If the test fails, check your connections and/
or contact your local Avery Weigh-Tronix distributor for service.
10. Press the ZERO key …
HRESA is displayed. This stands for the high resolution test with AZT
enabled.
Press the ZERO key to scroll through lists of selections.
Press the UNITS key to make a selection.
If you want to skip a test, press the ZERO key to scroll to the next test.
DIAG will flash every 10 seconds during the high resolution test to remind you that
you are doing a test and not seeing normal weight readings.