EasyManua.ls Logo

Awntech RN22 - User Manual

Awntech RN22
10 pages
Print Icon
To Next Page IconTo Next Page
Loading...
Page | 1
New Yorker Style Awning (5’-20)
OWNER’S MANUAL & INSTALLATION INSTRUCTIONS
Warning: Adult Assembly Required; Kit Contains Parts with Sharp Points and Edges, and Components
are Packed in Plastic Bags That Can Present a Choking Hazard to Children.
NOTE: Please inspect the parts for damage from shipping and/or any missing parts. If you suspect there
may be damage or a shortage, contact us within 5-days of delivery to report shipping damage or within
30-days of delivery to report missing or incorrect parts for a warranty replacement at no cost and we
will send replacement parts if needed. At this time, visualize how the components fit together and
determine if you have identified all necessary parts.
Models with Valance: RN22, EN23, EN24, CN32, CN33, CN34, CN43, CN44, EN2442, EN1836, EN1030
Awning Size
Width in Inches
Awning Size
Width in Inches
3
40.5
12
148.5
4
52.5
13
160.5
5
64.5
14
172.5
6
76.5
15
184.5
7
88.5
16
196.5
8
100.5
17
208.5
9
112.5
18
220.5
10
124.5
19
232.5
11
136.5
20
244.5
Due to the variety of construction materials, building surfaces, and mounting applications, Awntech
does not supply the hardware to install your awning. You will need to consult a contractor or purchase
installation hardware from your local hardware store. We advise you on different surface applications as
follows:
CONCRETE/STUCCO: 1/4” x 3” Masonry anchor bolts or Tapcon screws with washers.
WOOD/SIDING: 1/4” x 3” Lag screws/bolts plus nuts and washers.
OTHER MATERIALS: CONSULT A PROFESSIONAL
Question and Answer IconNeed help?

Do you have a question about the Awntech RN22 and is the answer not in the manual?

Summary

Introduction, Safety, and Specifications

Model Sizes and Widths

Table detailing awning sizes and corresponding widths in inches for various models.

Installation Hardware Advice

Guidance on selecting appropriate hardware for mounting based on surface materials.

Important Safety Warnings

Critical safety alerts regarding assembly, sharp parts, and choking hazards.

Component Identification and Preparation

Component Inventory and Parts List

List of awning components and their quantities based on awning size for inventory check.

Required Tools and Hardware

Identifies necessary tools and hardware components included in the package for assembly.

Awning Frame Assembly - Part 1

Attaching Projection Bars

Instructions for attaching projection bars to the front bar using a rubber hammer.

Attaching Back Bars

Guidance on connecting back bars to projection bars using self-tapping screws.

Awning Frame Assembly - Part 2

Attaching Top Bar

Steps for attaching the top bar to the back bars, ensuring correct C-channel orientation.

Attaching Cover Supports

Instructions for attaching cover supports and wall supports to the top bar.

Awning Frame Assembly - Part 3

Completing Frame Assembly

Final steps to attach cover supports to the front bar and wall supports to the frame.

Installing the Awning Cover

Sliding Fabric onto Frame

Procedure for inserting fabric tubing into the top bar's C-channel and securing it.

Mounting the Awning

Awning Mounting Specifications

Table providing dimensions like space between top/projection bars and projection for different models.

Marking and Installing Brackets

Steps for marking the wall and installing Z-brackets for secure awning mounting.

Securing the Awning Frame

Instructions for attaching the top bar to Z-brackets and securing back bars.

Warranty Information

Warranty Coverage and Terms

Details the 5-year limited warranty, prorated coverage, and general terms.

Purchaser and Manufacturer Responsibilities

Outlines the duties of both the purchaser and Awntech Corporation under the warranty.

Covered Components and Exclusions

Specifies which awning components are covered and lists general exclusions from warranty.

Warranty Limitations and Returns

Warranty Limitations and General Provisions

Discusses general limitations, disclaimers, and states the exclusive remedy under warranty.

Return and Damaged Material Policy

Explains the process for returning products, handling damaged materials, and restocking fees.

Cleaning and Maintenance

Stain Removal Chart

A table providing recommended cleaning solutions for various common awning stains.

General Cleaning and Care

Instructions for regular awning cleaning to preserve its beauty and extend its lifespan.

Wear and Tear Policy

Information regarding normal wear and tear, weather-related damage, and replacement fabric availability.

Overview

This document is an Owner's Manual & Installation Instructions for the Awntech New Yorker Style Awning, available in sizes ranging from 5 to 20 feet. It provides comprehensive guidance for assembly, installation, and maintenance, along with detailed warranty information.

Function Description:

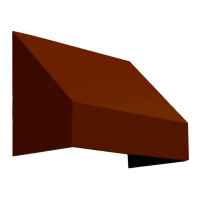
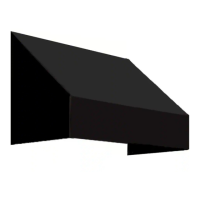
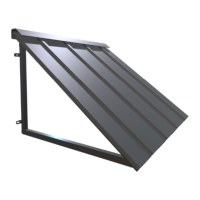
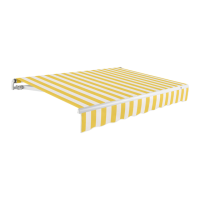
The Awntech New Yorker Style Awning is a fixed outdoor shading structure designed to be mounted on a wall. Its primary function is to provide shade and protection from the elements, enhancing the aesthetic and functional appeal of a building's exterior. The awning features a frame structure that supports a fabric cover, creating a durable and visually appealing addition to residential or commercial properties. The manual emphasizes that the awning is an exterior product requiring regular cleaning and care to preserve its beauty and extend its life.

Important Technical Specifications:

The manual provides a detailed parts list and dimensions based on the awning size in feet. The "Width in Inches" table on page 1 outlines the specific dimensions for various awning sizes:

  • Awning Size 3: 40.5 inches
  • Awning Size 4: 52.5 inches
  • Awning Size 5: 64.5 inches
  • Awning Size 6: 76.5 inches
  • Awning Size 7: 88.5 inches
  • Awning Size 8: 100.5 inches
  • Awning Size 9: 112.5 inches
  • Awning Size 10: 124.5 inches
  • Awning Size 11: 136.5 inches
  • Awning Size 12: 148.5 inches
  • Awning Size 13: 160.5 inches
  • Awning Size 14: 172.5 inches
  • Awning Size 15: 184.5 inches
  • Awning Size 16: 196.5 inches
  • Awning Size 17: 208.5 inches
  • Awning Size 18: 220.5 inches
  • Awning Size 19: 232.5 inches
  • Awning Size 20: 244.5 inches

The parts list on page 2 details the number of components required for different awning sizes (in feet):

  • (TB) Top Bar: 1 for 3-5 ft, 2 for 6-10 ft, 3 for 11-18 ft.
  • (FB) Front Bar (preassembled): 2 for 3-5 ft, 4 for 6-10 ft, 6 for 11-18 ft.
  • (CS) Cover Support: 2 for 3-4 ft, 3 for 5-7 ft, 5 for 8-10 ft, 4 for 11-12 ft, 7 for 13-18 ft. (Note: CS count includes Center Cover Supports (CCS)).
  • (PB) Projection Bar: 2 for all sizes (3-18 ft).
  • (PBS) Projection Bar Support: 2 for all sizes (3-18 ft).
  • (BB) Back Bar: 2 for all sizes (3-18 ft).
  • (WS) Wall Supports: 0 for 3-4 ft, 1 for 5-7 ft, 3 for 8-10 ft, 5 for 11-18 ft.

The manual specifies that all awning sizes over 6' wide come in multiple sections for the Top Bar and Front Bar. For example, a 6' Top Bar consists of TB1 & TB2, and Front Bars are pre-assembled in 3'-5' sections (2 sections for 6'-10' awnings, 3 sections for 11'-20' awnings).

Mounting dimensions are provided for various models, including "Space Between TB and P" (Top Bar and Projection) and "Height w/ Valance," and "Projection" in inches. For example:

  • RN22: 31" (TB and P), 31" (Height w/ Valance), 24" (Projection).
  • CN32/CN33/CN34: 44" (TB and P), 44" (Height w/ Valance), with Projections of 24", 36", and 48" respectively.
  • NY1618/NY1624/NY1630: 22" (TB and P), 22" (Height w/ Valance), with Projections of 18", 24", and 30" respectively.
  • NY3024/NY3030/NY3036: 37" (TB and P), 37" (Height w/ Valance), with Projections of 24", 30", and 36" respectively.

The hardware package includes Z-brackets and self-tapping screws. However, the manual explicitly states that installation hardware (e.g., masonry anchor bolts, Tapcon screws, lag screws/bolts) is not supplied due to the variety of construction materials and mounting surfaces. Recommended hardware types are suggested for concrete/stucco (1/4” x 3" Masonry anchor bolts or Tapcon screws) and wood/siding (1/4" x 3" Lag screws/bolts).

Usage Features:

The awning is designed for fixed installation on a wall. The assembly process involves several steps:

  1. Attaching Projection Bars (PB) and Projection Bar Supports (PBS): These are attached to the Front Bar (FB) using a rubber hammer, with Velcro on FB and PB facing upwards.
  2. Attaching Back Bars (BB): These are attached to the Projection Bars (PB) using a rubber hammer and secured to PBS with self-tapping screws. Velcro on Back Bars (BB) faces front.
  3. Attaching Top Bar (TB): The Top Bar is attached to the Back Bars (BB) using a rubber hammer, ensuring the C-Channel on the Top Bar is oriented towards the back/wall side.
  4. Attaching Cover Supports (CS) and Wall Supports (WS): With the frame oriented on its back, Cover Supports (CS) are attached to the Top Bar (TB) using a power drill and self-tapping screws. Larger awnings also include additional Center Cover Supports (CCS) and Wall Supports (WS).
  5. Attaching Cover Supports (CS) to Front Bar (FB) and Wall Support (WS) to Front Bar (FB): With the frame flat on its bottom, Cover Supports (CS) are attached to the Front Bar (FB) using a power drill and self-tapping screws. Wall Supports (WS) are attached to the top level of the back side of the Front Bar (FB); there are no pre-drilled holes for WS.
  6. Installing the Cover: The fabric tubing is inserted into the C-Channel on the Top Bar (TB), slid into position, and then wrapped tightly around the frame, securing it to Velcro.
  7. Mounting the Awning: The awning is temporarily placed in the desired location, marked, and then removed. Z-brackets are installed into the mounting surface to hold the Top Bar (TB). The Top Bar is then dropped into the Z-brackets and secured with self-tapping screws. Additional Z-brackets are installed on the inside of each Back Bar (BB) with self-tapping screws. The manual notes that Z-brackets can be placed anywhere along the Top Bar and Back Bars to accommodate stud locations.

Tools required for installation include an Electric Impact Drill, Rubber Hammer, Installation Anchors (specific to surface material), Tape Measure, Safety Glasses, Level, Ladder, and a #2 Pencil. An assistant may be helpful for larger awnings.

Maintenance Features:

The manual provides a "Cleaning Chart for Typical Awning Stains" and general "Cleaning & Care" instructions.

  • Cleaning Frequency: Awnings should be cleaned at least once a year in low maintenance areas or twice a year in high maintenance areas (e.g., FL, TX, NM, AZ, NV, or high-altitude areas).
  • Cleaning Process: Involves brushing off debris with a broom, brushing on a non-detergent cleaning compound (such as a solution of 1-part vinegar to 1-part water), allowing it to sit for 20 minutes, and then rinsing.
  • Stain-Specific Solutions:
    • Charcoal: Vacuum, then liquid detergent.
    • Chewing Gum: Acetone.
    • Soda: Liquid detergent.
    • Car Grease: Acetone.
    • Iron Rust: Oxalic or citrus acids, water.
    • Mildew: 1 cup of bleach and ¼ mild soap per gallon of water. (Note: Mildew will not form on the fabric itself but on dirt/dust not removed).
    • Oil: Acetone.
    • Paint (Latex) Wet: Liquid detergent, water.
    • Paint (Latex) Dried: Paint, oil or grease remover.
    • Paint (Oil or Lacquer): Paint, oil or grease remover.
    • Suntan Lotion: Pine Power® or pine oil detergent.
    • Tree Sap: Turpentine, liquid detergent.

Warranty Information:

The Awntech New Yorker Style Awning comes with a 5-Year Manufacturer's Limited Warranty (Prorated by the month).

  • Coverage: Applies only to the original purchaser in the United States.
  • Responsibilities of Awntech: Furnish replacements for parts found defective in design, manufacture, or assembly.
  • Responsibilities of Purchaser: Must have paid in full for the product, use care in installation, maintenance, operation, use, and storage according to the manual, and promptly notify Awntech of claims. May be required to provide photos/videos of defects and pay a deposit until parts are returned for inspection. A return authorization form is required for returns.
  • Covered Components: Structural supports and acrylic fabric are warranted for five (5) years prorated against manufacturer's defects.
    • Within one year: Defective components replaced at no charge.
    • After one year but within five years: Defective components replaced upon payment of 1/60th of the full retail cost per month of use.
    • Acrylic Fabric: Warranted against excessive fading under normal conditions (if maintained) and mildew (mildew on dirt/dust, not fabric itself).
  • What is NOT Covered:
    • Failure/damage from intentional or negligent actions.
    • Failure/damage from the awning falling due to improper fastening to structural members.
    • Labor charges for installation of replacement parts.
    • Freight expenses to/from Awntech Corporation.
    • Stretching of fabric or damage to structural components caused by wind, water pooling, or other weather (except as specified for acrylic fabric).
    • Normal wear and tear due to weather conditions (e.g., in high maintenance areas).
    • Damages caused by improper anchoring, strong winds, snow, or ice.
  • Returns: Only defective products upon arrival are eligible for return. If the product is disliked or incorrectly measured, it qualifies for merchandise credit, requires payment for return shipping, and incurs a 25% restock fee. Awnings 10' or larger or customized are non-returnable.
  • Damaged Material: Damage during shipping should be noted with the carrier at delivery, and shipments with apparent product damage should be refused.
  • Fabric Dye-Lot and Lighting Variation: Minor variations in fabric dye-lots and appearance due to lighting are considered normal.

Awntech RN22 Specifications

General IconGeneral
BrandAwntech
ModelRN22
CategoryAccessories
LanguageEnglish

Related product manuals