Do you have a question about the Barco DP2K-15C and is the answer not in the manual?
Describes general safety guidelines, warnings, and optical radiation notices.
Covers crucial safety instructions regarding electrical shock and user safety.
Details handling of cooling liquid and cleansing agent with personal protection rules.
Explains hazard distance and eye safety related to high brightness lamps.
Discusses hazard zones and safety measures for enclosed projection systems.
Covers how hazard distance is affected by different lens types.
Outlines environmental conditions, cooling needs, and power requirements for installation.
Provides step-by-step instructions and required tools for unpacking the projector.
Details the procedures for initial inspection of the projector after unpacking.
Offers a checklist and overview of all stages in the projector installation process.
Covers projector placement, centering, and leveling at the installation site.
Details the mandatory installation and requirements for the projector's exhaust system.
Explains the electrical connection procedures and safety precautions.
Describes how to provide power to projector electronics without a UPS unit.
Provides instructions for connecting an Uninterruptible Power Supply (UPS).
Introduces supported xenon lamps and key handling precautions.
Procedure for safely removing the projector's lamp house assembly.
Step-by-step guide on how to remove the xenon lamp from the lamp house.
Detailed instructions for installing a new xenon lamp into the projector.
Procedure for reinstalling the lamp house assembly into the projector.
Explains how to reset lamp information after a new lamp installation.
Describes the process to realign the lamp for optimal performance.
Lists available projector lenses and their corresponding zoom ranges.
Guides users on selecting the appropriate lens using the Barco lens calculator tool.
Provides detailed steps for installing a lens into the projector's lens holder.
Details the procedure for safely removing a lens from the projector.
Explains how to use the motorized controls for lens shift, zoom, and focus.
Describes how to adjust the Scheimpflug for optimal focus plane alignment.
Overview of the projector's input and communication interfaces.
Identifies the keys and functions of the projector's local control panel.
Details the ICP board, including its LEDs, ports, and functions.
Describes the ICP-D board, its functions, and related specifications.
Lists the technical specifications for ICP-D HDMI 2.0 inputs.
Covers the optional HD-SDI input module and its specifications.
Describes the optional Integrated Media Block (IMB) and Media Server (IMS).
Explains the communication ports and functionality of the Cinema Controller.
Overviews the ICMP-X assembly, its role in processing cinema content, and front panel.
Explains the ICMP-X HDD configuration in RAID 5 and degraded mode operation.
Details possible scenarios for HDD replacement and data continuity.
Step-by-step guide for installing a Hard Disk Drive into the ICMP-X.
Procedure for safely removing a Hard Disk Drive from the ICMP-X.
Describes the HDD status indicator lights and troubleshooting for errors.
Explains the ICMP-X operational status LEDs and the reset button.
Discusses the purpose and necessity of the Barco ICMP-X device certificate.
Guides on how to download the ICMP-X certificate using QR codes or software.
Explains how to configure the ICMP-X using the Barco Communicator software.
Details the various communication ports available on the ICMP-X.
Identifies and describes the video source input ports on the ICMP-X.
Covers the requirements and specifications for Live IP network streaming.
Lists the technical specifications for the DisplayPort interface.
Details SDI interface standards, terminology, and supported formats.
Lists the technical specifications for HDMI 2.0 inputs and supported formats.
Lists the technical specifications for HDMI 1.4 inputs and supported formats.
Explains the different methods to reset the ICMP-X, including hardware reset.
Introduces the Communicator Touch Panel for projector control and its interface.
Provides step-by-step instructions for mounting the touch panel interface.
Explains how to adjust the position of the touch panel interface using its swivel arm.
Step-by-step guide on how to properly switch on the DP2K-xxC projector.
Procedure for safely switching off the DP2K-xxC projector and cooling down.
Procedure for removing the projector's lamp cover.
Procedure for removing the projector's input cover.
Procedure for removing the projector's front cover.
Procedure for removing the projector's side cover.
Procedure for removing the projector's rear cover.
Procedure for removing the projector's top cover.
Steps to open the sealed compartment of the light processor unit.
Steps to close the sealed compartment of the light processor unit.
Procedure for reinstalling the projector's top cover.
Procedure for reinstalling the projector's rear cover.
Procedure for reinstalling the projector's side cover.
Procedure for reinstalling the projector's front cover.
Procedure for reinstalling the projector's input cover.
Steps to remove and access the projector's front dust filter.
Instructions for cleaning the bottom-side dust filter.
Instructions for cleaning the top-side dust filter.
Guide for safely cleaning the projector lens to maintain optical quality.
Instructions for cleaning the external housing of the projector.
Procedure to check the liquid cooling system level for specific models.
Steps to clean the UV blocker component within the lamp house.
Procedure to clear security warnings after module removal or compartment access.
Identifies and explains the extended control knobs used for convergence adjustment.
Steps required to prepare the projector for the convergence adjustment process.
Detailed steps for aligning the red image channel with the blue reference.
Detailed steps for aligning the green image channel with the blue reference.
Technical specifications for the DP2K-12C projector model.
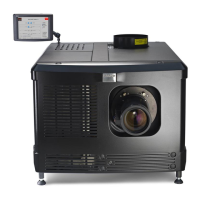
Technical specifications for the DP2K-15C projector model.
Technical specifications for the DP2K-20C projector model.
Technical specifications for the Integrated Cinema Media Processor (ICMP).
Technical specifications for the ICMP-X module.
Provides physical dimensions of the DP2K-xxC projector in millimeters.
Indicates the location of the projector's center of gravity in millimeters.
Lists the physical dimensions of the optional universal pedestal.
Lists relevant certifications and regulatory marks for the product.
Explains GPIO ports, their electrical specifications, and general purpose inputs/outputs.
Details the pin assignments for RS232 IN and Ethernet ports.
Provides specific pin configuration details for ICMP-X audio and GPIO ports.
Lists the pin configurations for DVI-D input ports.
Provides guidelines for the responsible disposal of waste equipment and batteries.
Information regarding compliance with Turkish RoHS regulations.
Lists Barco's contact addresses and importer information.
Lists the addresses of the manufacturing factories.
Information on how to access and download product manuals online.
| Projector Type | Digital Cinema Projector |
|---|---|
| Resolution | 2048 x 1080 |
| Brightness | 15, 000 lumens |
| Contrast Ratio | 2, 000:1 |
| Light Source | Lamp |
| Lamp | Xenon lamp |
| Light Source Life | 1000 hours |
| Lens Options | Various lenses available |
| Input Connectors | DVI |
| Operating Temperature | 40 °C |
| Cooling System | Forced air |