Do you have a question about the Barco DP2K-S Series and is the answer not in the manual?
Sets the terms and conditions for using the software. Ensures compliance with license agreement.
Outlines the warranty disclaimer for the software and accompanying files, limiting liability.
Explains the manual's content, purpose, and how to use it effectively for safety and performance.
Introduces the safety chapter and clarifies terms used throughout the document.
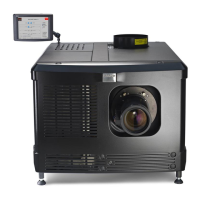
Defines which Barco products are covered by the term 'DP2K-S series'.
Lists the main sections within the safety chapter for easy navigation.
Provides essential safety guidelines for equipment operation, installation, and adherence to warnings.
Details compliance with international safety standards for IT equipment.
Defines roles like Service Personnel, Trained Projectionist, and User for safety context.
Section to record product article and serial numbers for reference.
Instructions to prevent electrical hazards during operation and installation.
Guidelines to prevent fire risks associated with projector use and placement.
Advises on servicing procedures, potential hazards, and warranty implications.
Introduces the chapter on initial setup and requirements for the projector.
Lists the main topics covered in the Getting Started chapter.
Summarizes operating and storage environmental conditions for the projector.
Details cooling needs and exhaust system requirements for proper operation.
Specifies power requirements and electrical connection guidelines.
Explains the packaging and initial steps for unpacking the projector.
Step-by-step guide for safely unpacking the projector.
Outlines general inspection procedures after unpacking the projector.
Lists items included in the projector package.
Details checks for physical condition of the projector's exterior and controls.
Explains the function and location of tamper labels for security indication.
Introduces the chapter detailing the projector installation process.
Lists the main stages of the projector installation process.
Provides a comprehensive checklist for all stages of projector installation.
Describes the mechanical and electrical setup of the projector.
Lists the main topics covered in the physical installation section.
Guidelines for mounting and positioning the projector relative to the port window.
Lists tools required for projector positioning and adjustment.
Instructions for centering the projector with the theatre screen.
Explains the exhaust stack and its requirements for projector cooling.
Provides instructions for installing the projector's exhaust stack.
Lists tools required for connecting the projector to the power net.
Lists necessary parts for AC power connection.
Step-by-step guide for connecting the projector to the main AC power.
Introduces the chapter on available lenses and their selection, installation, and adjustment.
Lists the main topics related to lenses and lens selection.
Lists the available DC2K zoom lenses for the DP2K-S series projector.
Guide to selecting the correct lens using the digital cinema calculator.
Step-by-step instructions for installing a lens into the projector's Lens Holder.
Instructions for safely removing a lens from the projector's Lens Holder.
Explains the motorized lens adjustment features for shift, zoom, and focus.
Details the lens shift capabilities and limitations.
Guide to using the local keypad for lens shifting vertically and horizontally.
Instructions for using the local keypad's zoom buttons.
Instructions for using the local keypad's focus buttons.
Introduces the chapter on input and communication features of the projector.
Lists the main topics related to input and communication ports.
Describes the input/communication components: Local Keypad, card cage, and tail light.
Identifies and describes the function of each button on the local keypad.
Details the operation and backlight behavior of the local keypad buttons.
Explains the function and location of the projector status light (tail light).
Describes the meaning of different status light colors indicating projector states.
Explains the projector's state in Standby mode, with lamp off but electronics active.
Explains the projector's state in Sleep mode for energy saving.
Identifies LEDs and ports on the Integrated Cinema Processor module.
Shows the location of the HD-SDI input ports on the module.
Definition of SMPTE (Society of Motion Picture and Television Engineers).
Details the general and advanced settings for HD-SDI input.
Provides an example image of an Integrated Media Block (IMB).
Provides an example image of an Integrated Media Server (IMS).
Identifies communication ports on the Cinema Controller.
Details the functionality of controller ports, diagnostic LEDs, and network connectivity.
Introduces the Communicator Touch Panel, its installation, and connection.
Lists the main topics covered for the Communicator Touch Panel.
Describes the Touch Panel's design, benefits, and ease of use.
Details mounting options, Ethernet connection, and power requirements.
Identifies parts of the Touch Panel interface, including screen, ports, and controls.
Lists tools required for installing the Touch Panel interface.
Step-by-step guide for mounting the Touch Panel interface onto the projector.
Instructions for adjusting the position of the Touch Panel interface.
Covers projector ON/OFF procedures and important startup checks.
Lists topics related to starting up and shutting down the projector.
Step-by-step guide for switching the projector ON, including checks.
Instructions to wake the projector from Sleep mode to Standby.
Steps for safely switching the projector OFF, including cool-down.
Instructions for putting the projector into Sleep mode.
Explains the Scheimpflug principle and procedures for adjustment.
Lists topics related to Scheimpflug principle and adjustment.
Explains the Scheimpflug principle and its effect on focus.
Describes the optical principle of Scheimpflug correction.
Identifies the physical adjustment points for Scheimpflug correction.
Lists tools required for performing Scheimpflug adjustment.
Steps to prepare the projector for Scheimpflug adjustment.
Conditions under which Back Focal Length adjustment is necessary.
Explains the concept and purpose of Back Focal Length adjustment.
Lists tools required for Back Focal Length adjustment.
Procedure to check if Back Focal Length adjustment is needed.
Introduces the chapter on preparing and adjusting image convergence.
Lists the main topics for convergence adjustment.
Describes the physical control knobs for adjusting image convergence.
Illustrates the test pattern used for convergence adjustment.
Advice on limiting adjustment range to prevent damage during convergence.
Addresses issues with loose control knobs during convergence adjustment.
Lists tools required for preparing convergence adjustment.
Step-by-step guide to prepare the projector for convergence adjustment.
Lists tools needed for aligning the blue pattern with the red pattern.
Step-by-step guide to align the blue pattern with the red pattern.
Lists tools needed for aligning the green pattern with the red pattern.
Step-by-step guide to align the green pattern with the red pattern.
Lists tools required for closing the Light Processor compartment.
Steps to reassemble the Light Processor compartment.
Introduces the chapter covering lamp replacement procedures and related tasks.
Lists topics related to lamp house and lamp replacement.
Describes the lamp and lamp house assembly, and lamp as a consumable item.
Explains projector behavior regarding lamp status notifications and errors.
Identifies the various parts of the Lamp House assembly.
Describes the cathode adapter required for mounting the xenon lamp.
Lists supported xenon lamps and their corresponding cathode adapters.
Explains the chronological order of procedures for xenon lamp replacement.
Provides a comprehensive step-by-step guide for lamp replacement.
Lists tools required for removing the Lamp House.
Step-by-step guide for removing the Lamp House from the projector.
Lists tools required for removing the xenon lamp.
Step-by-step guide for removing the xenon lamp from the Lamp House.
Lists tools required for installing the xenon lamp.
Step-by-step guide for installing the xenon lamp into the Lamp House.
Lists tools required for installing the Lamp House.
Step-by-step guide for installing the Lamp House into the projector.
Steps to reset lamp parameters for a newly installed lamp.
Explains the purpose of lamp realignment for optimal light output.
Lists tools required for lamp realignment.
Step-by-step guide for realigning the lamp in its reflector.
Describes the maintenance program structure based on time frames.
Lists the types of preventative maintenance actions covered.
Details monthly maintenance tasks that can be performed by trained projectionists.
Details quarterly maintenance tasks that can be performed by trained projectionists.
Lists maintenance tasks required specifically during lamp changes.
Introduces the chapter describing various maintenance procedures for the projector.
Lists the specific maintenance procedures covered in this chapter.
Lists tools required for checking the large dust filter.
Step-by-step guide for checking and inspecting the large dust filter.
Lists tools required for checking the small dust filter.
Step-by-step guide for checking and inspecting the small dust filter.
Specifies when vacuum cleaning of the dust filters is sufficient.
Lists tools required for vacuum cleaning dust filters.
Step-by-step guide for vacuum cleaning the dust filter.
Discusses cleaning agents and precautions for filter washing and drying.
Recommends Sodium carbonate as a cleansing agent for greasy filters.
Lists tools required for washing and drying dust filters.
Step-by-step guide for washing and drying the dust filters.
Lists tools required for cleaning the projector lens.
Step-by-step guide for cleaning the projector lens using specialized cloth.
Instructions for cleaning the projector's exterior housing.
Specifies when cleaning the UV blocker is necessary (visible dust).
Lists tools required for cleaning the UV blocker.
Step-by-step guide for cleaning the UV blocker.
Specifies when cleaning the reflector is necessary (visible dust).
Lists tools required for cleaning the reflector.
Step-by-step guide for cleaning the reflector.
Conditions requiring authorization to clear security warnings (e.g., module removal).
Lists tools required for the authorization process.
Step-by-step guide for clearing security warnings using the keypad.
Introduces procedures for removing and installing projector covers.
Lists all cover removal and installation topics.
Lists tools required for removing the Lamp House cover.
Step-by-step guide for removing the Lamp House cover.
Lists tools required for removing the rear cover.
Step-by-step guide for removing the rear cover.
Lists tools required for removing the top cover.
Step-by-step guide for removing the top cover.
Lists tools required for removing the left side cover.
Step-by-step guide for removing the left side cover.
Lists tools required for removing the Light Processor top cover plate.
Step-by-step guide for removing the Light Processor top cover plate.
Lists tools required for removing the Light Processor side cover plate.
Step-by-step guide for removing the Light Processor side cover plate.
Lists tools required for installing the Light Processor side cover plate.
Step-by-step guide for installing the Light Processor side cover plate.
Lists tools required for installing the Light Processor top cover plate.
Step-by-step guide for installing the Light Processor top cover plate.
Lists tools required for installing the left side cover.
Step-by-step guide for installing the left side cover.
Lists tools required for installing the top cover.
Step-by-step guide for installing the top cover.
Lists tools required for installing the rear cover.
Step-by-step guide for installing the rear cover.
Lists tools required for installing the Lamp House cover.
Step-by-step guide for installing the Lamp House cover.
Introduces the chapter on projector specifications and dimensions.
Lists the types of specifications and dimensions covered.
Summarizes key specifications of the DP2K-10S projector.
Provides detailed dimensional drawings and measurements of the projector.
Provides dimensional drawings and measurements of the universal pedestal.
Lists topics related to pin configurations and communication ports.
Details the functionality of general purpose inputs for macro triggering.
Specifies input voltage requirements and pulse characteristics for GPIs.
Discusses external power supply needs and resistor addition for GPIs.
Recommends cable types for connections, especially shielded twisted pairs.
Guide to making connections to GPIs, including power supply and grounding.
Details the functionality of general purpose outputs controllable via software.
Describes output signal types: falling edge, rising edge, toggle, continuous toggle.
Specifies output transistor characteristics like voltage, current, and dissipation.
Lists pin assignments for General Purpose Input/Output (GPIO).
Details pin configurations for 10/100 Base-T and 1000 Base-T Ethernet ports.
Details pin configurations for the 3D interface port.
Lists the environmental information topics covered in the manual.
General information on disposing of waste electrical equipment according to EU directive.
Information on the EU directive (2002/96/EC) for WEEE disposal.
Information on battery disposal according to EU Directive 2006/66/EC.
RoHS compliance information for products sold in Chinese Mainland.
Safety hazards associated with Sodium Carbonate (irritant, sensitizer).
Lists Barco's factory locations for production.