This document describes the RC 06 remote controller, which is used for managing gas boilers. It covers commissioning, special functions, error messages, parameter display, climatic curves, and parameter settings.
Function Description
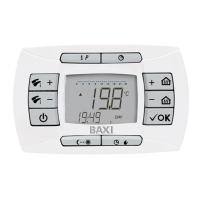
The RC 06 remote controller provides comprehensive control over a gas boiler, allowing users to manage heating, domestic hot water (DHW), and various operational modes. It features a display and several buttons for interaction.
- Information/Programming button (1): Used for accessing information and programming settings.
- Timing function (2): Manages time-based operations.
- Central Heating temperature regulation (3): Adjusts the central heating temperature.
- Confirmation button (4): Confirms selections and settings.
- Setting programmed operation in heating mode Manual/Automatic/Off (5): Selects the heating mode.
- Economy-Comfort button (6): Toggles between economy and comfort temperature setpoints.
- Enabling Summer-Winter-Heating only-Off (7): Sets the boiler's seasonal operation mode.
- Domestic Hot Water temperature regulation (8): Adjusts the domestic hot water temperature.
Description of Display Symbols:
- Time switch program histogram (9): Visual representation of programmed time slots.
- Comfort setpoint temperature mode (10): Indicates the comfort temperature setting is active.
- Reduced setpoint temperature mode (11): Indicates the economy temperature setting is active.
- Communication with the gas boiler in progress (12): Shows active communication with the boiler.
- Modulating flame level (boiler power level) (13): Displays the current boiler power output.
- Fault in progress (14): Indicates an active fault.
- Burner lighted (15): Shows when the burner is active.
- Pcb (boiler) parameters (16): Indicates access to boiler parameters.
- Battery level (17): Displays the remote controller's battery status.
- Week days (18): Shows the current day of the week.
- Time format / displaying information (19): Used for time display and information.
- Delayed mode (20): Indicates a delayed operation.
- Manual mode (21): Shows manual operation is active.
- Timing mode (22): Indicates timing programs are active.
- Standby (23): Shows the device is in standby.
- CH mode (24): Indicates Central Heating mode is active.
- D.H.W. mode (25): Indicates Domestic Hot Water mode is active.
Important Technical Specifications
The remote controller displays 4 power levels during boiler operation, relevant to gas boiler modulation:
- ≤ 25%
-
25% < 50%
-
50% < 75%
-
75% ≤ 100%
Usage Features
Commissioning of the Boiler:
To light the boiler:
- Ensure power supply to the boiler.
- Open the gas cock.
- Press the "Enabling Summer-Winter-Heating only-Off" button (7) to set the gas boiler mode.
- Adjust CH and D.H.W. temperatures using the respective +/- buttons (3 and 8).
Press this button to set boiler operation modes:
- SUMMER: Boiler meets DHW demands only; heating is disabled (frost protection enabled).
- WINTER: Boiler meets DHW and heating demands (frost protection activated).
- HEATING ONLY: Boiler meets heating demands only (frost protection enabled).
- OFF: Neither DHW nor heating demands are met (frost protection enabled).
Sets heating modes:
- AUTO: Heat request depends on "Time Programs" (Comfort or Reduced room temperature).
- MANUAL: Disables "Time Programming." Room temperature is set manually using +/- buttons.
- OFF: Disables heating mode; only frost protection is enabled.
Room and Domestic Hot Water (D.H.W.) Temperature Adjustment:
- Adjust room and DHW temperatures using the relative +/- buttons (3 and 8).
- When the burner is lit, the display shows the flame symbol.
- Central Heating (CH): Displays "CH" symbol and room temperature (°C). During regulation, shows "AMB".
- Domestic Hot Water (D.H.W.): Displays "D.H.W." symbol and room temperature (°C). During regulation, shows "HW SP".
- If an external water tank is connected, a specific symbol is shown during DHW request.
- Remote control installed on boiler front panel: +/- buttons regulate CH flow temperature; display shows room temperature.
Programming (PROGR) - Setting the Date-Time:
- Press the "Information/Programming" button (1); "PROGR" appears, and time flashes.
- Use +/- buttons to set hour, then OK.
- Use +/- buttons to set minutes, then OK.
- Use +/- buttons to set the day of the week (1=Monday to 7=Sunday).
- Press "Information/Programming" button (1) to exit.
Programming Heating Mode Operation Times:
- Press the "Timing function" button (2) to enable.
- Allows setting 4 time bands for boiler activation/deactivation in heating mode for single days or groups of days.
- Single days:
- Press "Information/Programming" button (1), then "Timing function" button (2).
- Choose a day (1-7) using +/- buttons.
- Press OK.
- "on 1" and 4 flashing digits appear.
- Use +/- buttons to set boiler lighting time, then OK.
- "of 1" and 4 flashing digits appear.
- Use +/- buttons to set boiler switching off time, then OK.
- Repeat for remaining three time bands.
- Press "Information/Programming" button (1) to exit.
- Groups of days:
- Press "Information/Programming" button (1), then "Timing function" button (2).
- Select a group (MO-FR, SA-SU, MO-SA, MO-SU) using +/- buttons.
- Press OK.
- Repeat steps 4-10 from "Single days" programming.
Programming DHW Mode Operation Times (for boilers with external heater):
- Press "Information/Programming" button (1), then "Timing function" button (2).
- Select "HW PR" using +/- buttons.
- Press OK.
- Set 4 time slots for DHW mode operation (same for every day).
Special Functions
Economy - Comfort Function:
Sets two room temperature setpoints: Economy (reduced) and Comfort (nominal).
- Press the "Economy-Comfort" button (6).
- "ECONM" (reduced) or "COMFR" (nominal) appears, with corresponding symbols.
- Temporary change: use +/- buttons.
- Automatic Operation: Temperature depends on time slots (Comfort during, Economy outside). Temporary change with "Economy-Comfort" button (6) lasts until next time change.
- Manual Operation: Press "Setting programmed operation in heating mode Manual/Automatic/Off" button (5) for manual mode. Temporary change with "Economy-Comfort" button (6) lasts until next button press.
Shower Function:
Ensures better hot water comfort.
- Press +/- buttons, then OK to activate. "SHOWR" appears, then "HW SS".
- Flow temperature and flame symbol flash.
- Duration: 60 minutes. After this, DHW temperature returns to previous setting.
- To disable early: press +/- buttons, then OK. "HW S^" appears.
Temperature Values Modification:
- Press "Information/Programming" button (1) for PROGR function.
- Press "Economy-Comfort" button (6) to select function (COMFR, ECONM, NOFRS, SHOWR).
- Use +/- buttons to modify the value.
- Press "Information/Programming" button (1) to exit.
Programmable Switching Time Function:
Holiday Program Function:
Temporarily shuts off timing program, guaranteeing a minimum room temperature (default 5°C, modifiable via NOFRS).
- Press "Setting programmed operation in heating mode Manual/Automatic/Off" button (5) for AUTO mode.
- Press "Timing function" button (2); "MM 60" and symbols flash.
- Use +/- buttons to set period (10 minutes to 45 days). After 90 minutes, "HH 02" (hours) appears; after 47 hours, "DD 02" (days) appears.
- WARNING: Do not press other buttons after enabling to avoid disabling the function.
Party Function:
Sets a temporary room temperature value. Operating mode returns to previous setting afterward.
- Press "Setting programmed operation in heating mode Manual/Automatic/Off" button (5) for MANUAL mode.
- Press "Timing function" button (2); "MM 60" and symbols flash.
- Set period as in Holiday Program.
- To modify temperature: press OK ("AMB" appears), then +/- buttons.
Error Messages and Table of Faults
Two types of faults: FAULT and BLOCK.
- FAULT: Display shows "10E ERROR" and flashing symbols. Not resettable. Call service.
- BLOCK: Display shows "01E ERROR" alternating with ">>>OK" and flashing symbols. Identified by error code + E.
- Press OK to reset. Display shows "RESET", then ">>>OK".
Error Codes and Corrective Actions:
- 01E Gas supply fault: Press OK for 2s. If persists, call service.
- 02E Safety thermostat sensor tripped: Press OK for 2s. If persists, call service.
- 03 Flue pressure switch tripped / Flue thermostat sensor tripped: Call service / Press OK for 2s. If persists, call service.
- 04E Safety error for frequently loss of flame: Call service.
- 05E Central heating NTC sensor fault: Call service.
- 06E Domestic Hot Water NTC sensor fault: Call service.
- 10E Water pressure LOW: Check system pressure. If persists, call service.
- 11E Safety thermostat has cuts out (for low temperature system): Call service.
- 18E System water filling function enable: Waiting until filling is finished.
- 19E System filling anomaly: Call service.
- 25E Boiler max temperature exceeded: Call service.
- 31E No communication between main board and remote temperature control: Press OK for 2s. If persists, call service.
- 35E Fault flame (parasitic flame): Press OK for 2s. If persists, call service.
- 80E-96E Internal remote control error: Call service.
- 97E Wrong power supply electrical frequency (Hz): Set correct frequency.
- 98E-99E Electrical main board internal error: Call service.
Parameters Display
- Press "Information/Programming" button (1) for 3s; "INFO" appears.
- Briefly press "Information/Programming" button (1) to exit.
- Press OK to scroll windows; +/- buttons to set parameters.
- WARNING: Communication with boiler may be delayed.
Central Heating (CH) Parameters:
- "CH SL": Max. heating circuit setpoint. Use +/- buttons to set. Change °C/°F with "Economy-Comfort" button (6).
- "EXT°c": Outside temperature (with external sensor).
- "CH O>": Maximum Heating flow temperature.
- "CH R<": Return heating temperature (unplanned).
- "CH S^": CH temperature setpoint.
- "CH MX": Maximum CH temperature setpoint (max. settable value).
- "CH MN": Minimum CH temperature setpoint (min. settable value).
- "PWR %": Power level/modulating flame (%).
- "P BAR": Water pressure heating circuit (bar).
- "F L/M": Water flow rate (l/min).
Parameters Setting:
- "K REG": Central Heating setting constant (0.5-9.0, factory 3). Use +/- buttons to set. High value = high flow temperature.
- "BUILD": Building insulation degree (1-10, factory 5). Use +/- buttons to set. High value = heavy building structures; low value = light structures.
- "YSELF": CH flow temperature auto setting function (1/0, factory 1). Enables automatic K REG modification with external sensor. Use +/- buttons to set.
- "AMBON": Room temperature influence Enabled/Disabled (1/0, factory 1). CH regulation depends on flow temperature. Use +/- buttons to set.
- "T ADJ": Reading correction of Room Sensor (-3.0°C to 3.0°C). Use +/- buttons to set (only if unit is °C).
- "MODUL": Enable/disable Modulation of flow temperature (1/0). Depends on room and external temperature. Use +/- buttons to set.
Combination table between AMBON and MODUL functions:
-
AMBON 1, MODUL 1: Room temperature adjustment (modulating flow temperature).
-
AMBON 0, MODUL 1: KREG curve adjustment (with external sensor) or Calculated flow temperature adjustment (without external sensor).
-
AMBON 0, MODUL 0: Flow temperature adjustment.
-
AMBON 1, MODUL 0: Room temperature adjustment (fixed flow temperature).
-
"HW PR": Enabling DHW programmer (0=Disabled, 1=Always enabled, 2=Enabled with DHW weekly program). Factory 1.
-
"NOFR":* Frost protection Enabled/Disabled (1/0). Factory 1. WARNING: Must always be enabled (1).
-
"COOL": Summer temperature control Enable/Disable (factory 0). Setting to 1 enables "SUMMER+COOL" mode. Remote control adjusts room temperature by controlling external cooling devices.
Kreg CLIMATIC CURVES
- CH flow temperature depends on Kreg curves (Graph 1), adjustable with +/- buttons.
- The electronic control automatically sets the correct curve based on outside and room temperatures.
- Graphs show flow temperature (Tm) vs. external temperature (Te) for different Kreg values, with max flow temperatures of 45°C and 85°C.
Parameters Setting
- Access: Press "Information/Programming" button (1) for 3s. Then press "Timing function" button (2), then "Confirmation" button (4). "F01" appears.
- Use +/- buttons to scroll parameters.
- Use +/- buttons to change parameter value.
- Note: Value is saved automatically after ~3 seconds. Do not press buttons until value flashes again.