ENGLISH
98
Familiarization
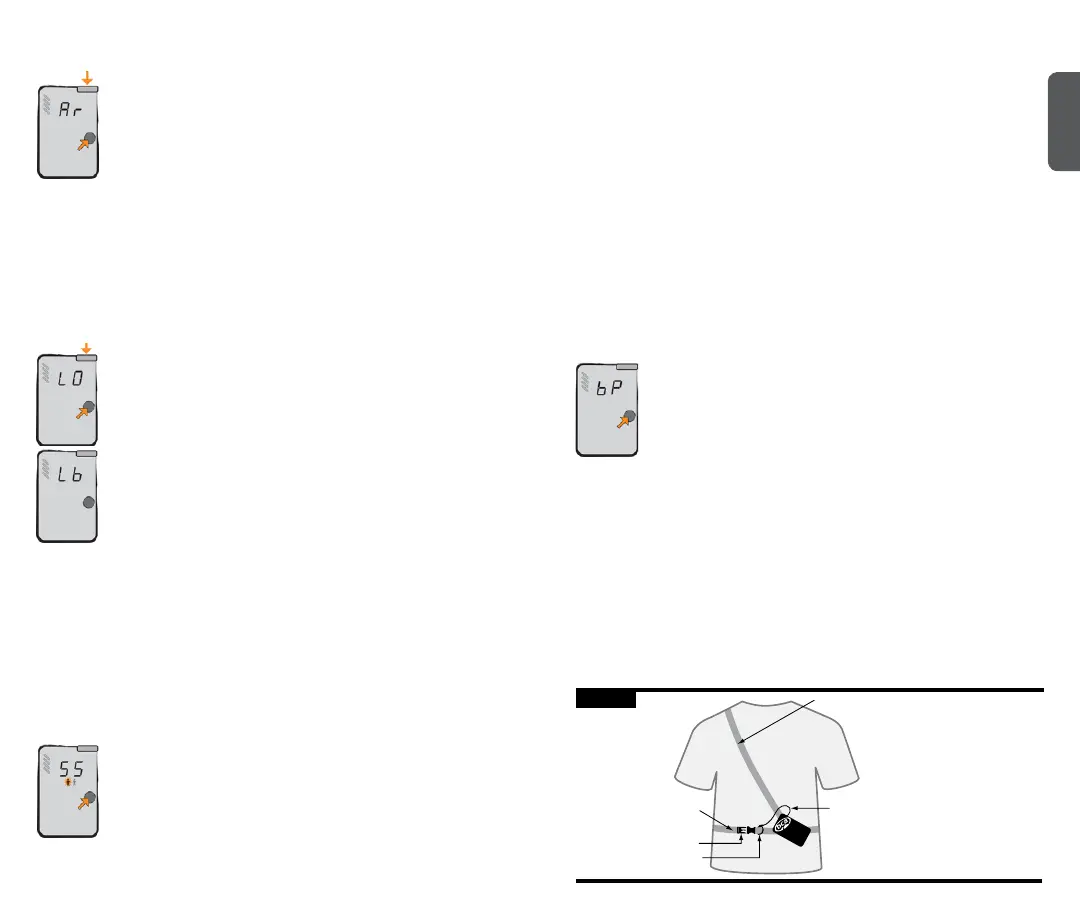
Auto Revert Mode: Auto revert mode will make your Tracker S
automaticallyreverttoTR(transmit)ifthesearcherremainsin
searchmodeformorethanveminutes.Analarmwillsound
30secondsbeforetheunitreturnstotransmitmode.Thiscan
be avoided by pressing the Options button or turning the dial
switchbeforethe30-secondwarningperiodhaselapsed.
Auto revert mode is activated by holding down the Options button while
turningonthedevice,ineithertransmitorsearchmode.Youmustcontinue
toholddowntheOptionsbuttonuntil“Ar”isshownonthedisplay.
Before“Ar”isshown,otherdiagnosticswillbedisplayed,including“TS,”
“r.c.”(withsoftwareversionnumber)andbatterypowerpercentage.
If choosing to use auto revert, it must be activated every time the unit
is turned on. Otherwise, the unit can only be switched from search to
transmit mode manually.
Muting the Sound:ThesoundinSearchmodecanbemuted
by pressing the Options button while switching from transmit
tosearchmode.“LO”willappearinthedisplayandallsounds
assisting the search function are muted.
Low battery warning: At40percentbatterypower,theaudible
soundsatstartupwillnolongerbeheard.At20percent,no
sounds will be heard in search mode.
When the battery power becomes too low to operate, the
transceiverwilldisplaythe“Lb”sign.Whenyouseethis,
replace the batteries before further use. When batteries are too low to do
startuproutines,asimple“0”willblinkonthedisplay.
Mismatched batteries can act unpredictably at various temperatures
andlowbatteriescandieunexpectedlyfast.Therefore,westrongly
recommend changing batteries once the battery power indicator reaches
40percent.
NOTE:nevermixnewandusedbatteriesinyourtransceiver–orbatteries
ofmixedbrands.Neveruselithiumorrechargeablebatteries.Thesemay
all lead to an inaccurate battery power indication.
Signal Suppression: Signal Suppression mode suppresses the
strongest signal and shows the searcher the second strongest
signal, including directional arrows. Always stay in standard
searchmodewhensearchingforthersttransmitter.Oncethe
rstvictimhasbeenlocatedandyournesearchiscomplete,
you are ready to use Signal Suppression.
Signal Suppression mode is activated by pressing the Options button until
“SS”isshownonthedisplay.Toentersuppressionmode,theOptions
Familiarization
buttonmustbereleasedbefore“BP”isdisplayed.Themultiplevictimicon
willashalternatelywhileinSSmode.
If Tracker S has not collected enough data on the multiple transceivers and
youtrytosuppress,bothmultipleburialiconswillashsimultaneously.
Wait three seconds and try Signal Suppression again, or use Big Picture
mode instead.
Suppression of the strongest signal will last for one minute, giving the
searcher time to move away from the suppressed signal and lock on to the
nexttransmitter.TheTrackerSwillautomaticallydefaultfromsuppression
mode to standard search mode after one minute. This can also be done
manually,bypressingtheOptionsbuttonuntil“SE”isdisplayed.When
returningtosearchmode,themultiplevictimiconwillstopashingand
the Tracker S will isolate the strongest signal.
NOTE:Signalsuppressioncanbeunreliablewhenattemptingtosuppress
older analog transceivers.
Big Picture: Big Picture mode is the closest thing to an analog
transceiver in the digital world. It displays distances and
directions of all the transceivers that are transmitting within
range. With Big Picture mode, you can estimate how many
transceiversareinthesearchareaalongwiththeirapproximate
direction.YoucanalsoperformasearchinBPmode,but
alwaysremembertoreturntonormalsearchmodeduringthenesearch
when you’re getting close to the victim.
Big Picture mode is activated by holding down the Options button
until“BP”ashesinthedisplay.Youmustcontinuetoholddownthe
Options button to stay in BP mode. Once the mode button is released,
the Tracker S will automatically return to search mode and isolate the
strongest signal.
Adjustment/Fitting
Tracker S can be worn with or without its harness. When used with a
harness, Tracker S should be worn underneath your outer garments, as
shown in Figure D.
Shoulder Strap
Waist Attachment Buckle
Waist Strap
Lanyard
Lanyard Attachment Loop
Figure D