UK UK
80 81
FI FI
VASTASYNTYNEEN LISÄOSAN POISTAMINEN
Vastasyntyneen lisäosa (X) voidaan poistaa, kun vauva on 61 cm pitkä
(n. 3 kuukauden iässä), jotta lapsi saa enemmän tilaa. Irrota vastasyntyneen lisäosa
(X) avaamalla ja poistamalla olkapehmusteet. Poista seuraavaksi vastasyntyneen
lisäosa ja aseta olkapehmusteet takaisin olkavöihin.
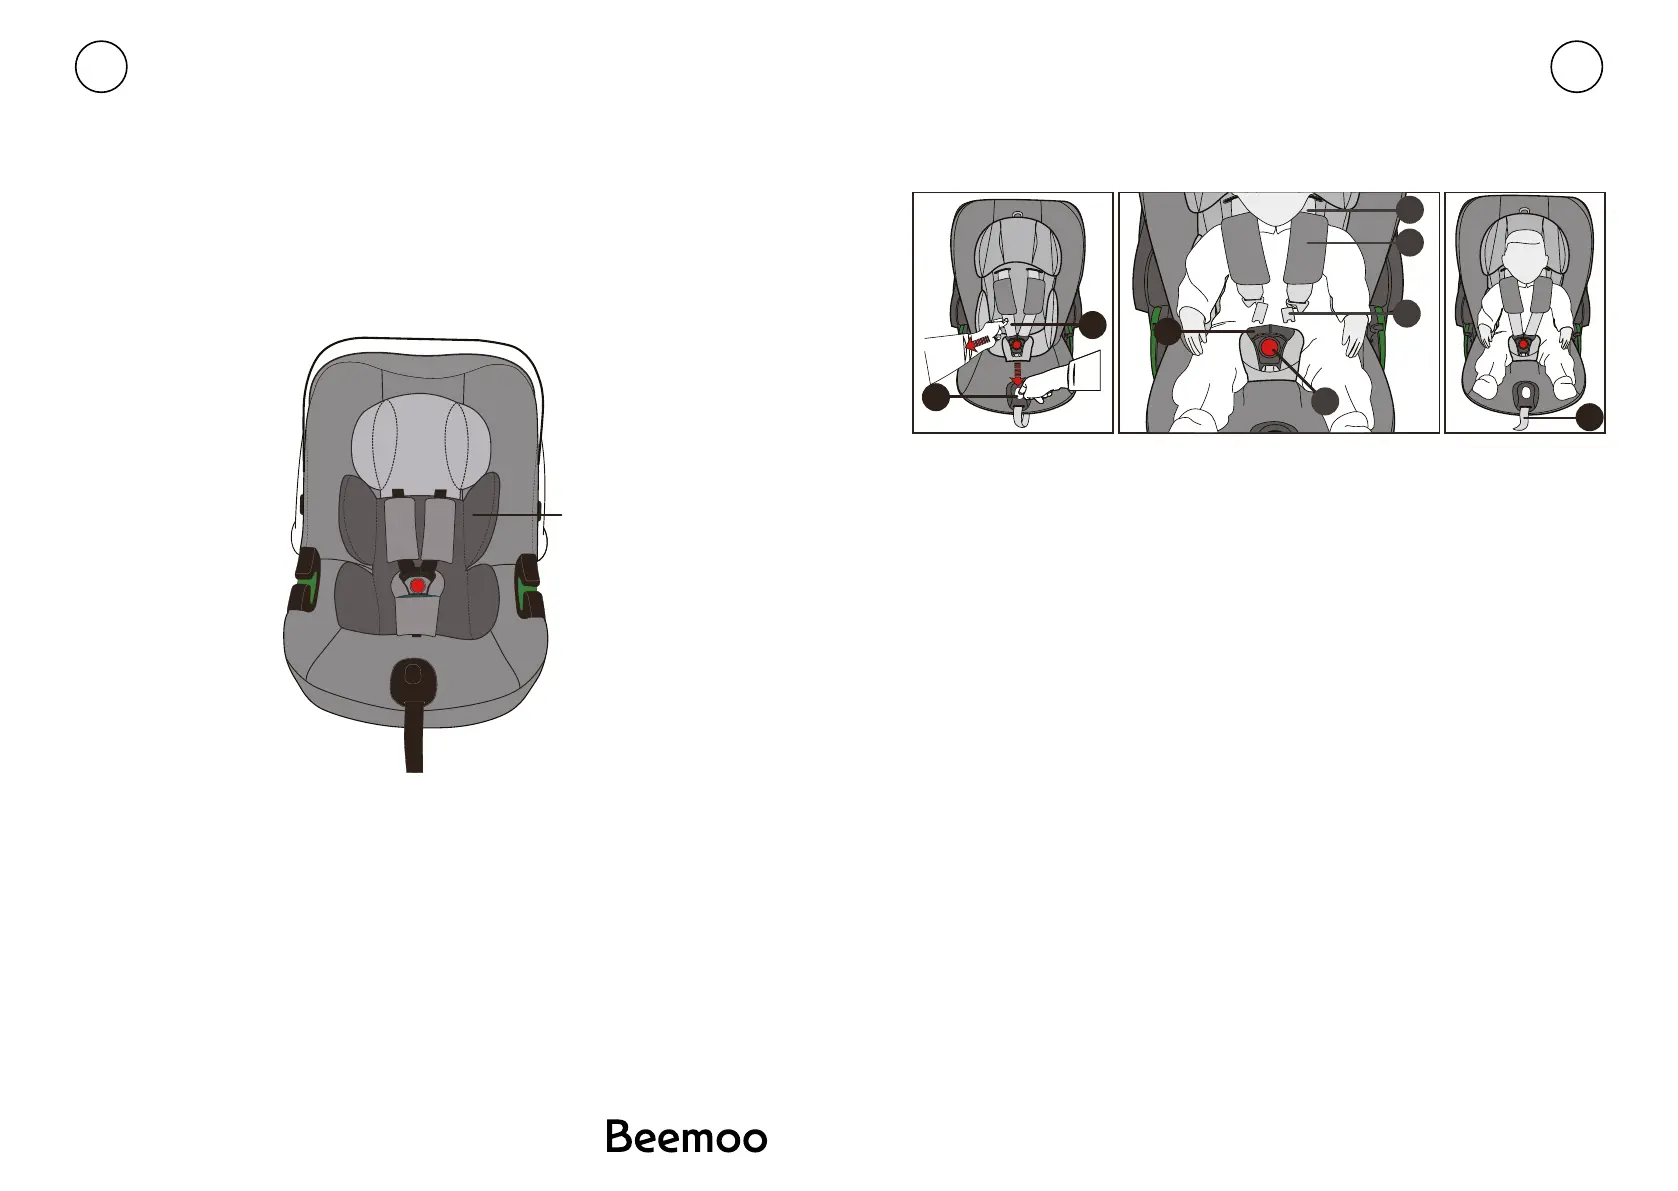
STRAPPING WITH Y-SHAPED HARNESS SYSTEM
Huomioitavaa: Varmista, ettei turvakaukalossa ole irrallisia esineitä ja leluja.
Huomioitavaa: Varmista ennen istuimen käyttöä, että päätuki on lukittu kunnolla
paikalleen.
• Löysää olkavyöt (e) painamalla keskisäätimen (d) säätöpainiketta ja vetämällä
samanaikaisesti molempia olkavöitä ylös.
• Avaa vyön solki painamalla punaista painiketta (h). Huomioitavaa: Vedä aina
olkavöistä (e), älä vyön pehmusteista (f).
• Aseta lapsi turvakaukaloon.
• Aseta olkavyöt (e) suoraan lapsen olkapäille.
Huomioitavaa: Varmista, etteivät olkahihnat (e) ole kiertyneet.
• Aseta molemmat soljet (g) yhteen ja lukitse ne paikoilleen vyölukkoon (i). Kuulet
“KLIK”-äänen lukituksen yhteydessä.
• Vedä varovasti keskisäätövyötä (j) kiristääksesi olkahihnat (e), kunnes ne istuvat
napakasti lasta vasten.
Varmista vauvasi turvallisuus tarkistamalla seuraavat asiat:
• Turvakaukalo asennetaan ajoneuvoon selkä menosuuntaan päin, siten, että jalat
osoittavat penkin selkänojaa kohti.
• Turvakaukaloa saa käyttää matkustajan penkillä VAIN, jos auton etuturvatyyny on
poistettu käytöstä.
The newborn inlay (x) may be removed
after the baby is 76 cm (approx. 3 months)
to provide more space for the child. To
remove the newborninlay (x) open and
remove the shoulder pads. Then remove the
newborn inlay and place the shoulder pads
back on the shoulder belts.
Note! Ensure that the headrest is correctly locked in place before
using the seat.
09
10
To ensure your baby’s safety, check that:
• Loosen shoulder belts (e) by pressing the adjustment button on
central adjuster (d) and simultaneously pulling both shoulder belts up.
• Undo the belt buckle by pressing red button (h) firmly.
• the infant car seat is secured with the child facing the rear of the car
(the child’s feet point towards the backrest of the infant car seat).
• the infant car seat is only used on the front passenger seat if there is
no front airbag that can impact on the infant car seat.
STRAPPING WITH Y-SHAPED BELT SYSTEM
Note! Ensure that the infant car seat is free from toys and hard objects.
• Loosen shoulder belts (e) by pressing the adjustment button on
central adjuster (d) and simultaneously pulling both shoulder belts up.
• Undo the belt buckle by pressing red button (h) firmly.
Note! Please always pull on shoulder belt (e) and not on belt pads (f).
• Put your child into the child seat.
• Place shoulder belt (e) directly over your child’s shoulders.
Note! Ensure that the infant car seat is free from toys and hard objects.
Note! Please always pull on shoulder belt (e) and not on belt pads (f).
• Put your child into the child seat.
• Place shoulder belt (e) directly over your child’s shoulders.
Note! Ensure that shoulder belts (e) are not twisted.
• Place both buckle tongues together and lock them in place in belt
buckle (i) with an audible “CLICK”.
• Pull cautiously on central adjustment belt (j) in order to tighten
shoulder belts (e) until they fit your child’s body.
CONNECTING THE INFANT CAR SEAT WITH BASE
Before first use
STRAPPING WITH Y-SHAPED BELT SYSTEM
40-87cm Rearward facing ISOFIX+Support leg+shaped belt.
Remove the leg support first, when the base is green, it means the
installation is correct
(x)
Removing the Newborn Inlay
d
e
g
f
e
h
i
j
 Loading...