250 251Quick Start Guide
GRIND
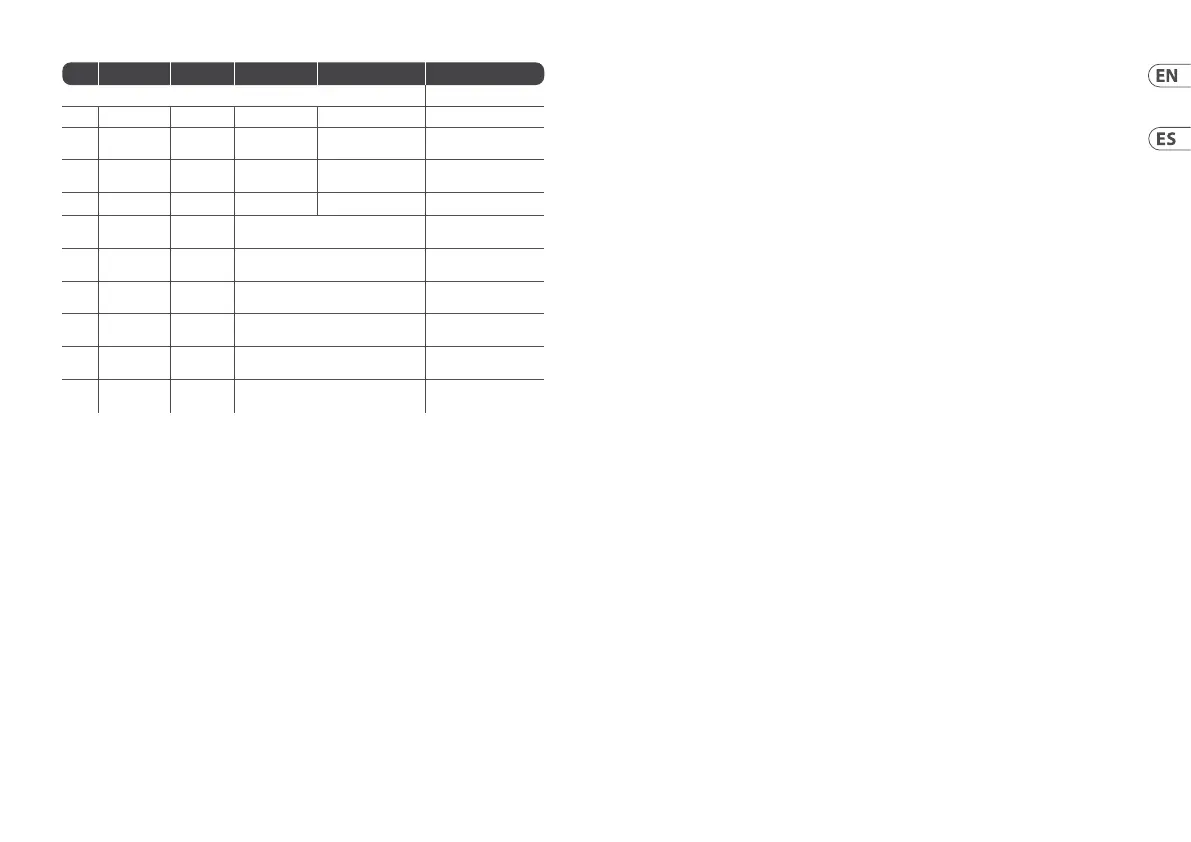
Icon Name Timbre Harmonics Morph Level
Yellow Bank
1 BX7 Vibrato Preset selection Tremolo Velocity
2 BASSLINE Cuto Resonance +
distortion
Env mod + Decay Accent
3 WAVE
GENERATOR
Waveform Bit Crush Sample Rate Level
4 VOX Formant shift Reso Blend Vowels
Level
5 For
expansion
6 For
expansion
7 For
expansion
8 For
expansion
9 For
expansion
10 For
expansion
Note 1: for BX7 mode, it is possible to send a DX7 Sysex le using USB, the Sysex will overwrite the presets
present in GRINDmemory.
Note 2: Model input only controls the red/green engines.
Note 3: Audio Scope input is via V/Oct socket.
(EN) CALIBRATION
The GRIND is factory calibrated with high precision
instruments and should not need any further
calibration. If it does become necessary to
calibrate it, please follow this procedure:
Disconnect all CV inputs except v/oct, which
should be connected to a well calibrated CV
keyboard or MIDI/CV converter.
Press the BANK and MODEL buttons
simultaneously, therst LED will ash green.
Send 1 V to the V/OCT input from the keyboard.
Press any button, the rst LED will now ash
in orange.
Send 3 V to the V/OCTinput from the keyboard.
Press any button, the GRIND will now leave
calibration mode.
To check that the GRIND is correctly calibrated
follow thisprocedure:
Send 0 V to the V/OCTinput from the keyboard.
Use the FREQ control (13) to tune the output to
110Hz (MIDI A2)
Send 1 V to the V/OCTinput from the keyboard.
Thetuner should now show 220 Hz (A3).
Send 2 V to the V/OCTinput from the keyboard.
Thetuner should now show 440 Hz (A4).
Send 3 V to the V/OCTinput from the keyboard.
Thetuner should now show 880 Hz (A5).
(ES) CALIBRACIÓN
El GRIND viene calibrado de fábrica con
instrumentos de alta precisión y no debería
necesitar ninguna calibración posterior, pero si
necesita recalibrarlo, siga estos pasos:
Desconecte todas las entradas de CV excepto v/
oct, que debería estar conectada a un teclado
CV o convertidor MIDI/CV perfectamente
calibrado.
Pulse simultáneamente los botones BANK
y MODEL; el primer piloto LED parpadeará
enverde.
Envíe desde el teclado una señal de 1 V a la
entrada v/oct.
Pulse cualquier botón; el primer piloto LED
parpadeará ahora en color naranja.
Envíe desde el teclado una señal de 3 V a la
entrada v/oct.
Pulse después cualquier botón y el GRIND saldrá del
modo de calibración.
Para vericar si el GRIND está correctamente
calibrado realice este procedimiento:
Envíe desde el teclado una señal de 0 V a la
entrada v/oct.
Use el control FREQ (13) para anar la salida a
110Hz (MIDI A2)
Envíe desde el teclado una señal de 1 V a la
entrada v/oct. El anador le debería mostrar
ahora 220Hz (A3).
Envíe desde el teclado una señal de 2 V a la
entrada v/oct. El anador le debería mostrar
ahora 440Hz (A4).
Envíe desde el teclado una señal de 3 V a la
entrada v/oct. El anador le debería mostrar
ahora 880Hz (A5).